Do It Yourself

7734 readers
1 users here now

Make it, Fix it, Renovate it, Rehabilitate it - as long as you’ve done some part of it yourself, share!

Especially for gardening related or specific do-it-yourself projects, see also the Nature and Gardening community. For more creative-minded projects, see also the Creative community.


This community's icon was made by Aaron Schneider, under the CC-BY-NC-SA 4.0 license.

founded 2 years ago
MODERATORS
76


I have an ancient and rather ugly office chair which I love to pieces. Unfortunately, on Thursday morning, the chair attempted to make that literal, as I sat down and heard a nasty splintering sound. Now, I got this thing secondhand, and it's always had a vertical split up one wooden leg. My brother had run four large carriage bolts through it in an attempt to hold it together, which in hidsight turned out to be a bad idea, as one half of the leg had split in the opposite direction along the line of the first two bolts. ☹️

Removing the bolts, applying a rather considerable amount of wood glue and some dowels, then clamping it, letting it dry, and cleaning up got me to the point shown in the picture (larger version here )

What I need to know is, is there anything I can do to structurally reinforce this thing any further, short of replacing either that leg (beyond my skill level at the moment) or the entire base (a new one would have to be shipped up from the US)? In particular, would "splinting" it with a piece of new wood along the damaged side (or pieces along both sides) help keep it from tearing itself apart? Or should I just redrill the hole for the castor further away from the end, put a couple of C-clamps on, and hope it holds long enough for a new base to arrive?

I want my chair back. 😭

77


cross-posted from: https://jorts.horse/users/fathermcgruder/statuses/110789232582943740

What's a good torque wrench to get?

I want to replace the spark plugs in my car and I'm apparently going to have to torque them to 30Nm. #diy #tools

@tools

78
22
submitted 1 year ago* (last edited 1 year ago) by SamVergeudetZeit@feddit.de to c/diy


A mist shower saves you water while giving you a feeling of showering in light warm summer rain.

I used 6 six mm mist nozzles from Aliexpress. (https://de.aliexpress.com/item/1005004796821344.html?channel=twinner)

A black hose (https://de.aliexpress.com/item/1005005746555890.html?channel=twinner)

T fitting parts(https://de.aliexpress.com/item/32954860198.html?channel=twinner)

This diverter valve (https://de.aliexpress.com/item/1005004981191866.html?channel=twinner)

And on of those t connect from the diverter valve to the hose (https://de.aliexpress.com/item/1005005082968859.html?channel=twinner)

79
13
submitted 1 year ago by alex to c/diy


publication croisée depuis : https://beehaw.org/post/6817655

I love this person and everything they do.

Here's his take on the latest project, in this video:

This year I attended an art workshop on publishing and print-making. The goal was to make an art book, with total freedom of form and design. Here is "unrolling", my take on the (broad) concept of a book, with scrolls, spools and rolls.

80


Hello,

I am looking to buy a house with a lot of work that needs done. I am hoping to learn a lot from the experience so when I am living in it I can fix more myself rather than pay someone else to get it done. One of the first projects is going to be adding an internal staircase. The home used to be single family, but was converted a few owners ago to a duplex. When they did this they removed the stairs connecting the top and bottom floors. I plan to add that back in and make it single family again.

For the project itself, my step dad will be there to help install the stairs. But I don't want to fully rely on him, even though he does know what he's doing. We have done multiple, simple, project together before including installing multiple decks. The stairs for those were only 4-5 steps and pre-cut at Lowes though so I don't think there is much to take away.

The plan is to install the stairs where the old staircase used to be as I think that will make the most sense, but if I am wrong about that please explain why so I can consider that when viewing the house this week.

What I would like to know is when I am at the house next is what should I look for, how do I calculate what all I will need, what I will need, and if there are any good sources online for this kind of project.

What should I look for:

I am pretty sure the best place to build the stairs is going to be where they already were, but what should I look for that will tell me there is a problem that will arise?

How do I calculate what all I will need and what I will need:

I know I need wood, screws and brackets. I am sure 2 boxes of screws will probably be enough, and a trip to the hardware store will be easy for that. Same with the brackets. But how do I calculate how much wood I will need? What size boards do I use for each component? Will I need anything else?

Are the any good sources online:

My step dad is really handy with this stuff and I know he isn't going to let it get done wrong, but it's a struggle planning stuff ahead with him. When I ask him what I will need, he gives answers like "it depends" or "a lot" but he doesn't go into specifics. I would like to research a good bit on my own so when we do actually get together to do this he just needs to come over and help build it which is what he is great at.

I tried looking at YouTube and some google searches, but not much luck other than this wikihow (https://www.wikihow.com/Build-Stairs) which seems pretty comprehensive but I would like more than one article for a project this big. As for YT, it was videos on building prefab stairs and adding them to a home, or refinishing a current stairway, neither or which apply. If someone could supply a good website, or even a YouTube channel that I did not see I would greatly appreciate it.

81


Have a porch outside that is cracked and rotten, and the header boards are split and can't be drilled/screwed into. So I need to replace those. What's the correct way to attach 2x6 headers to concrete blocks, to remain secure and proper? This would specifically be for 2x6s flat against the concrete, not end to concrete.

82


I made a Bluetooth boombox of some old speakers.
The speakers were free on Kleinanzeigen (I guess kraigslist or whatever it's called would be a similar thing).
The Bluetooth amplifier board (TDA7492) I still had laying around.
The 3D printed battery adapters are for my 18V Ryobi tool batteries and for my 36V Bosch lawnmower batteries.
The Bluetooth board uses 8V to 25V so I had to put a 40V to 20V DC - DC converter inside for the Bosch batteries.
Some old belts were sacrificed for carrying straps.

83
 
 
84


Hey all,

So I will be moving into a 70 year old house soon. There is some old carpet that needs removed. I already had a contractor come out and he tore a corner up and inspected it and said the hardwood floors underneath looked good.

He gave a quote of $2700 to remove the carpet and clean the floors for 3 rooms.

I was having some friends over this weekend to help clean and was debating doing it ourselves. I have a decent idea of getting the carpet out, but are unsure of what should be done with the hardwood floor.

Any help or pointers?

85
12
submitted 1 year ago* (last edited 1 year ago) by cadeje to c/diy


I'm starting to get more interested in building more complex things, but am unsure how to plan out my ideas. Is there a good source on drafting/planning designs? I honestly have no idea where to start.

86


Let's hear it. No project too big or too small.

87


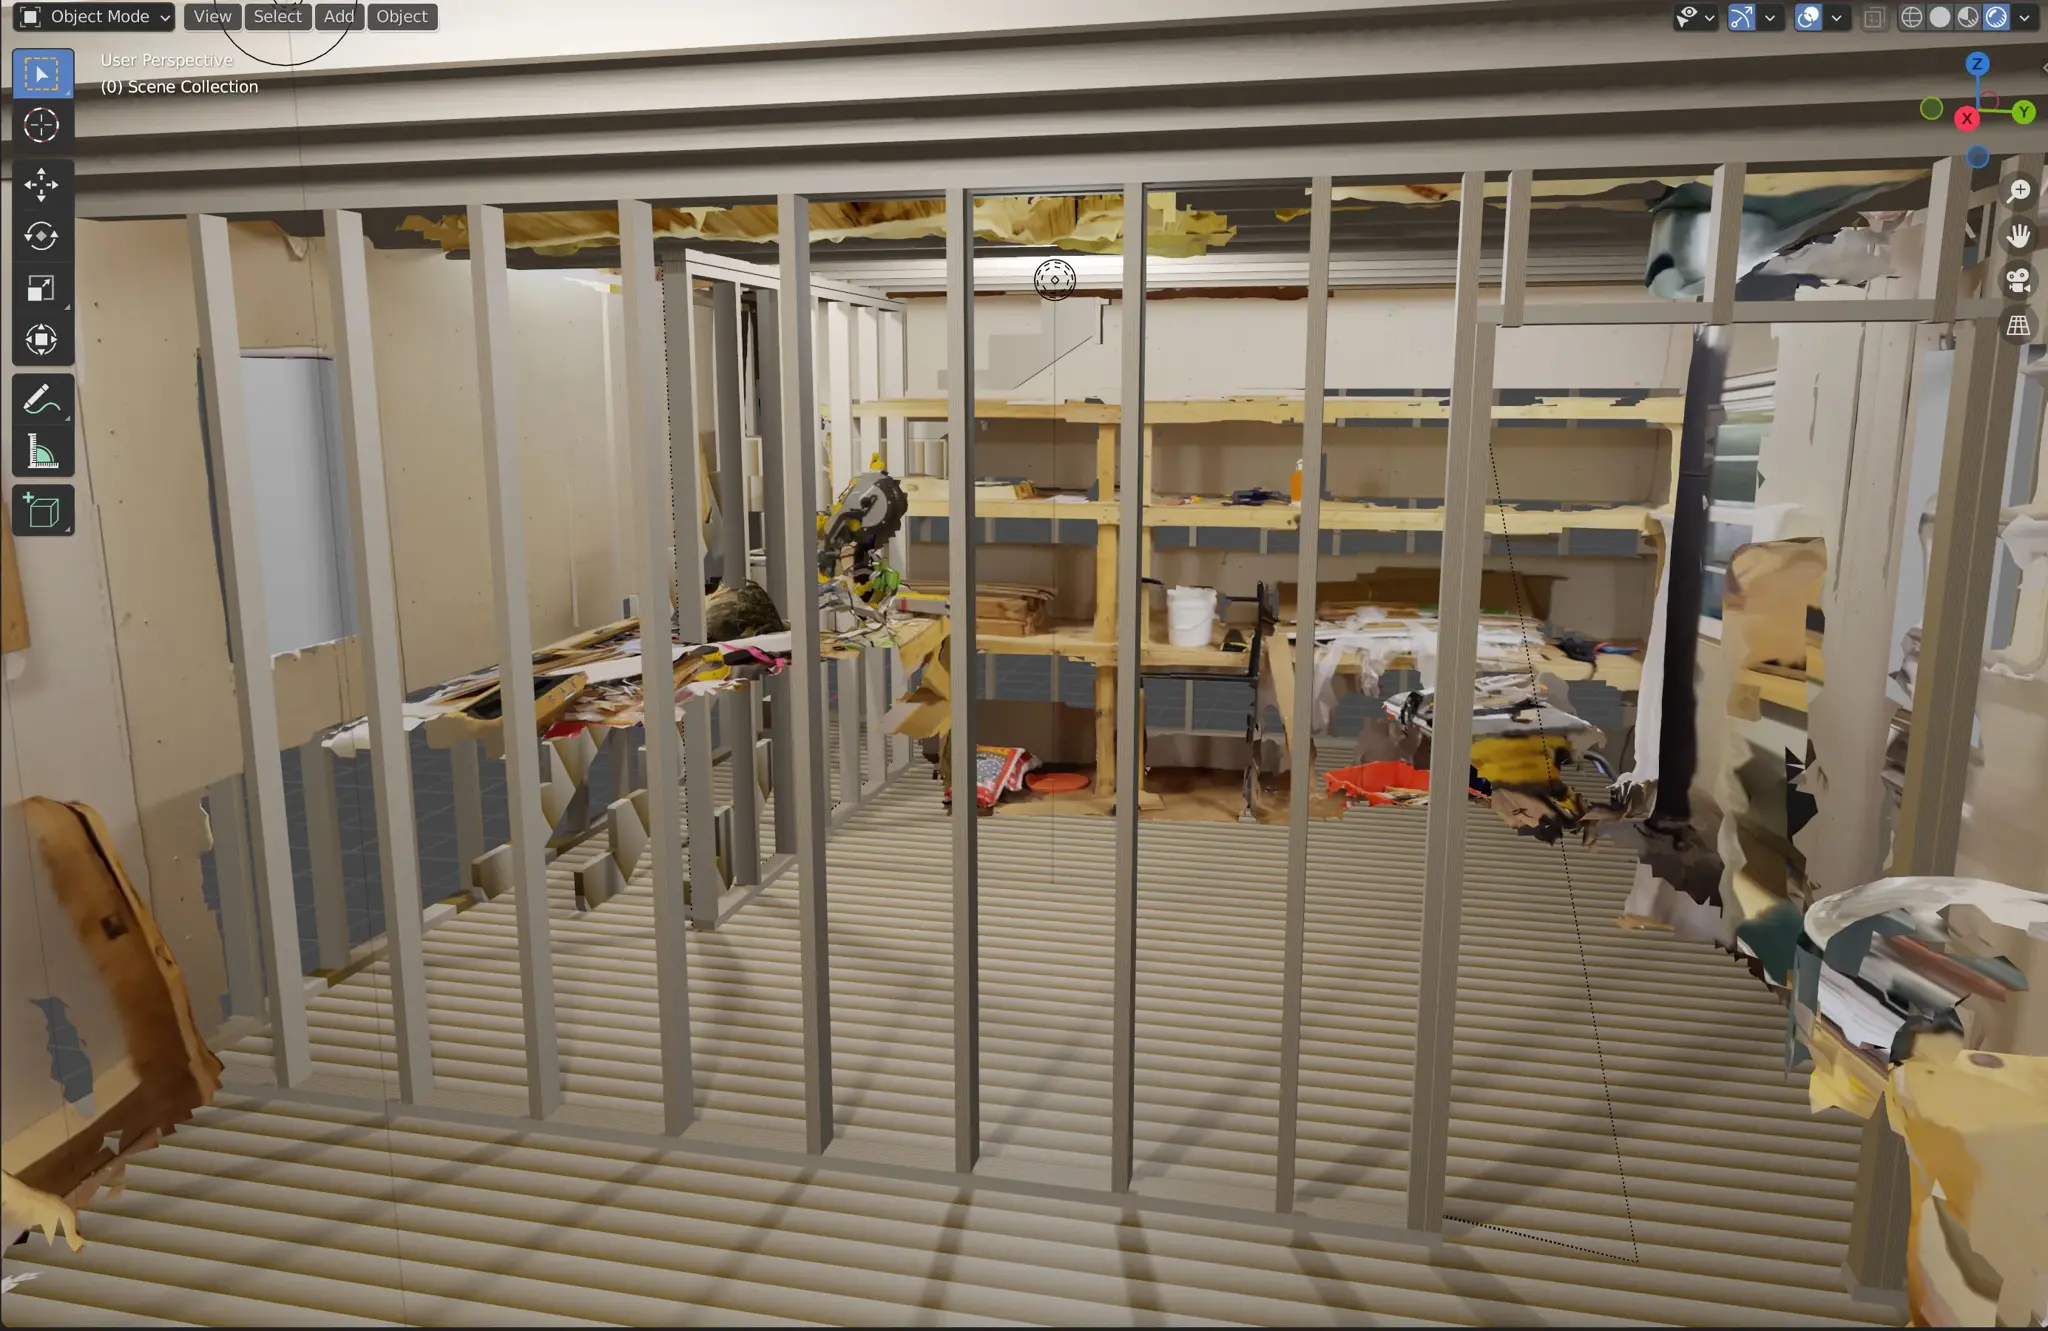
I'm building 90s themed arcade In my shed... but I still want to keep a little workshop area so I'm splitting my shed into 3 rooms including the attic/upstairs.

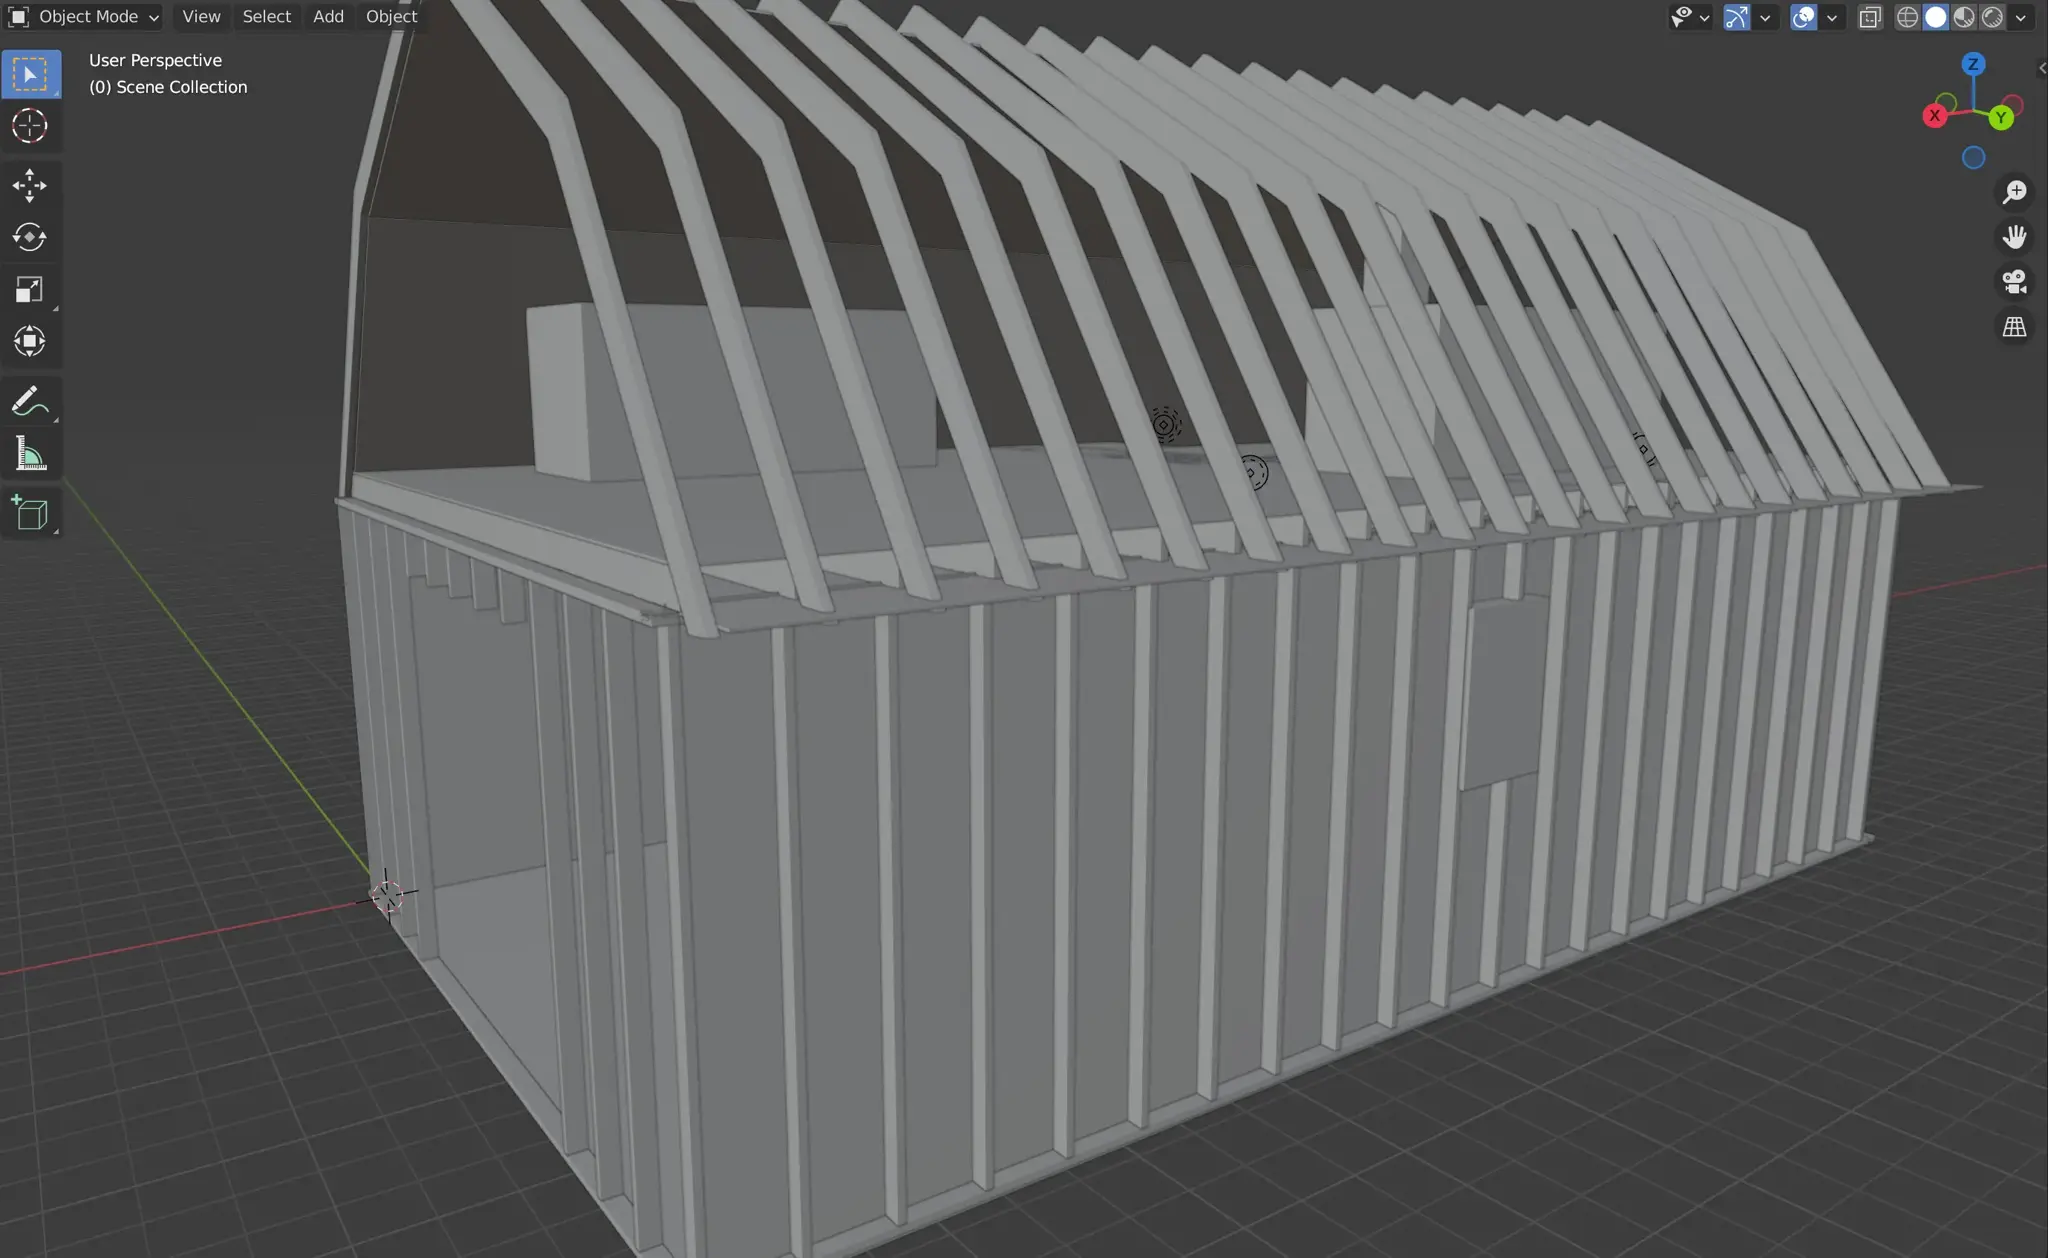
I've never done construction aside from small things like routing cat6 through the house, so I decided to practice virtually first - I've reconstructed my shed's frame in Blender and added all the lumber that I need to add the second floor. I've also 3d-scanned the current structure and superimposed it in blender so it was a bit easier to see if what I'm doing is sane at all.

Bonus: 3dscan video:

I have a laserdisc collection with a few CRT TVs, Pentium 3 computer with Windows 98, and PlayStation1. I'm also planning on building a few arcade cabinets with emulators.

88
32
submitted 1 year ago by TerryTPlatypus to c/diy
89


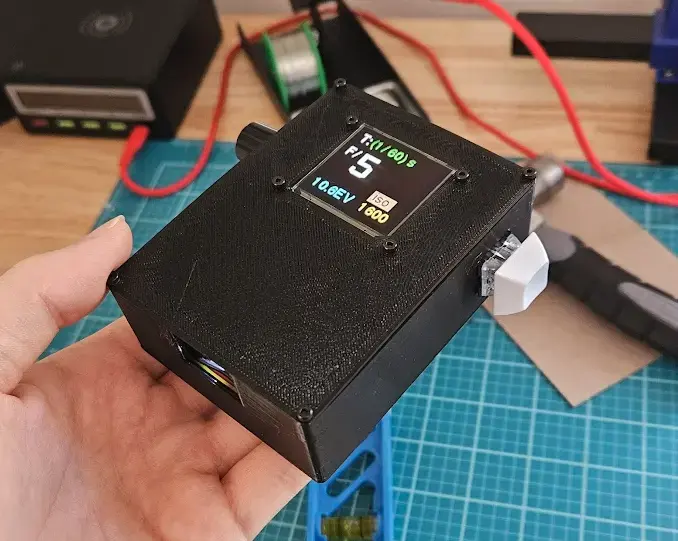
The original plan is here: https://github.com/veebch/photon

Any of the case options didn't fit my needs. I needed something easy to put together along with support for the encoder I chose. This is the first time working in CAD and while it ended up very simple, it works great!

90
91


See title. I have only very little tools so far, screwdriver with plenty of bits, hammer, drill. I've been thinking of buying more tools for general purpose home improvement. I like to work with wood, unsure what I will expand into later. Is a multitool a good fit for me?

If yes any recommendations what I want to look out for when buying one? If no any alternate recommendations?

92


cross-posted from: https://lemmy.world/post/1115448

You can see more angles and the wiring on IG @jilanico

I used electroluminescent wire, but the battery life is bad. If I were to do it again, I'd try using LED filament.

How to Make Cyberpunk Chucks

Materials:

  • 2x coin cell inverters
  • 2x CR2032 batteries
  • 2x electroluminescent wire in whatever color you want (I used red to match my chucks)
  • 1x extension for EL connection
  • Shoe Goo (clear color)
  • Shoe Goo (black color, optional)
  • X-acto knife with many, many extra blades
  • Soldering iron and solder
  • Shrink tubing of various diameters or electric tape (black)
  • Wire cutter
  • Wire stripper
  • Masking tape
  • Velcro squares
  • Needle and thread matching the color of the shoe tongue
  • Sand paper
  • Chucks

Plan:

The EL wire will run around the outside of the sole in place of the black stripe originally embedded in the rubber, therefore the toe cap will not be included. The EL wire will run under the heel patch (aka license plate). The EL wire will connect with its power source via a black wire that will start at one end of the EL strip, bent 90 degrees upwards towards the canvas upper, then bent again 90 degrees to run along the black strip where the canvas meets the sole as it makes its way towards a vent hole near the arch. It will run through the hole to the top of the inner side of the tongue where we will Velcro the inverter power source. If the black wires aren't long enough, we'll use an extension. See reference pics on my insta.

Steps:

  • Test out your EL wire: Make sure it lights up. Never turn on your inverter if it's not connected to any EL wire or it could be damaged. One of mine didn't light up, but I could hear the inverter whining (this is normal). Upon trimming the EL wire it started lighting up. The tiny inverter couldn't light such a long EL wire until it was shortened.
  • Cut out black stripe: Put a fresh blade on your xacto and start cutting out the black stripe around the sole (not adjacent to the canvas, but the stripe in the rubber of the sole). I cut in at an angle on each side of the stripe so the cross section of the "trench" or groove I was cutting would be v-shaped. Use at least 2 blades on each side of the shoe.
  • Cut heel patch: Put a fresh blade on the knife. Starting at the bottom of the heel patch slice underneath to separate the patch from the sole. Go slow. Don't remove the entire patch. Just go a little above the place where the black stripe runs under the patch. It's now a flap. Cut a groove where the black stripe runs under the flap so the EL wire has room to run underneath. You will go through at least 3 blades on this step.
  • Mask off arch side of shoe in preparation for gluing: Use masking tape to outline the groove you cut on the arch side of the shoe. Don't mask all the way to the heel patch since you'll want a say half an inch of wiggle room once the EL wire is glued so you can bend it under the heel patch "flap".
  • Apply glue: Squeeze some clear colored Shoe Goo onto a paper plate or something disposable. This stuff gives off fumes so be in a well ventilated area. Scoop up a small glob with your finger (wear disposable gloves if you're worried about chemicals) and rub it into the groove. Scoop up some more if you need it. You should have a flat even coating of glue in the groove. Carefully remove the masking tape. You should now only have glue inside the groove.
  • Glue half of EL wire: Quickly start playing an audiobook or Netflix because this part is boring. One end of the EL wire has a connector. That end should be closest to the toecap. Bend the connection wire 90 degrees so it points upwards. The point of that right angle should be placed at the toecap side of the groove and the rest of the EL wire run in the groove towards the heel. Use all 10 of your fingers to hold the EL wire in the groove so that it remains flush with the contours of the sole. Sit there like a statue. Enjoy your audiobook as your fingers begin to ache. When you begin to question your life choices, the glue should be dry enough to let go, I'd give it 20 min or so. Let the glue dry for a day before proceeding.
  • Run EL wire under heel patch: Lift the flap and run the EL wire under the patch. No need to glue, the flap should keep it in place.
  • Trim EL wire: using all of your fingers, run the EL wire through the groove on the outer side of the sole and hold in place so that it conforms to the contours of the sole. Note the point at which it meets the toecap and using scissors or wire cutters, trim off the excess EL wire. Don't worry, you can cut it as long as it's not powered on. Turn it on and make sure it still lights up.
  • More masking and gluing: repeat the masking, gluing, and sitting like a statue for the other side of the shoe. Let the glue dry for a day.
  • Glue Heel Patch: lift the flap and slather some Shoe Goo under there. Hold down the flap as the glue dries for 20 min or so.
  • Soldering prep: First connect the inverter to the EL wire and make sure it's still working. Note which wire from the inverter joins with which wire coming from the EL wire. You can even mark the wires with a dot of paint for reference. If you end up cross-wiring them, I don't know if it'll work, so just make sure the correct wires get soldered together. Measure and see if there's enough wire to make the connection. If not, measure the deficit and cut out the needed length from the extension wire.
  • Solder EL wire with extension wire: use wire cutter to cut off the plugs from the extension and the EL wire and use wire strippers to remove insulation off the ends of wires. Run the extension out through the vent hole. Pull the wires apart so you can run some shrink tubing over each side of the wire. If you want you can also run a larger diameter shrink tubing over the entire wire to cover both connections and keep everything neat. Just make sure it's black. Push all tubing away from the ends of the wires so you can solder without them getting in the way or getting hot. Once soldered, slide the tubing over the connections and heat with lighter or heat gun. Pull the larger diameter tubing over the smaller tubing and heat to shrink. If you don't have shrink tubing you can use electric tape.
  • Solder inverter with extension: Repeat the above step to connect the other end of the extension with the inverter. Make sure not to cross-wire and ensure there's enough length to let you place the inverter towards to top of the tongue. After tubing is in place, test to make sure it's lighting up.
  • Glue Velcro to inverter: use corse sandpaper to rough up the side of the inverter where the battery is inserted. Don't rough up the battery cover but the housing adjacent to it. Apply a small amount of shoe goo to it and stick on a square of loop Velcro to it.
  • Sew Velcro to tongue: determine where you want to hide the inverter on the inner side of the tongue. I placed mine long ways horizontal with the wire pointing to the side with the vent holes. Sew on hook Velcro where it lines up with the loop Velcro of the inverter. I just did a small stitch in each corner to keep it low-key.
  • Glue the EL connection wire near arch: the connection coming off the EL wire and running into the vent hole is not currently secured. We will glue it down. I used black Shoe Goo for this, but clear is fine too. Use masking tape to outline the path where the wire will run from the EL to the vent hole. Slather on a layer of glue. Remove the masking tape. Realize you forgot to play your audiobook and scramble for that before the glue starts to dry. Use all your figures to keep the wire pressed into the glue and sit there for 20 min. Let it dry for a day.
  • That was just one shoe. Now repeat everything for the 2nd shoe 💀
  • Muffle sound: The inverter makes a high pitched whine. This is normal. If you don't like it, remove the battery, unscrew and open up the housing, and cover the internals with hot glue and reassemble. That should muffle the sound. I haven't bothered.
  • Camo: I could have camouflaged the connection better with the sole by using white tubing or electric tape and maybe red tubing/tape where the connection comes off the red EL wire, but it was too late by the time the thought came to me. I might use paint to hide the wire more. You might not want to disguise it at all and embrace the diy cyberpunk look. Up to you.

fin

93
22
submitted 1 year ago* (last edited 1 year ago) by marty@discuss.tchncs.de to c/diy


Hi there,

I want to install a pump and filtration for my rain water collection system. This is what I've come up with so far. (Water is coming from the left) I thought diameter to be 1". Is this to much for gardening purposes and a tiny house?

Where should I put valves? Am I missing something? Can I cut costs by using other parts?

Greetings :)

94
61
submitted 1 year ago* (last edited 1 year ago) by Hypnotized@lemm.ee to c/diy


cross-posted from: https://lemm.ee/post/654873

The carcass is built from 1/2 sanded plywood assembled with pocket hole screws. In this picture I am filling all the seams and nail holes with filler.

I used hardboard for the moulding, which was glued and tact to the plywood. Again the holes were filled and then everything would be sanded down. The knobs were cut from some cherry scraps and are fitted with bolts through the front so that they can turn freely.

Maple scraps for the feet.

Primed and painted. I was running short in time so made a quick faucet and backsplash out of more cherry scraps. I had wanted to do something more detailed but it was after 11pm Christmas Eve when I was adding the final details and I needed to get it done and out for the kids by morning.

The oven door is plexiglass, with some metal screen spray glued onto the inside.

Burners installed and ready to set out for the kids

A few hours later

It's been 2.5 years since I made this and I have to say this has probably gotten the most use of any toy they have, and has held up without issues.

95


Crazy good DIY mechatronic skills.

96


Super detailed, high quality video on radiative cooling coating

97
16
Build Your Own CNC! (www.youtube.com)
submitted 1 year ago* (last edited 1 year ago) by circularfish to c/diy


I know there are a few out there who are interested in subtractive CNC (there are literally dozens of us!) but who may be a little bit intimidated by it. We've all seen our calendar app or Netflix account or some other piece of software go haywire suddenly and without warning -- imagine if it was connected to a razor sharp cutter spinning at 20,000 RPM. Yikes.

I won't lie, building a working CNC machine isn't exactly a cakewalk, either. But reassuringly, neither is it rocket science. 3D printers, which we all know and love, are just dinky little CNC machines with an extruder on the business end instead of a twirly metal thing (the endmill in the case of a CNC mill).

Component-wise, stepper motors, ball screws, and control interfaces have evolved to the point you can get quality parts that fit together in predictable ways for commodity prices online. And once you have your machine up and running, you'll be able to make just about anything - it is the ultimate DIY rush to be able to visualize, design, and create something new, robust, and beautiful out of a solid chunk of metal. Building that project and need a funky bracket that has to stand up to heat and torque? No problem. Decorative hat hook for Aunt Mabel? Get outta here.

"But Circularfish," I hear you say, "that sounds great but I don't even know what a 'stepper motor' is". Never fear, popular machine tuber This Old Tony has created a series of videos demystifying CNC. He is fairly entertaining and, even if you have no intention of building a CNC mill, it will help you understand what is going on with your 3D printer when it decides to crash itself at 4am. Enjoy!

98


I was unsatisfied with the lack of decent keyboard phones for a decent price on the market, so I made one myself.

It's all open source.

99


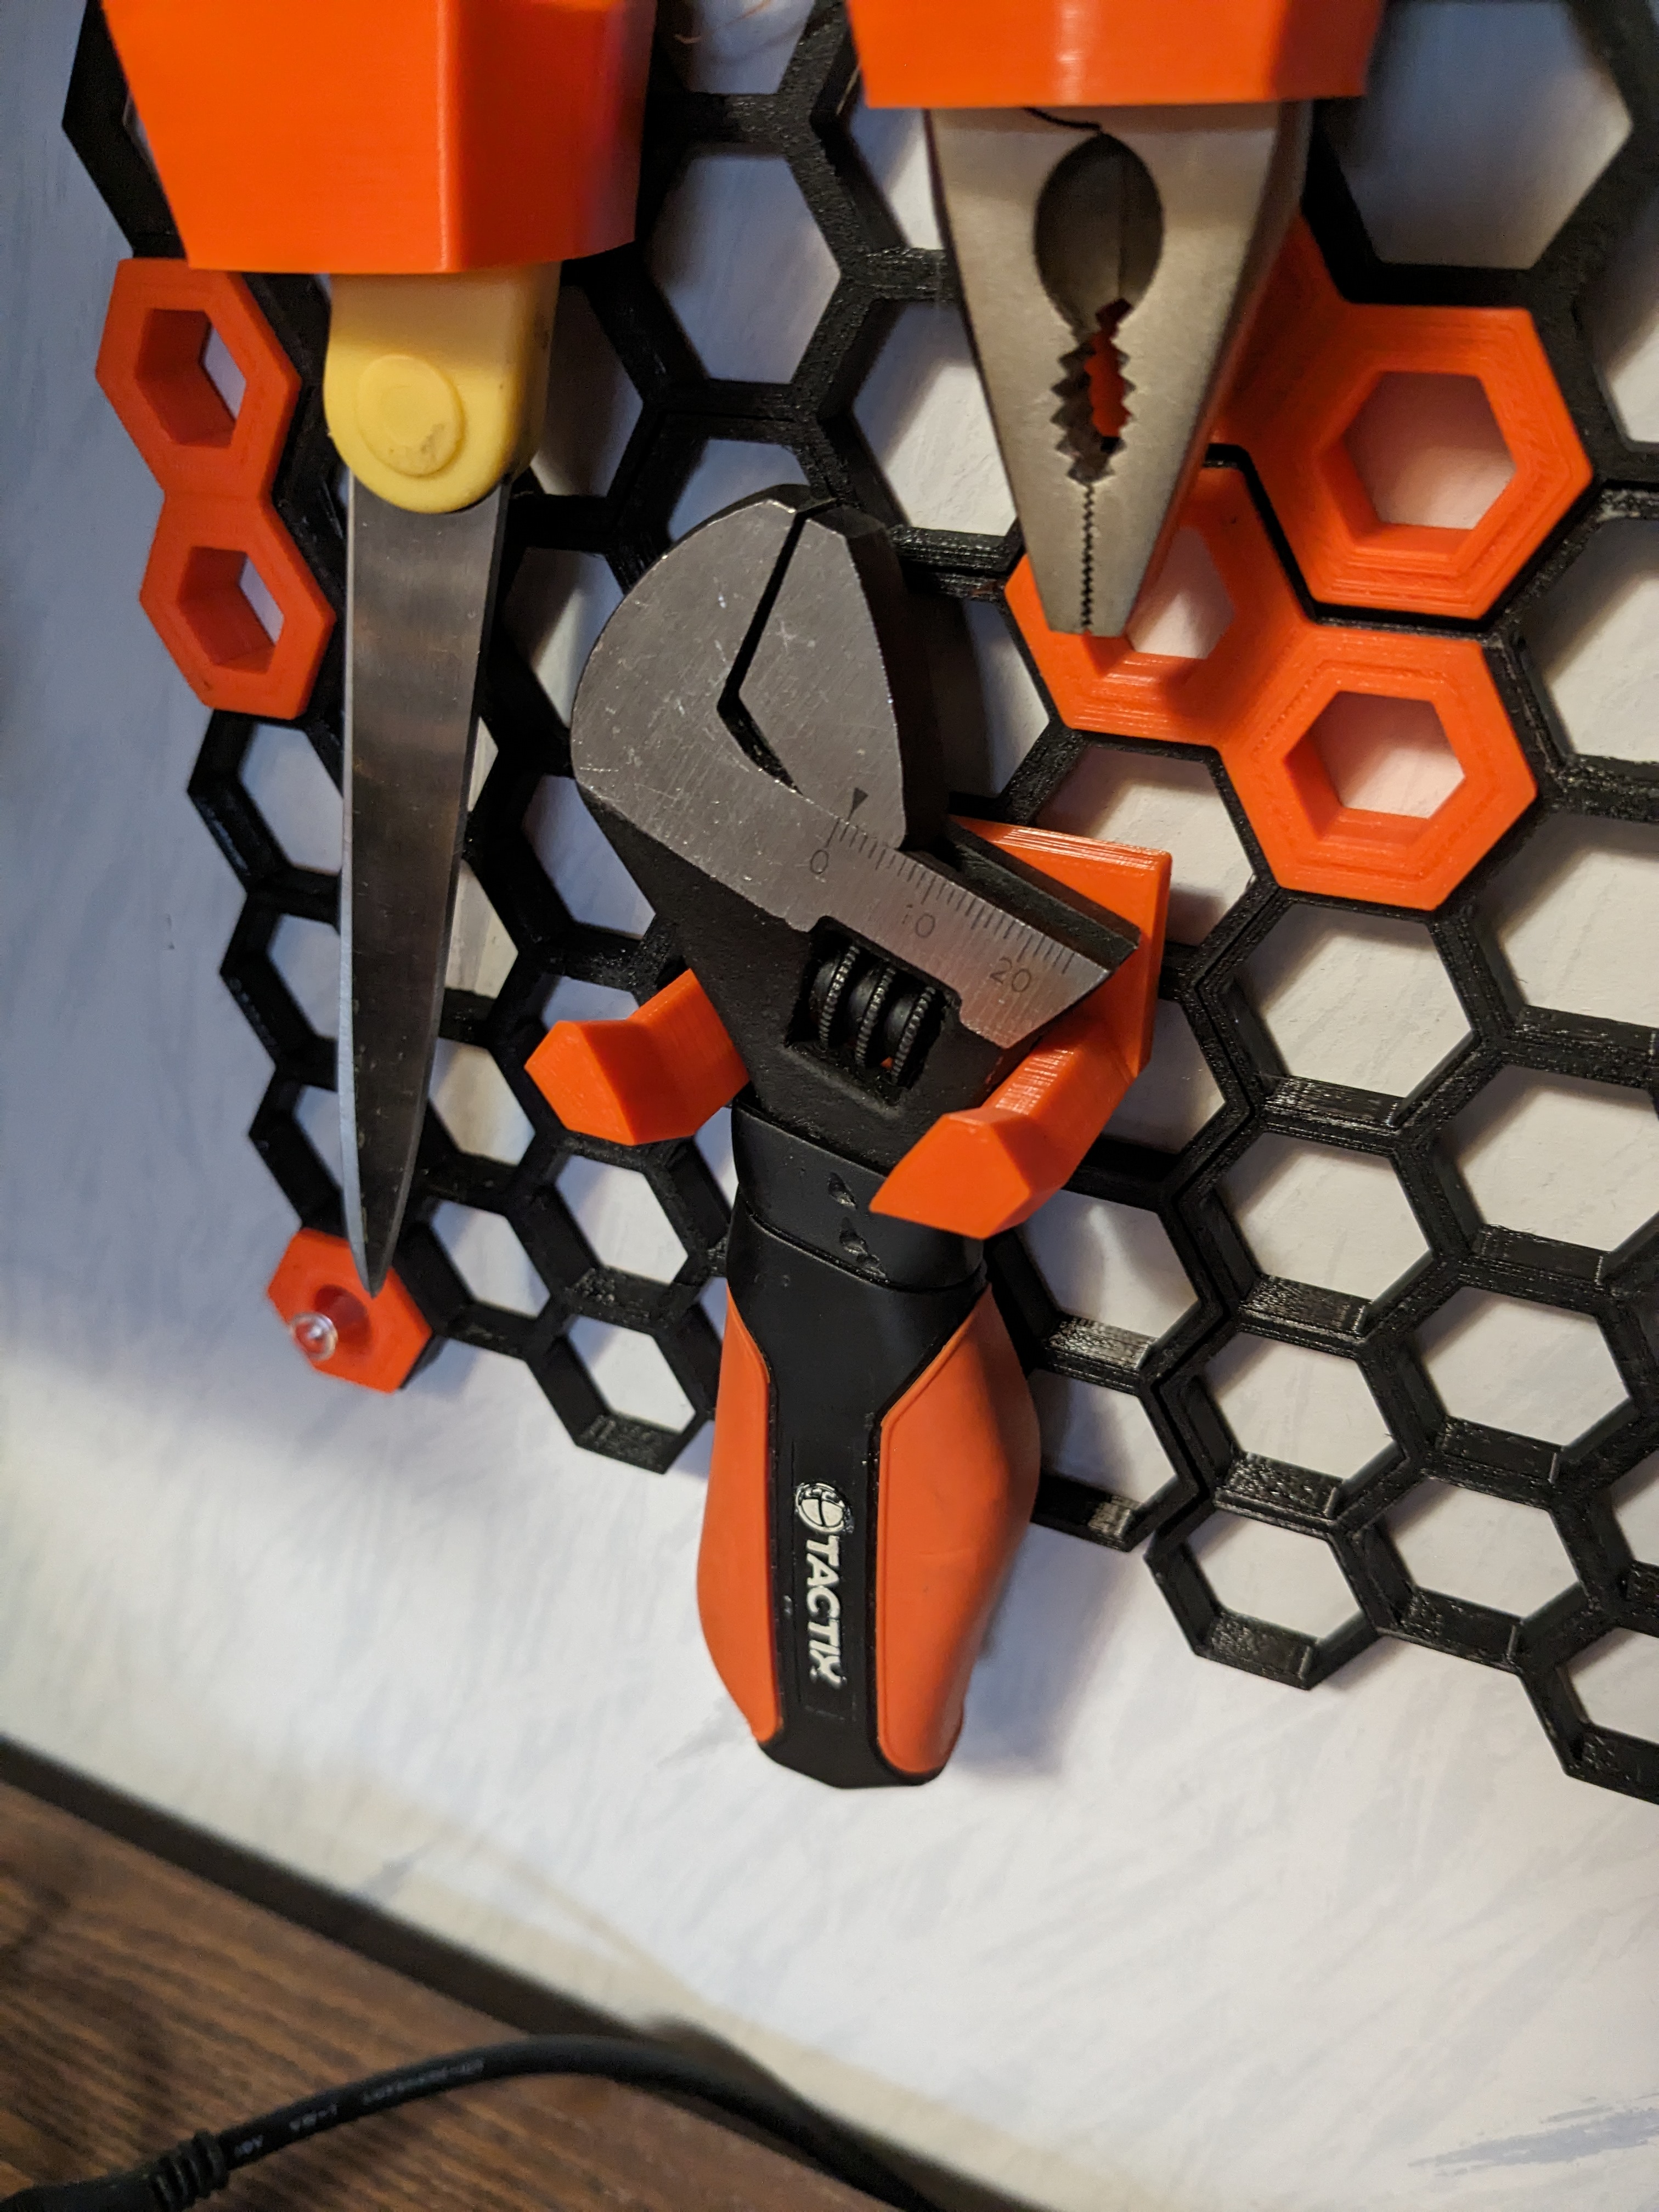
I scanned the wrench on a regular document scanner and used the siluette to get the optimum hook shape. It worked incredibly well and it sits perfectly. Thats important because I don't want the tools to raddle every time someone slams the door or I open a window.

100
28
Door Update (i.imgur.com)
submitted 1 year ago* (last edited 1 year ago) by Hypnotized@lemm.ee to c/diy


We had an ugly metal clad solid wood exterior door that leads from a basement family room into our below grade garage. I had redone the floor and trim in the family room and was looking for a way to fancy up the door without having to spend a fortune.

Original door

Took the door off and cleaned it up

Cut 1/2 MDF to size to give the apperance of a 5 panel door

Glued on the panels, and filled and sanded all the edges. Chamfered edges

Primed

Paint added

Rehung- the MDF made an already thick door significantly thicker so I had to spend quite some time finding hardware that would work.

It's been 4 years since this was installed and it's held up perfect. I was worried about the MDF getting dinged, but it has not.

view more: ‹ prev next ›