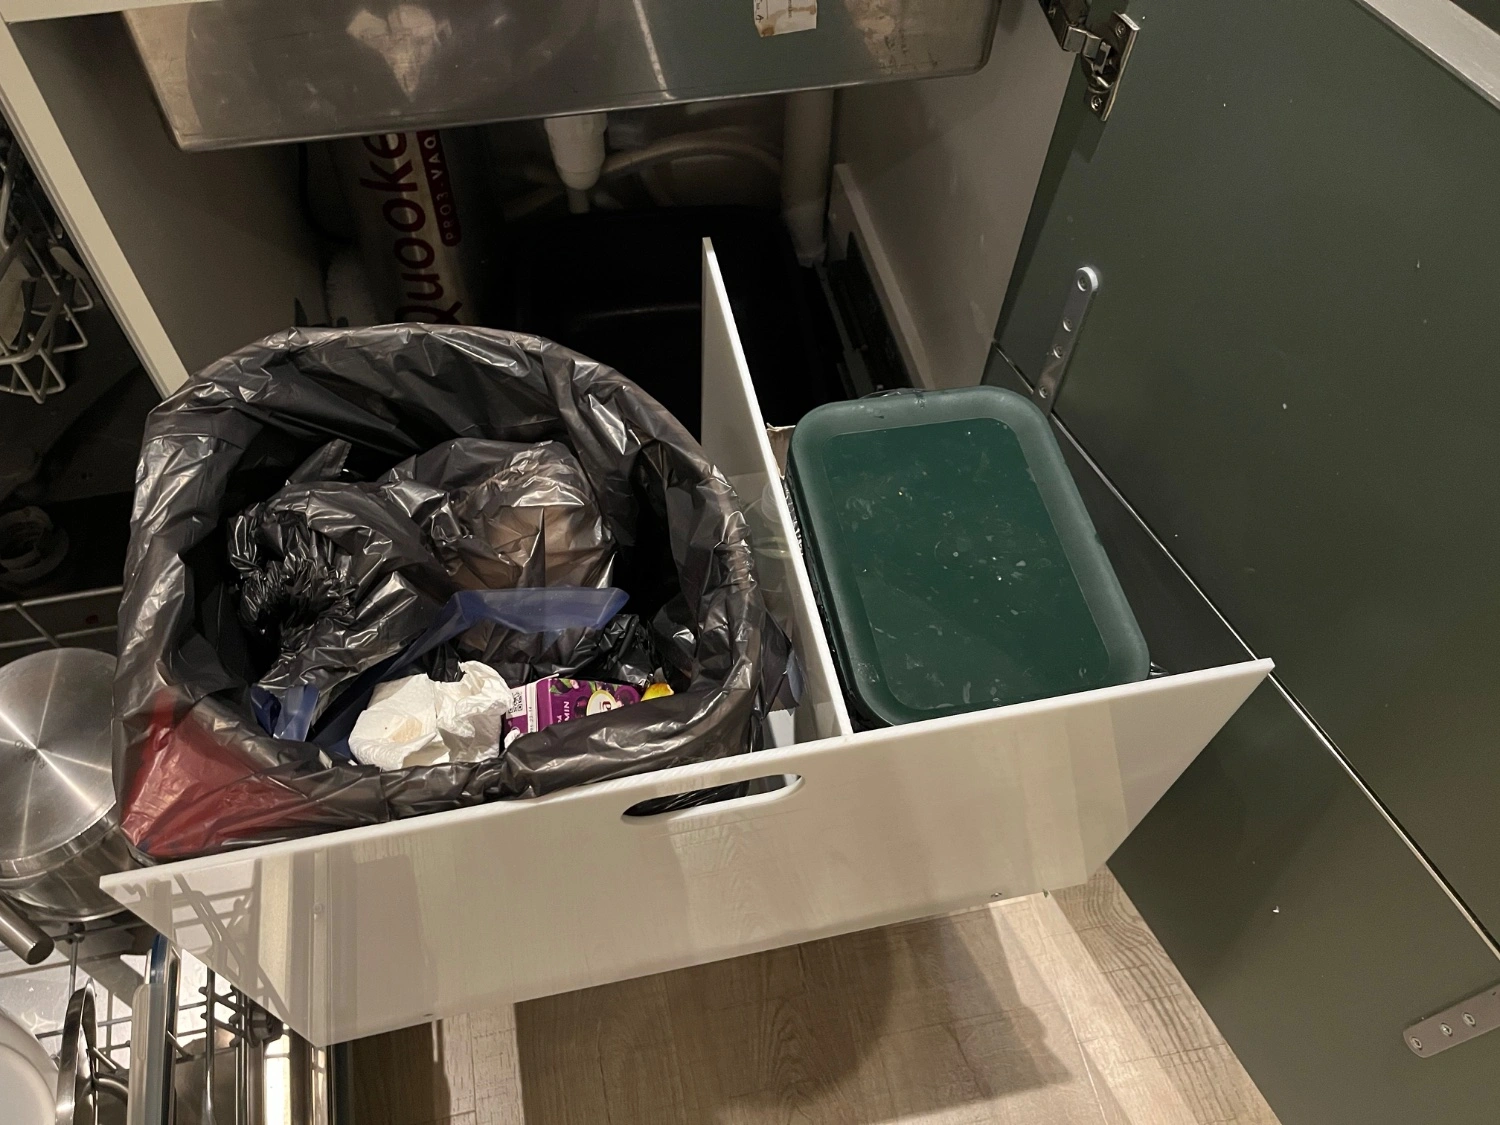
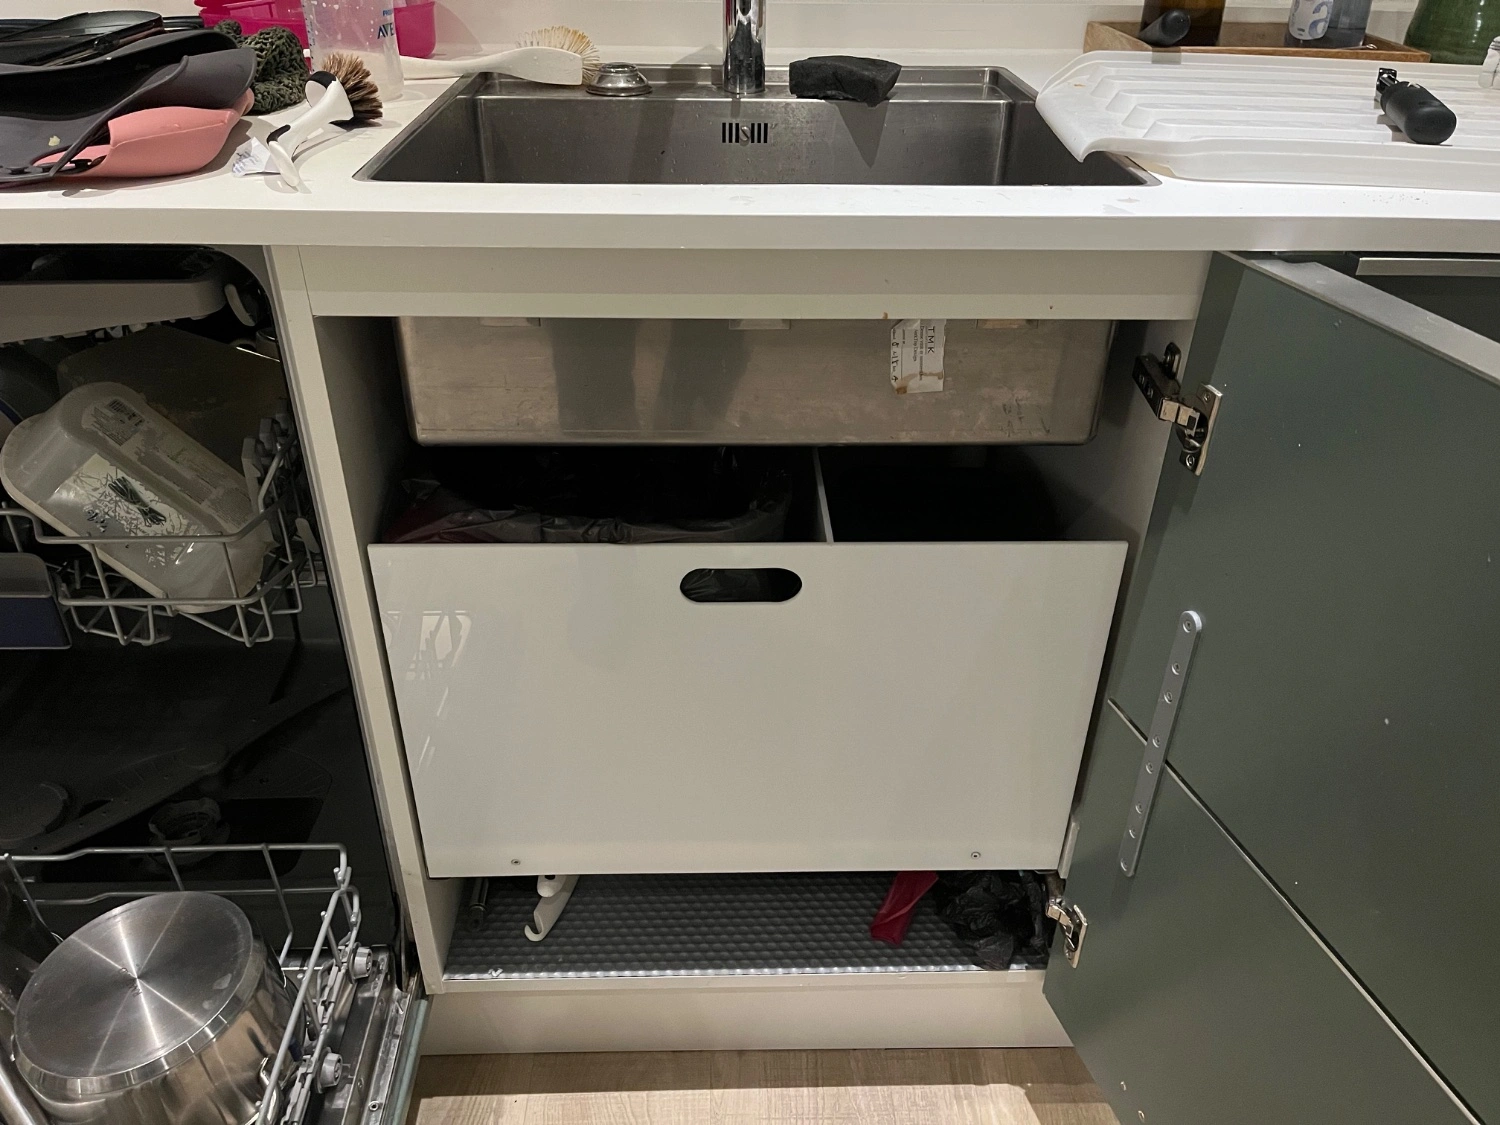
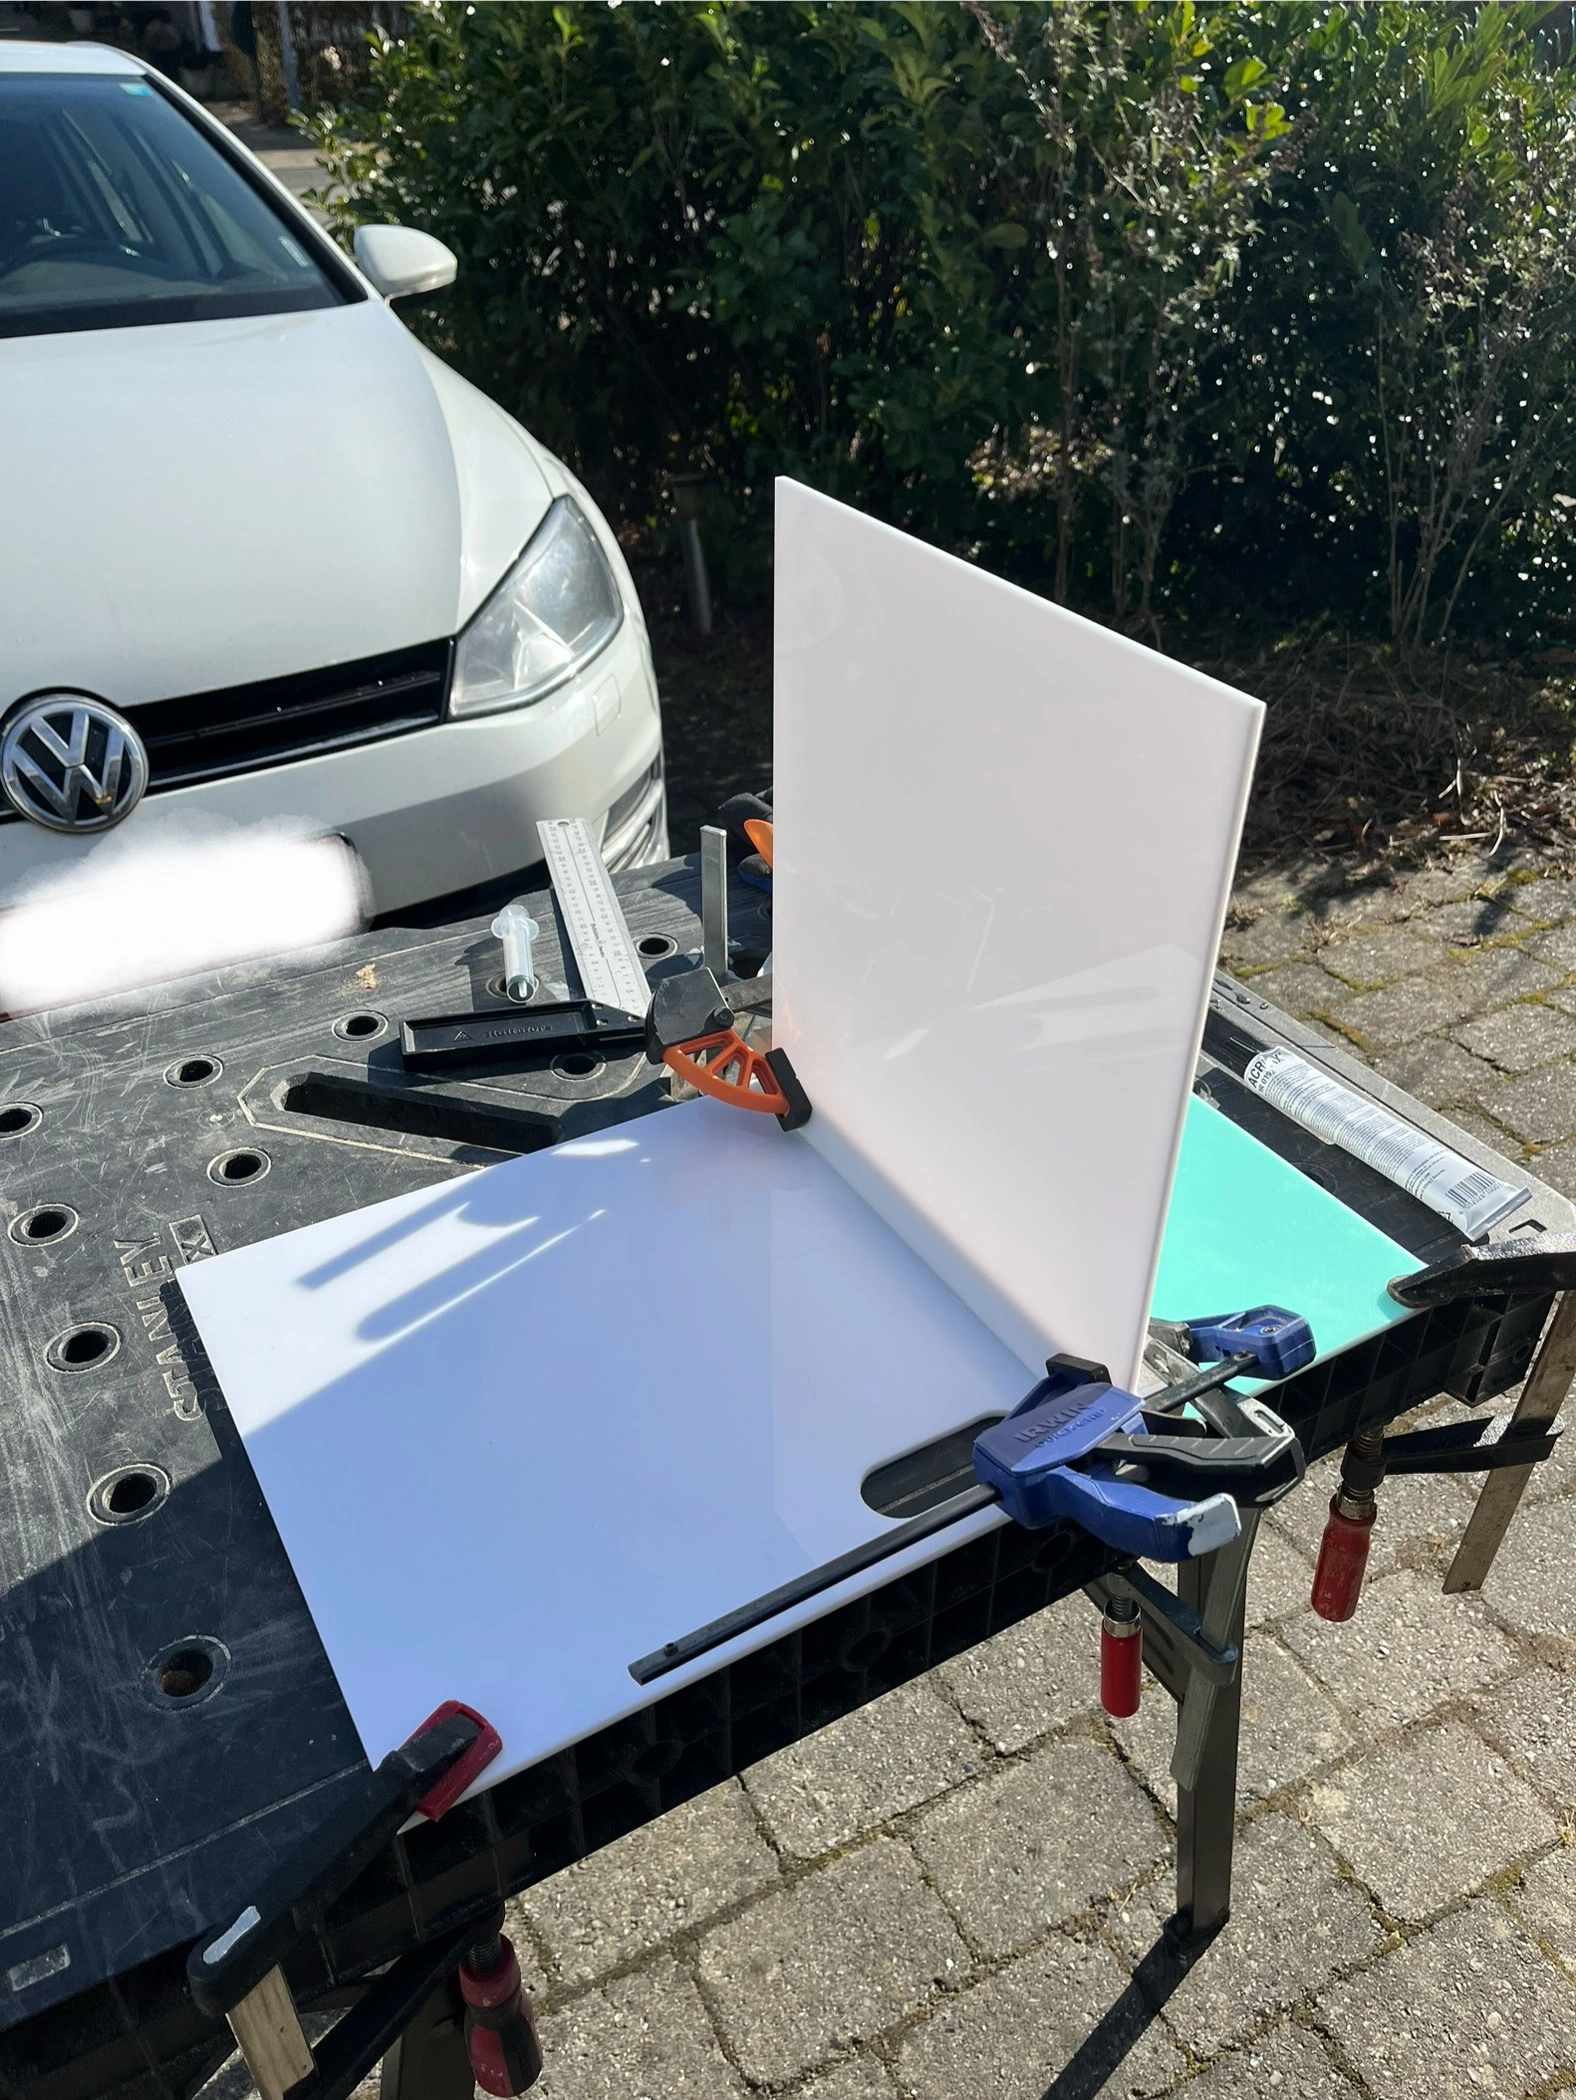
Do It Yourself

7834 readers
1 users here now

Make it, Fix it, Renovate it, Rehabilitate it - as long as you’ve done some part of it yourself, share!

Especially for gardening related or specific do-it-yourself projects, see also the Nature and Gardening community. For more creative-minded projects, see also the Creative community.


This community's icon was made by Aaron Schneider, under the CC-BY-NC-SA 4.0 license.

founded 2 years ago
MODERATORS
1


Hey all,

I recently got some pictures to hang onto the wall of my apartment. While I was able to hang up four of the five so far despite some challenges (needing to get a nut driver to remove portions of the frames and using a command hook for one of the frames rather than strips due to the screws holding the frame together jutting out too much for it to sit flat on the wall with command strips), there's been one picture that I'm in a weird spot with.

Now the picture is clearly not original, it's very obvious that it's a printed reproduction. Regardless, I love the way the art looks, and want to hang it on the wall behind the couch. My issue is that the wooden frame is warped, and I'm a bit lost as to where to go forward with this. The piece I removed from the frame seems to indicate that it was meant to be hung using a nail in the wall, but being in an apartment that would go against my lease. The good news is that I almost certainly can use command strips to attach it to the wall, if only I can figure out how to fix the warping to lay it flat.

Looking online, it might be me using bad search terms, but I can only seem to find out information about what causes this to happen rather than information as to how to fix it. If at all possible I want to avoid reframing the picture since honestly that wouldn't be worth the hassle with how cheap the picture seems to be seeing that it's a reprint.

Thanks in advance!

2


I got a canon pixma tr4520 from a technologically challenged relative, who told me they couldn't get it to print and it was mine to try and fix. I worked out that it didn't have an ink cartridge in it (not even an empty), bought a replacement, and got it printing. But now it has vertical alignment issues and paper jams. I can't afford a new printer right now, and I would love to fix this one. My fear is that I'll sink half the cost of a new one into it between the ink I already bought and replacement parts, just for it to come out not working anyway. Is it worth my time to try and fix or should I cut my losses and start saving for a new unit?

3
4


I have an absolutely incredible set of moose hide trigger mits by Hides In Hand - a traditional leather crafter in Canada who use locally sourced hides.

I backcountry ski a lot and DESTROY gear. My hides in hand mits are the most durable and comfortable mits I've ever had. The issue is the acrylic fleece liners - I blow through them.

So I decided to make a set of sheepskin liners. I went to Bill Worb Furs - who source pelts from traditional hunters and trappers (read: mostly, but not all indigenous) and scored some hides.

I deconstructed the original liners, made a pattern and made these new liners. Cost me $30CAD and I have material for a couple more.

Totally pointless, could have bought replacements, but it was a super fun project for someone who has never made something like this before.

5


Hello!

I plan to replace an electric vitroceramic cooktop for an induction one. Both are 60cm in width, but looking at their manuals, the current one specifies a cutout of 58cm while the new one says 56cm. Both specify the same height (49cm)

Now, thankfully I dont need to make the hole larger, but Im wondering if the extra 2cm will be a problem or not? The cooktop should cover the entire hole but Im not sure if it the extra space could allow it to move around. I'm hoping it would be ok (they tend to have an anti-slippery silicon thingy), but I prefer to ask if some has experience just in case.

6
7
submitted 1 month ago* (last edited 1 month ago) by hairyfeet@lemmy.ml to c/diy


I have laminate flooring which is chipping off at the joints due to an uneven underfloor. Does anyone have any suggestions for what i can fill it with please?

Tried super glueing the snapped off pieces and filling with outdoor sealant. Neither has worked.

7


I'm hoping to have access to a laser cutter in the near future, but due to scheduling conflicts most likely won't be able to attend any hands-on instruction on how to use it. In lieu of that, I'm in search of any online resources on the general use of laser cutters. Is there anything out there that would be useful to a complete newb like myself?

8
9
44
Made a book lamp (aussie.zone)
submitted 2 months ago* (last edited 2 months ago) by threeduck@aussie.zone to c/diy


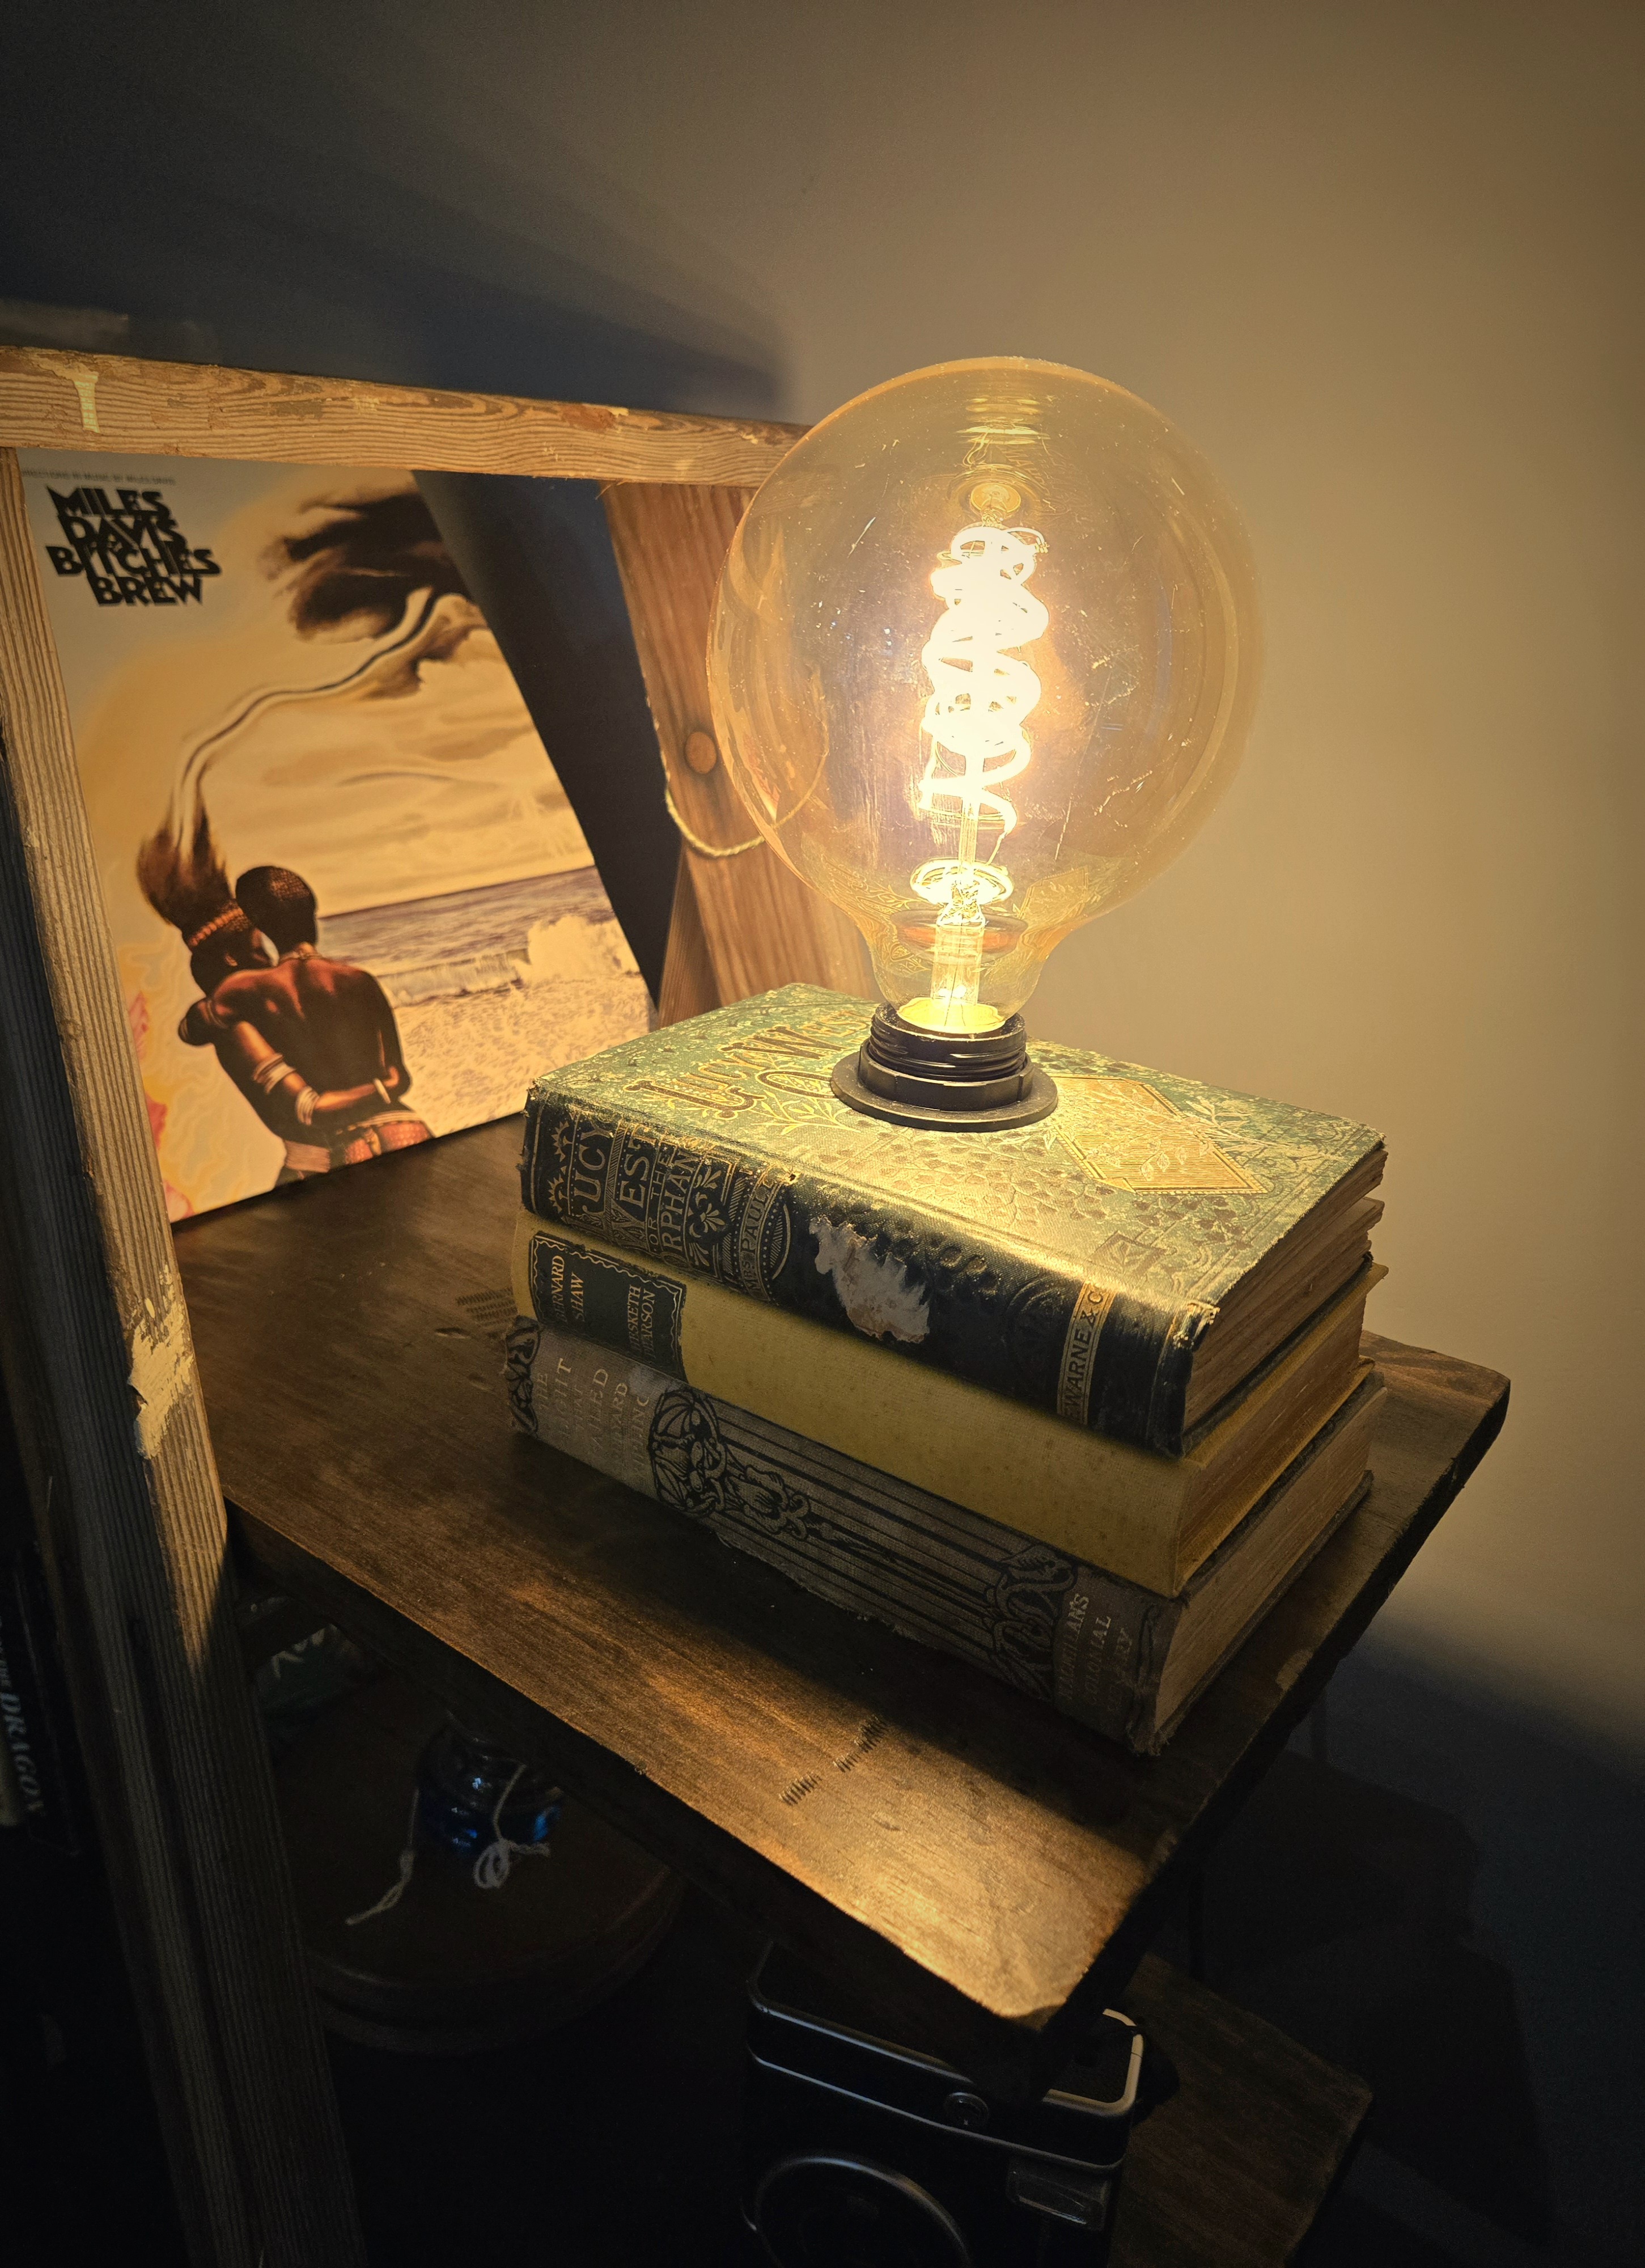
Pieces required. Three books from a thrift store ($6) pretty books are everywhere it seems! Australian lamp fitting with switch from AliExpress ($11), 3w LED bulb from AliExpress ($14).

Things I needed to buy: 40mm drill bit to drill through the books to fit the lamp socket ($12). Clamps to hold the books down during surgery ($20 for two).

Things I already had: PVA glue to attach the books together and seal the pages. Drill and 8mm drill bit, to feed the wire though and out the back of the bottom book. Soldering iron, I had to break open the light switch and snip the wires off to feed JUST the power cable through the drill hole I'd made (power plug too big)

I'm no DIY expert, and this was a fairly easy project. No major hurdles, and it looks great on my homemade ladder shelf.

10


cross-posted from: https://lemmy.sdf.org/post/24957830

So I had a taillight bulb go out on me this week, and changing that bulb was simple enough, but also not particularly obvious. Had to look it up and could only find a overly long winded youtube video on it. In the interest of saving some one else the headache of scrubbing through a 20 min video to get answer that could have been explained in 2 minute short, I figured I would write it out.

Tools and Parts list

  • Flat head screwdriver
  • 8mm deepwell socket or wrench (A standard socket might work, but a baby socket won't. Long bolts.)
  • Replacement bulb
    • The red brake and taillight bulb is a white 7443 bulb. )
    • The turn signal bulb is an amber 7440A
    • The reverse light is a 921

Instructions:

1.) Open the trunk. (Yes, I'm a smart ass :-D )
2.) On the rear (driver's perspective) corner of the trunk on the side with the blown bulb, look for a removable plastic rivet. Place under the center part of the rivet, a flathead screwdriver and lever the center part up, then pull the rivet out. If you try to remove the rivet before poping the center part up you will break the rivet.
3.) Pull the carpet to the side to reveal where the back of the tail light assembly should be. You will find 2 long bolts secured with 8mm nuts.
4.) Remove the 8mm nuts.
5.) Applying rearward pressure to the exposed bolts and the outside of the assembly, remove the assembly. It slides off to the rear, not the side. This will take a bit for force, but not much. Be careful not to damage the tail light assembly or damage the wiring harness. The wiring harness has roughly 8 inches of play.
6.) You now have access to the bulb holders for the tail/brake light, turn signal, and reverse light. The bulb holders twist loose and it shouldn't take much force. The bulbs themselves are a friction fit into the bulb holders.
7.) Reverse these steps to reassemble.

11
13
submitted 3 months ago* (last edited 3 months ago) by Binzy_Boi@feddit.online to c/diy


Hey all,

My friends and I have an inside joke that involves cinderblocks that has been a few years old now. There's a house under renovations across the street from where I live, and I asked the people doing the renovations if I would be able to have a cinderblock I saw on the front lawn, to which they said I could! (for context, the house hasn't been sold yet and they were getting rid of them anyway.)

I am literally doing nothing with this cinderblock other than having it as a decorative piece in my apartment for the joke. I have put the cinderblock in my bathtub and sprayed off most of the dirt on the surface, but I was curious as to how I would clean it to get it looking more or less good as new.

Thanks in advance, I'm really excited over this stupid thing lol

12


Hi all,

Recently got myself a popcorn maker from the thrift shop that unfortunately refused to work. Wanted to try and get it operating as it should again, but it seems the issue wasn't so much something being broken in the machine, but rather extremely cheap build quality.

Repairing the thing just didn't seem worth it, so I disassembled it and am recycling the individual parts. However, I am thinking about making a toolbox so that I can learn some repairs and all, and am hoping to save the screws that I've salvaged from the machine.

My question is this. How does one sort and categorize the screws they keep? Are there codes the screws have, or does it come down to personally measuring and determining the length and type of screwdriver needed for them? Currently just keeping them in a sandwich bag for the time being.

Thanks for any help in advance.

13
14


Me challenging myself to purely purchase second-hand goods has once again hit a bump in the road with my recent purchase of a bookshelf at the thrift shop.

The bookshelf itself is fine, it looks nice, it was cheap at $25 CAD, and doesn't seem to have any damage to it. However, what wasn't advertised was the fact that the three shelving pieces taped together that rested on top of the shelve in the middle, uhhh, didn't have the holes drilled in yet that would allow for me to attach them to the rest of the unit.

Everything is perfectly fine save for that, so I don't want to toss the bookshelf entirely. If I wanted to prepare the shelving pieces myself to hang them into the adjustable holes, how would I do so? What tools would I need? Since I've never done anything like this before, would this be a good starter project, or should I have someone more experienced do it for me?

Thanks for any help in advance.

15


cross-posted from: https://lemmings.world/post/11714128

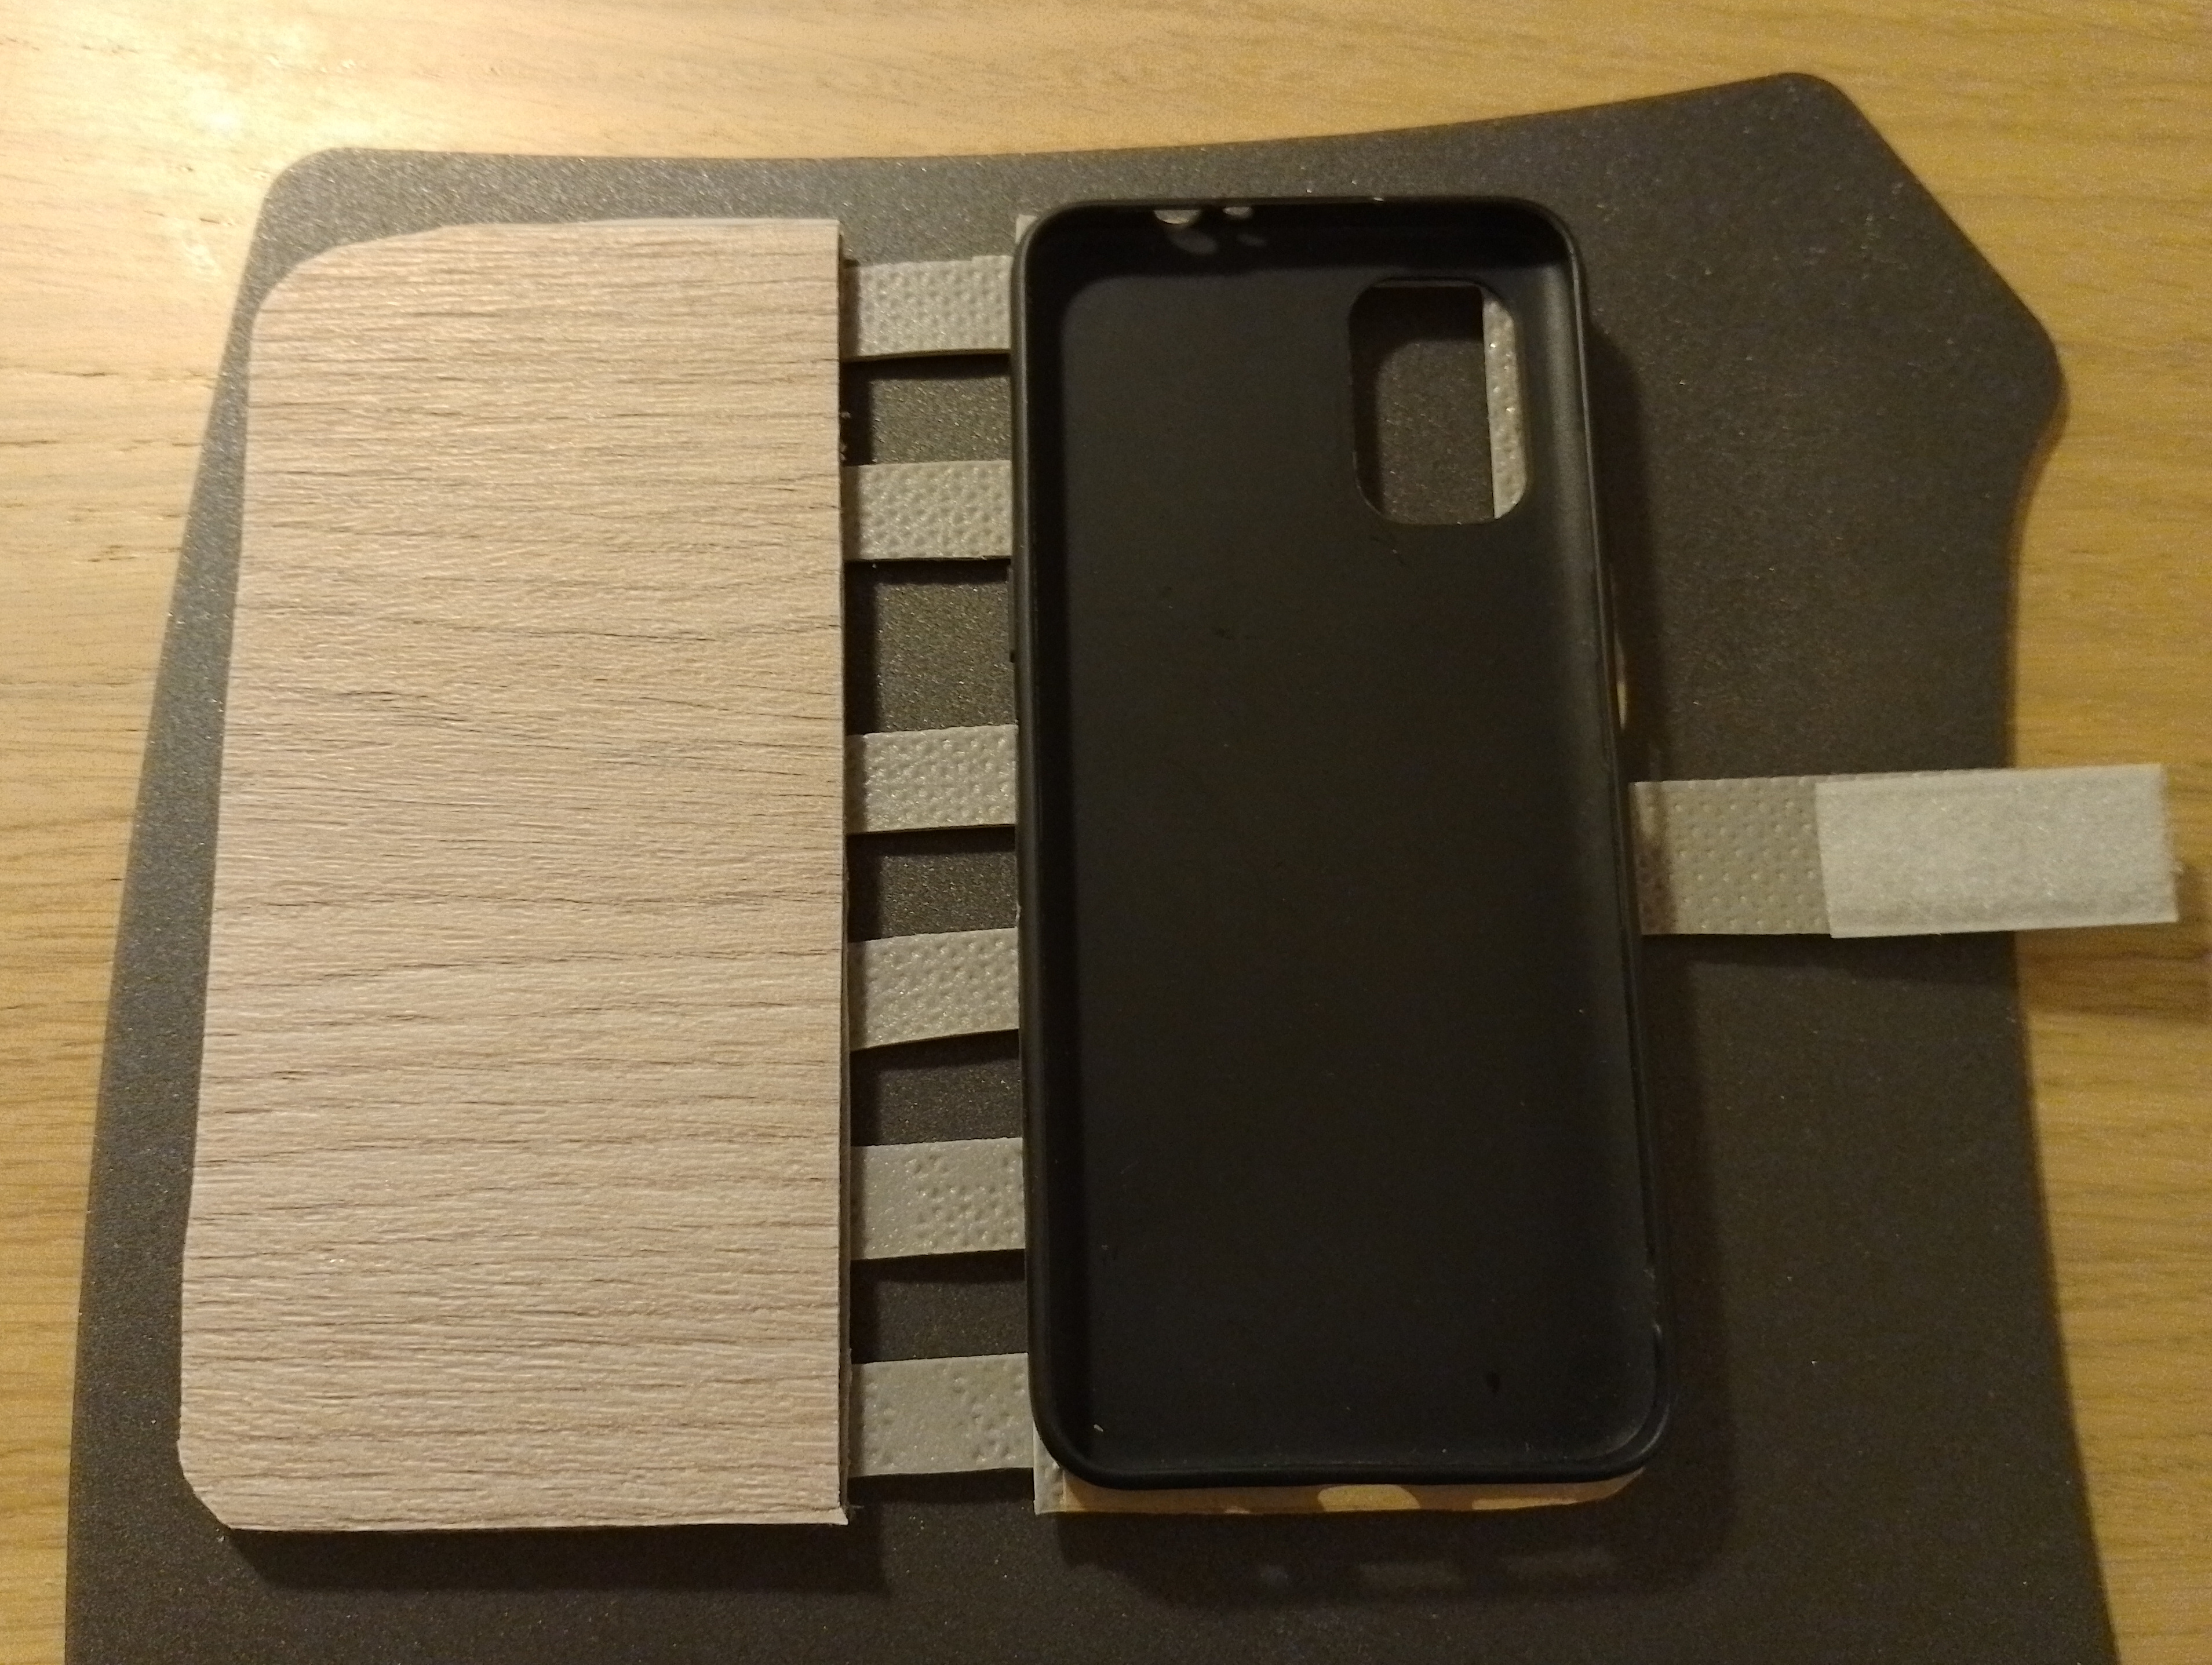
I tried to make a phone "wallet" case. I used the inside of my old one (what you press your phone into), cardboard from a an old box and some leftover vinyl flooring. I originally wanted to glue everything but ended up stapling some bits. these pics where hastily made and don't do the thing justice. Let's see how well this holds up (I seldom have it in my pocket so that helps).

16


I have an overhead light in my bedroom that I absolutely despise. It's way too bright and it's right behind my phone/book/whatever when I'm lying in bed. We have other lights around the room, and so I'd like to replace it with someone else. I don't really want a ceiling fan there, but that's the only thing I can think of. Does anyone have suggestions of something fun to put in the center of a bedroom ceiling?

17


cross-posted from: https://slrpnk.net/post/11339091

My bathroom tub fixtures have seen better days. Pretty sure they're original to the house (~60 years). We have fairly hard water, and the prior owners were not the best at maintenance so no clue how long these slow leaks have been going on. But the shower handle is stuck hard on the valve, and the bath spigot is crumbling away and similarly fused in place. Hot and cold come off easily.

Does anyone have any tips for freeing the one handle and spigot? I've tried light tapping with a mallet on the back of the handle to no avail. The spigot seems bound pretty tightly, to the point where I'm concerned about damaging the pipe if I apply too much torque.

As for the leaks, I haven't decided if I'm going to just replace the valves, or try fiddling with/replacing the packing nuts. This is my first time messing with plumbing, but either way seems straightforward enough after watching a few videos.

Any tips/tricks/suggestions appreciated, thanks!

18
94
submitted 7 months ago* (last edited 7 months ago) by morgunkorn@discuss.tchncs.de to c/diy


Hi everyone!

A slow week went by, with daily heavy rains it's not always easy to find the motivation to work outside.

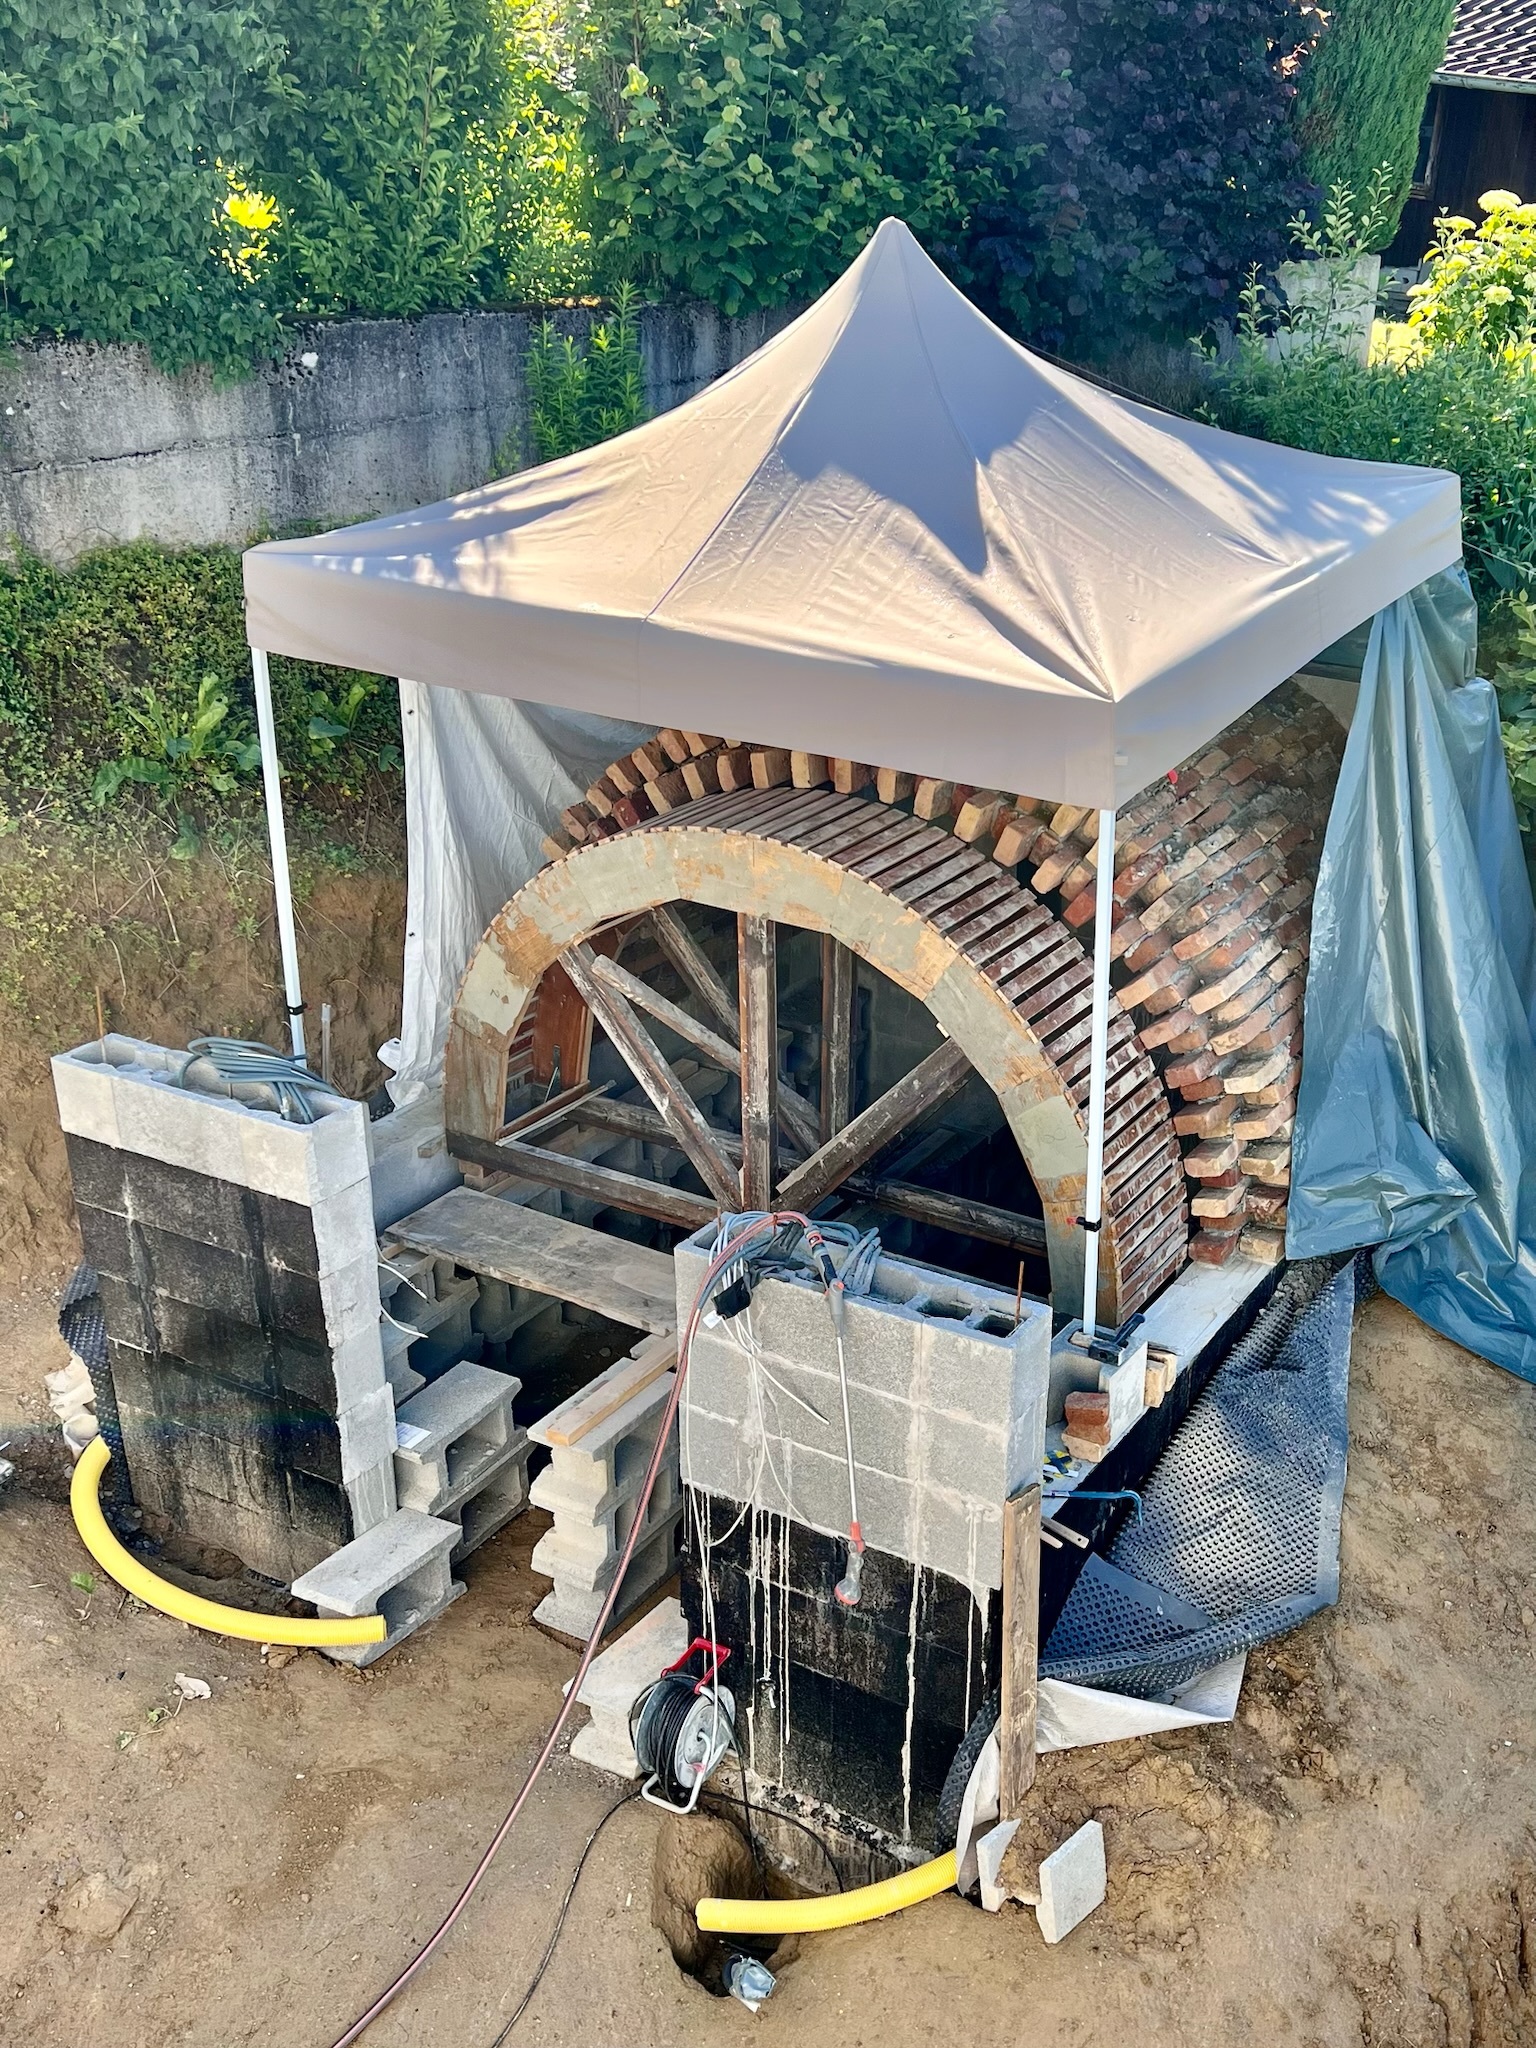
We installed a 50 square meter fleece and pond liner on top of the build, and started backfilling with dirt.

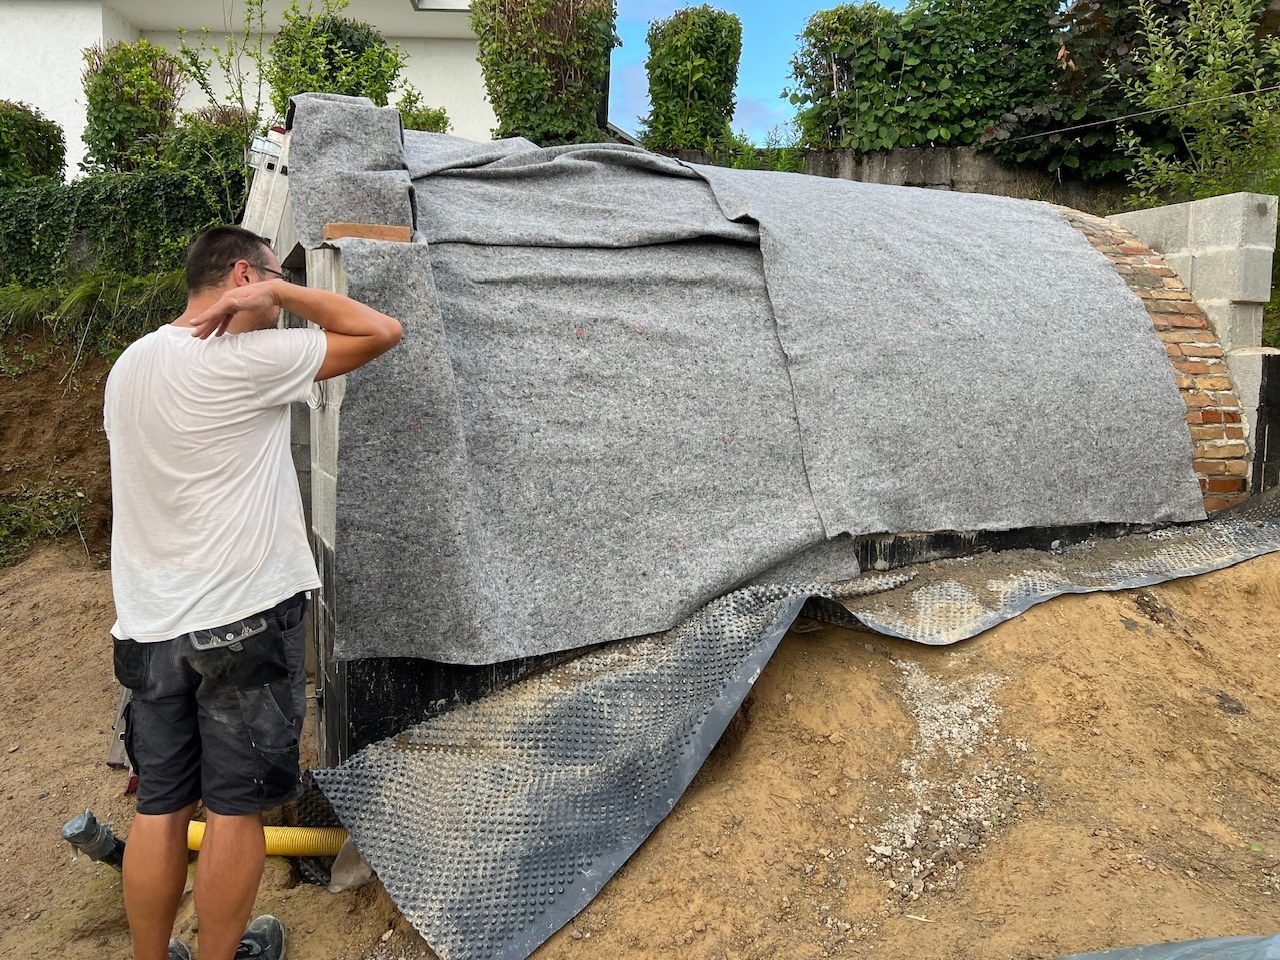
It's a lot of work because we have to dig the overgrown pile of dirt that's been sitting for 5 years on our lot, first getting rid of the roots in the top soil. But we have to do this manually as the back is only reachable through a narrow path in our neighbor's garden.

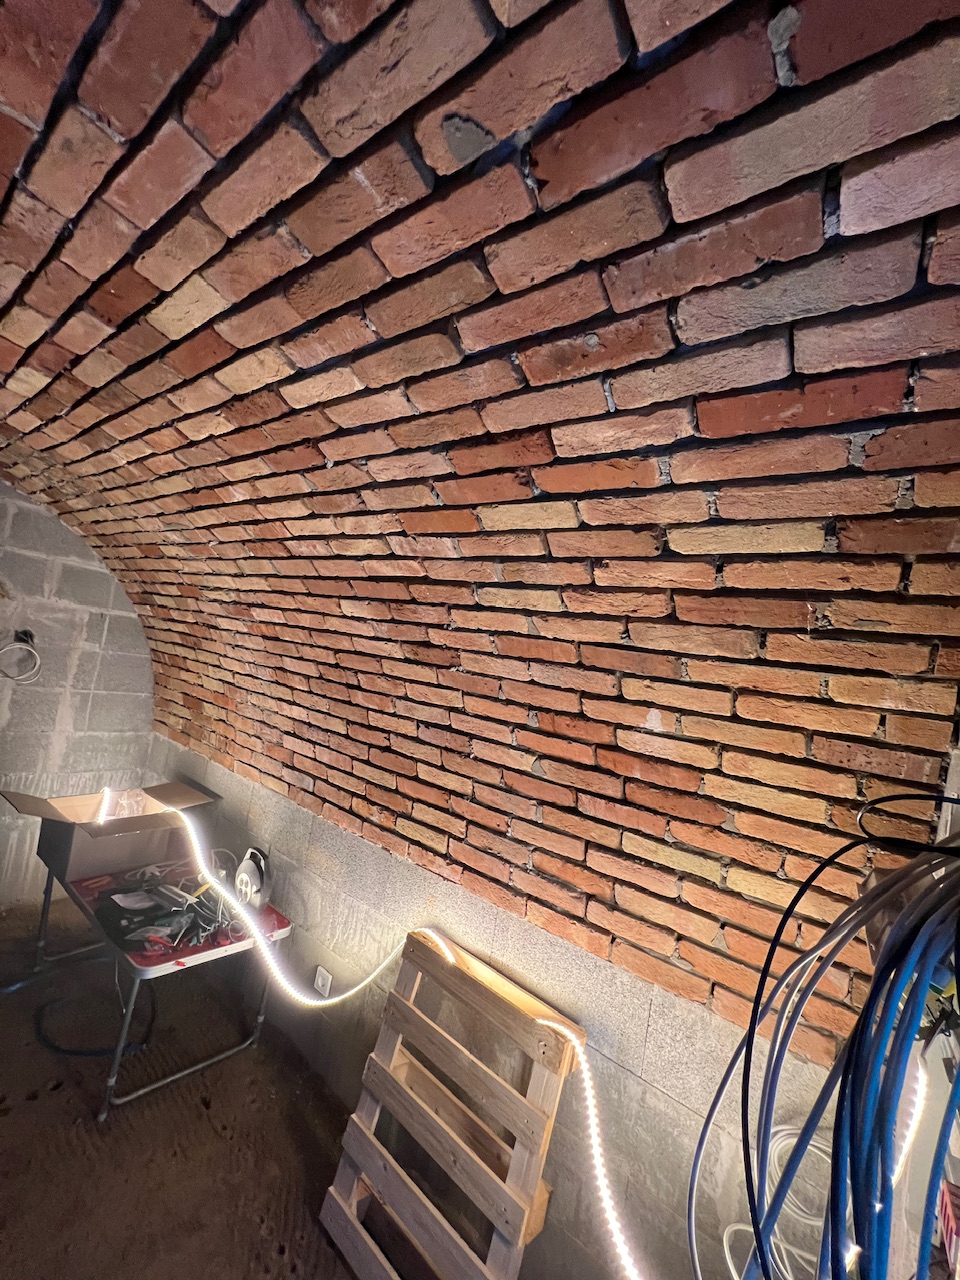
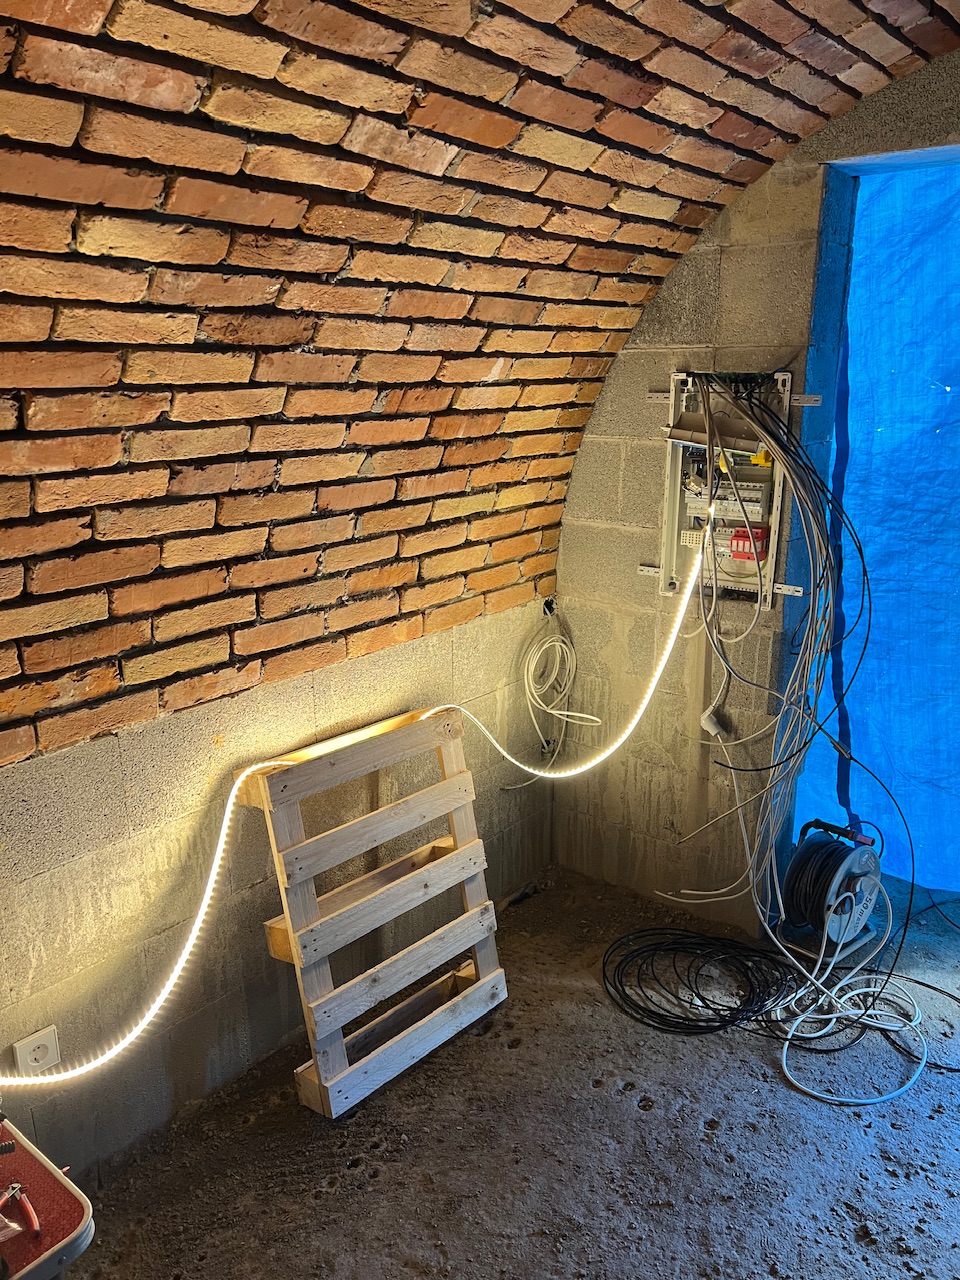
My partner also installed the electrical panel with 24V circuits for RGBW LED strips, a PoE WiFi access point and connected the wall outlets to the 230V main. It was temporarily connected to test how bright the strips will be. They will later be mounted in metal railings across the whole length of the lower brick line, with a wood cladding.

We will then have to dig a 20 meter trench from the house main electric supply, lay a PVC pipe and pull a 3-phase copper line to the cellar. This will be the garden hub to provide electricity to the future outdoor kitchen.

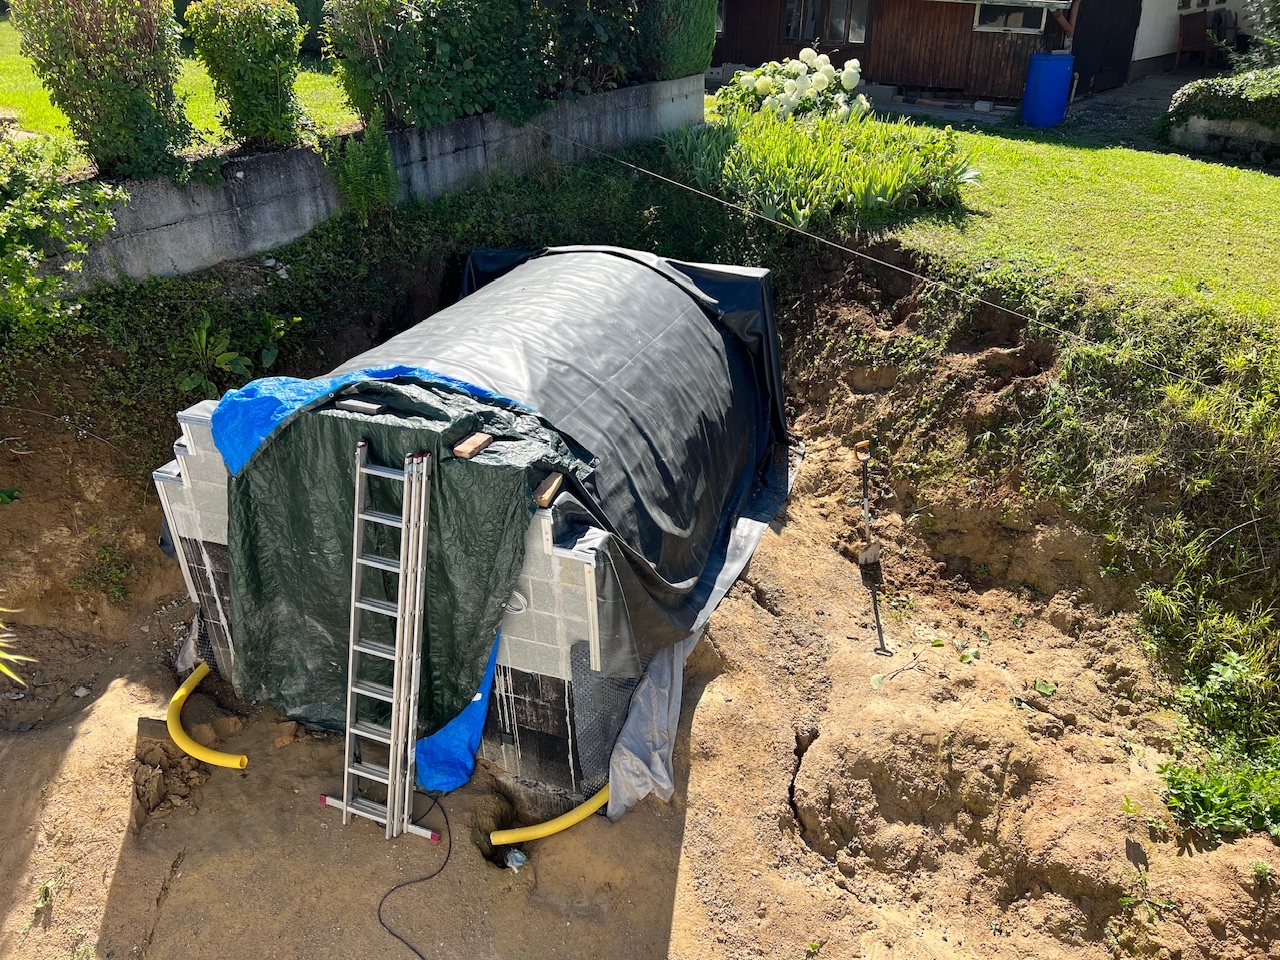
The next few days we will work on the mortar joints, using the multitool diamond blades that arrived in the mail to finish the cleanup before grouting all the joints cleanly.

Have a great week and keep on doing it yourself!

19
91
submitted 7 months ago* (last edited 7 months ago) by graphito to c/diy


jerk-sock

jerk-sock on a vacuum


old car

old car


perfectly good tennis balls

perfectly good tennis balls


dry wall

dry wall


sharp blades

who needs sharp blades anyways


art degree

art degree


Any more suggestions?

20
160
submitted 7 months ago* (last edited 7 months ago) by morgunkorn@discuss.tchncs.de to c/diy


Hi everyone

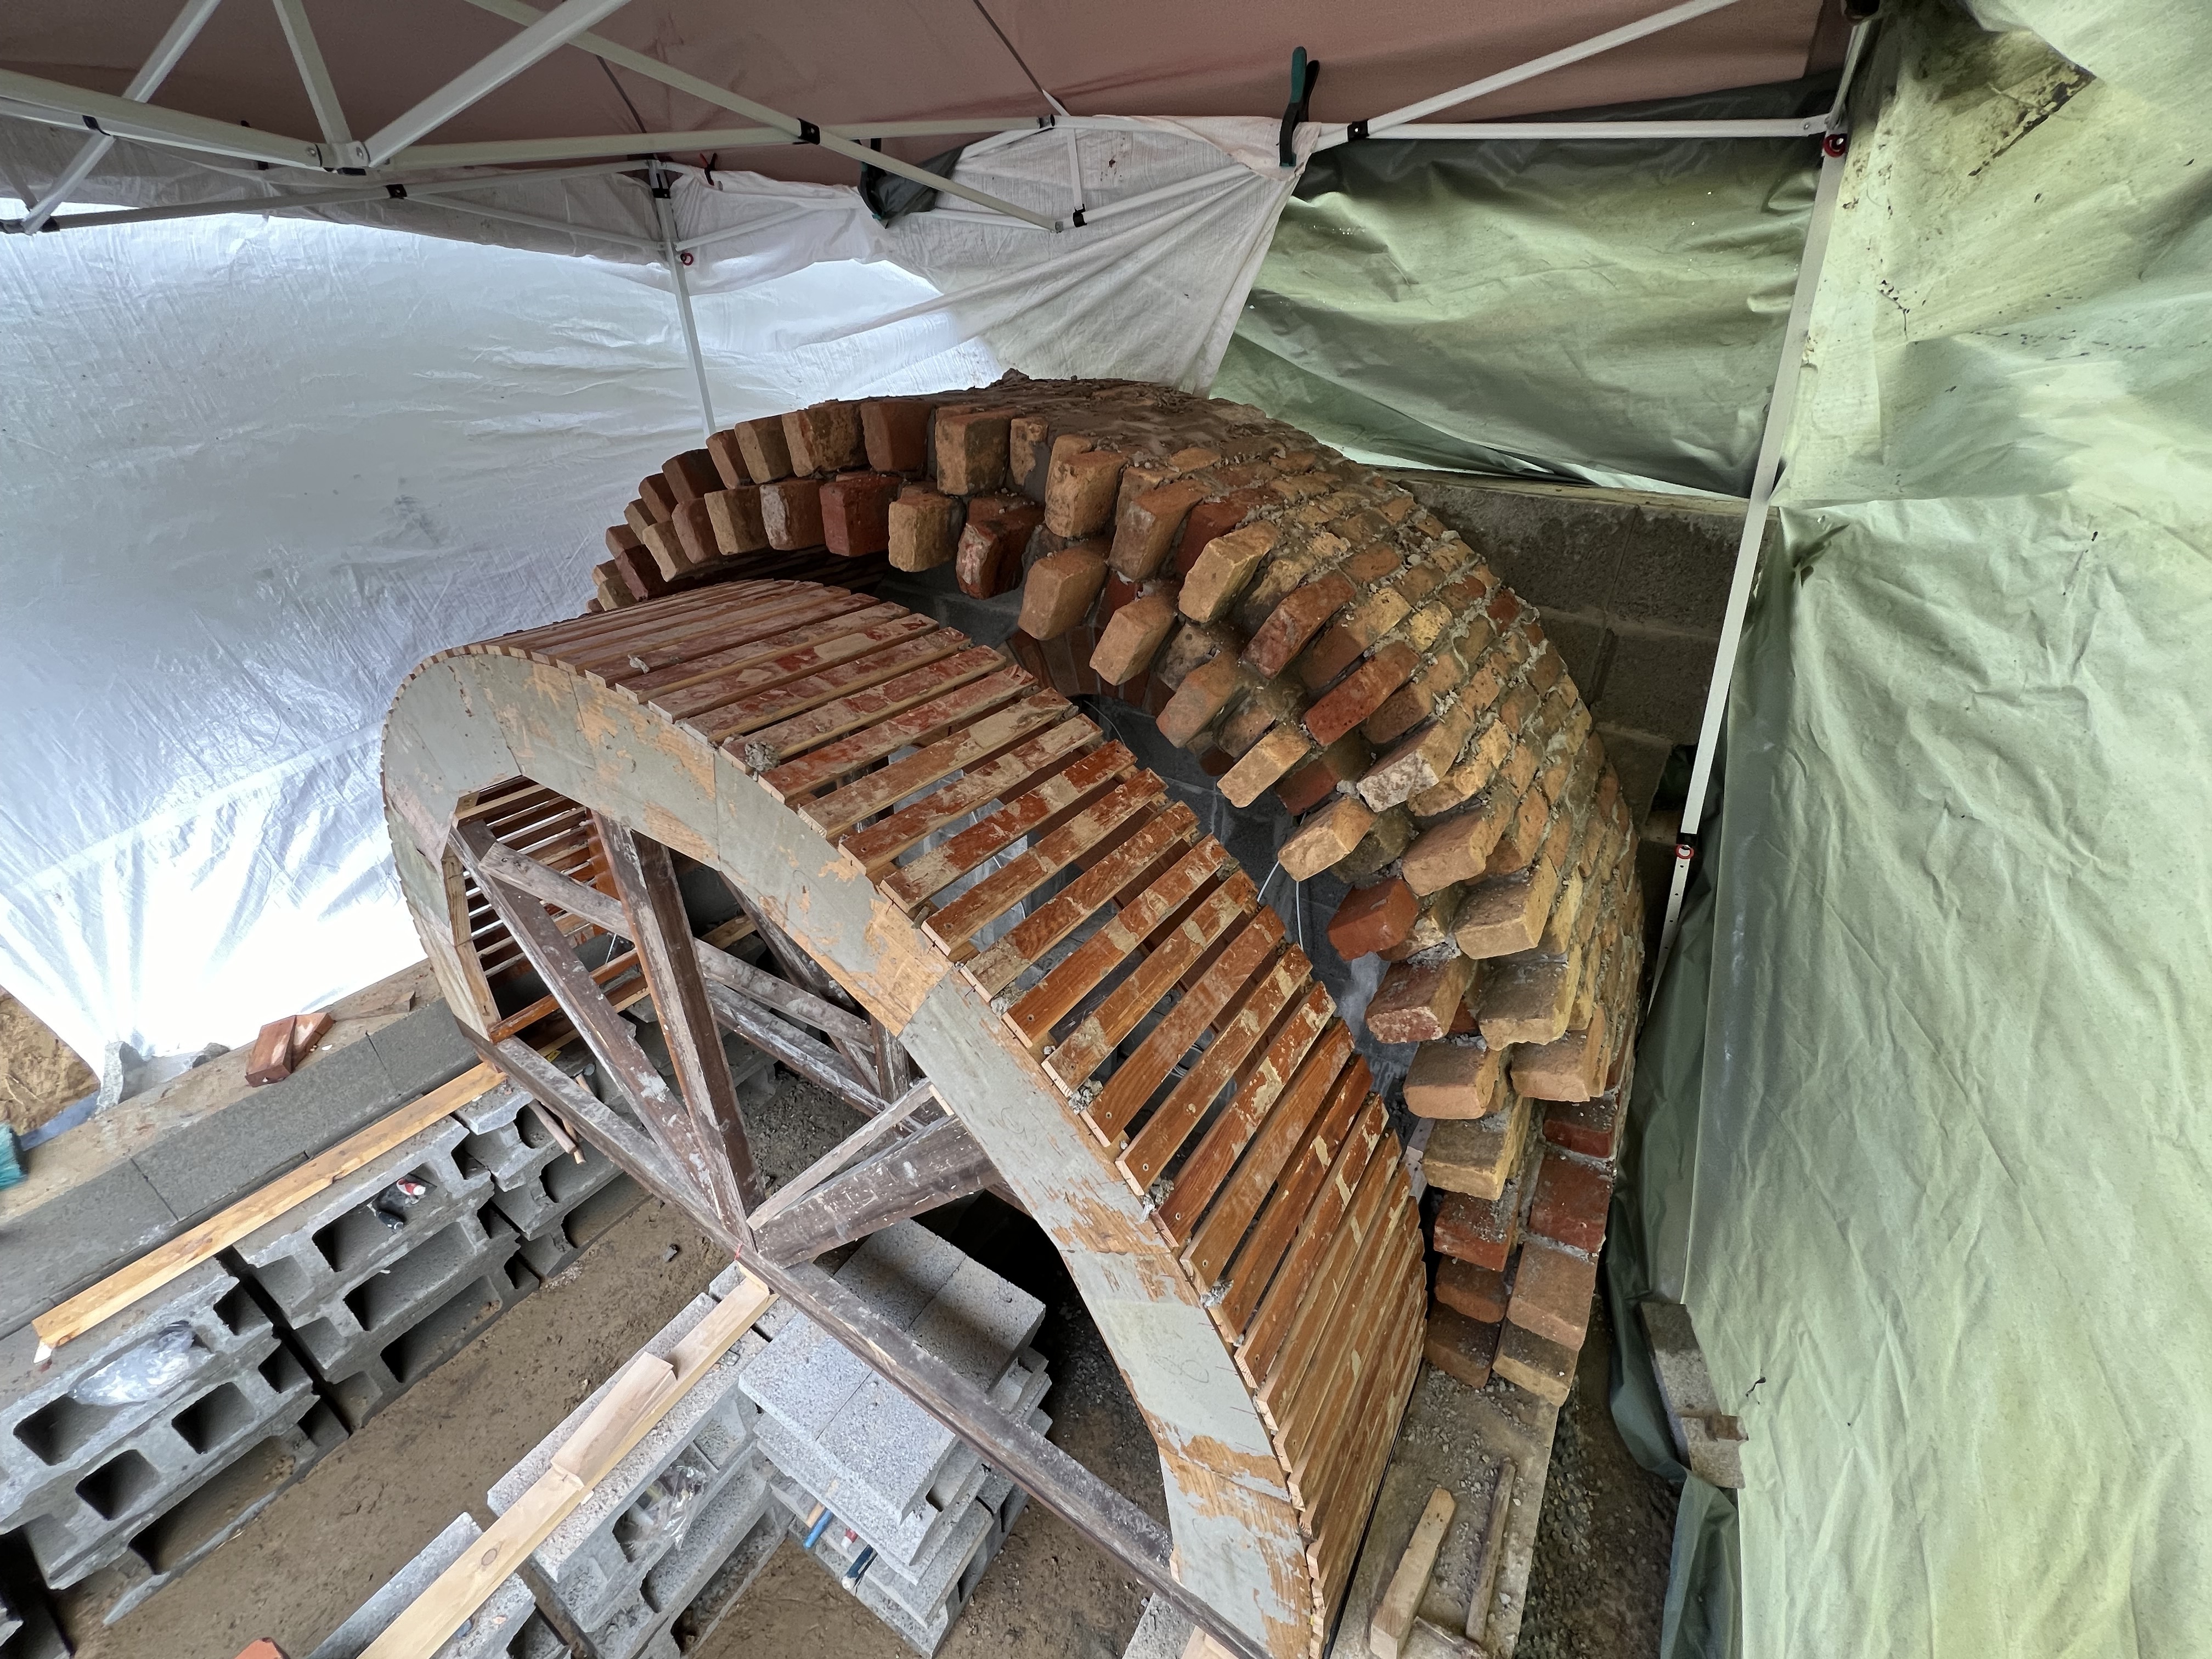
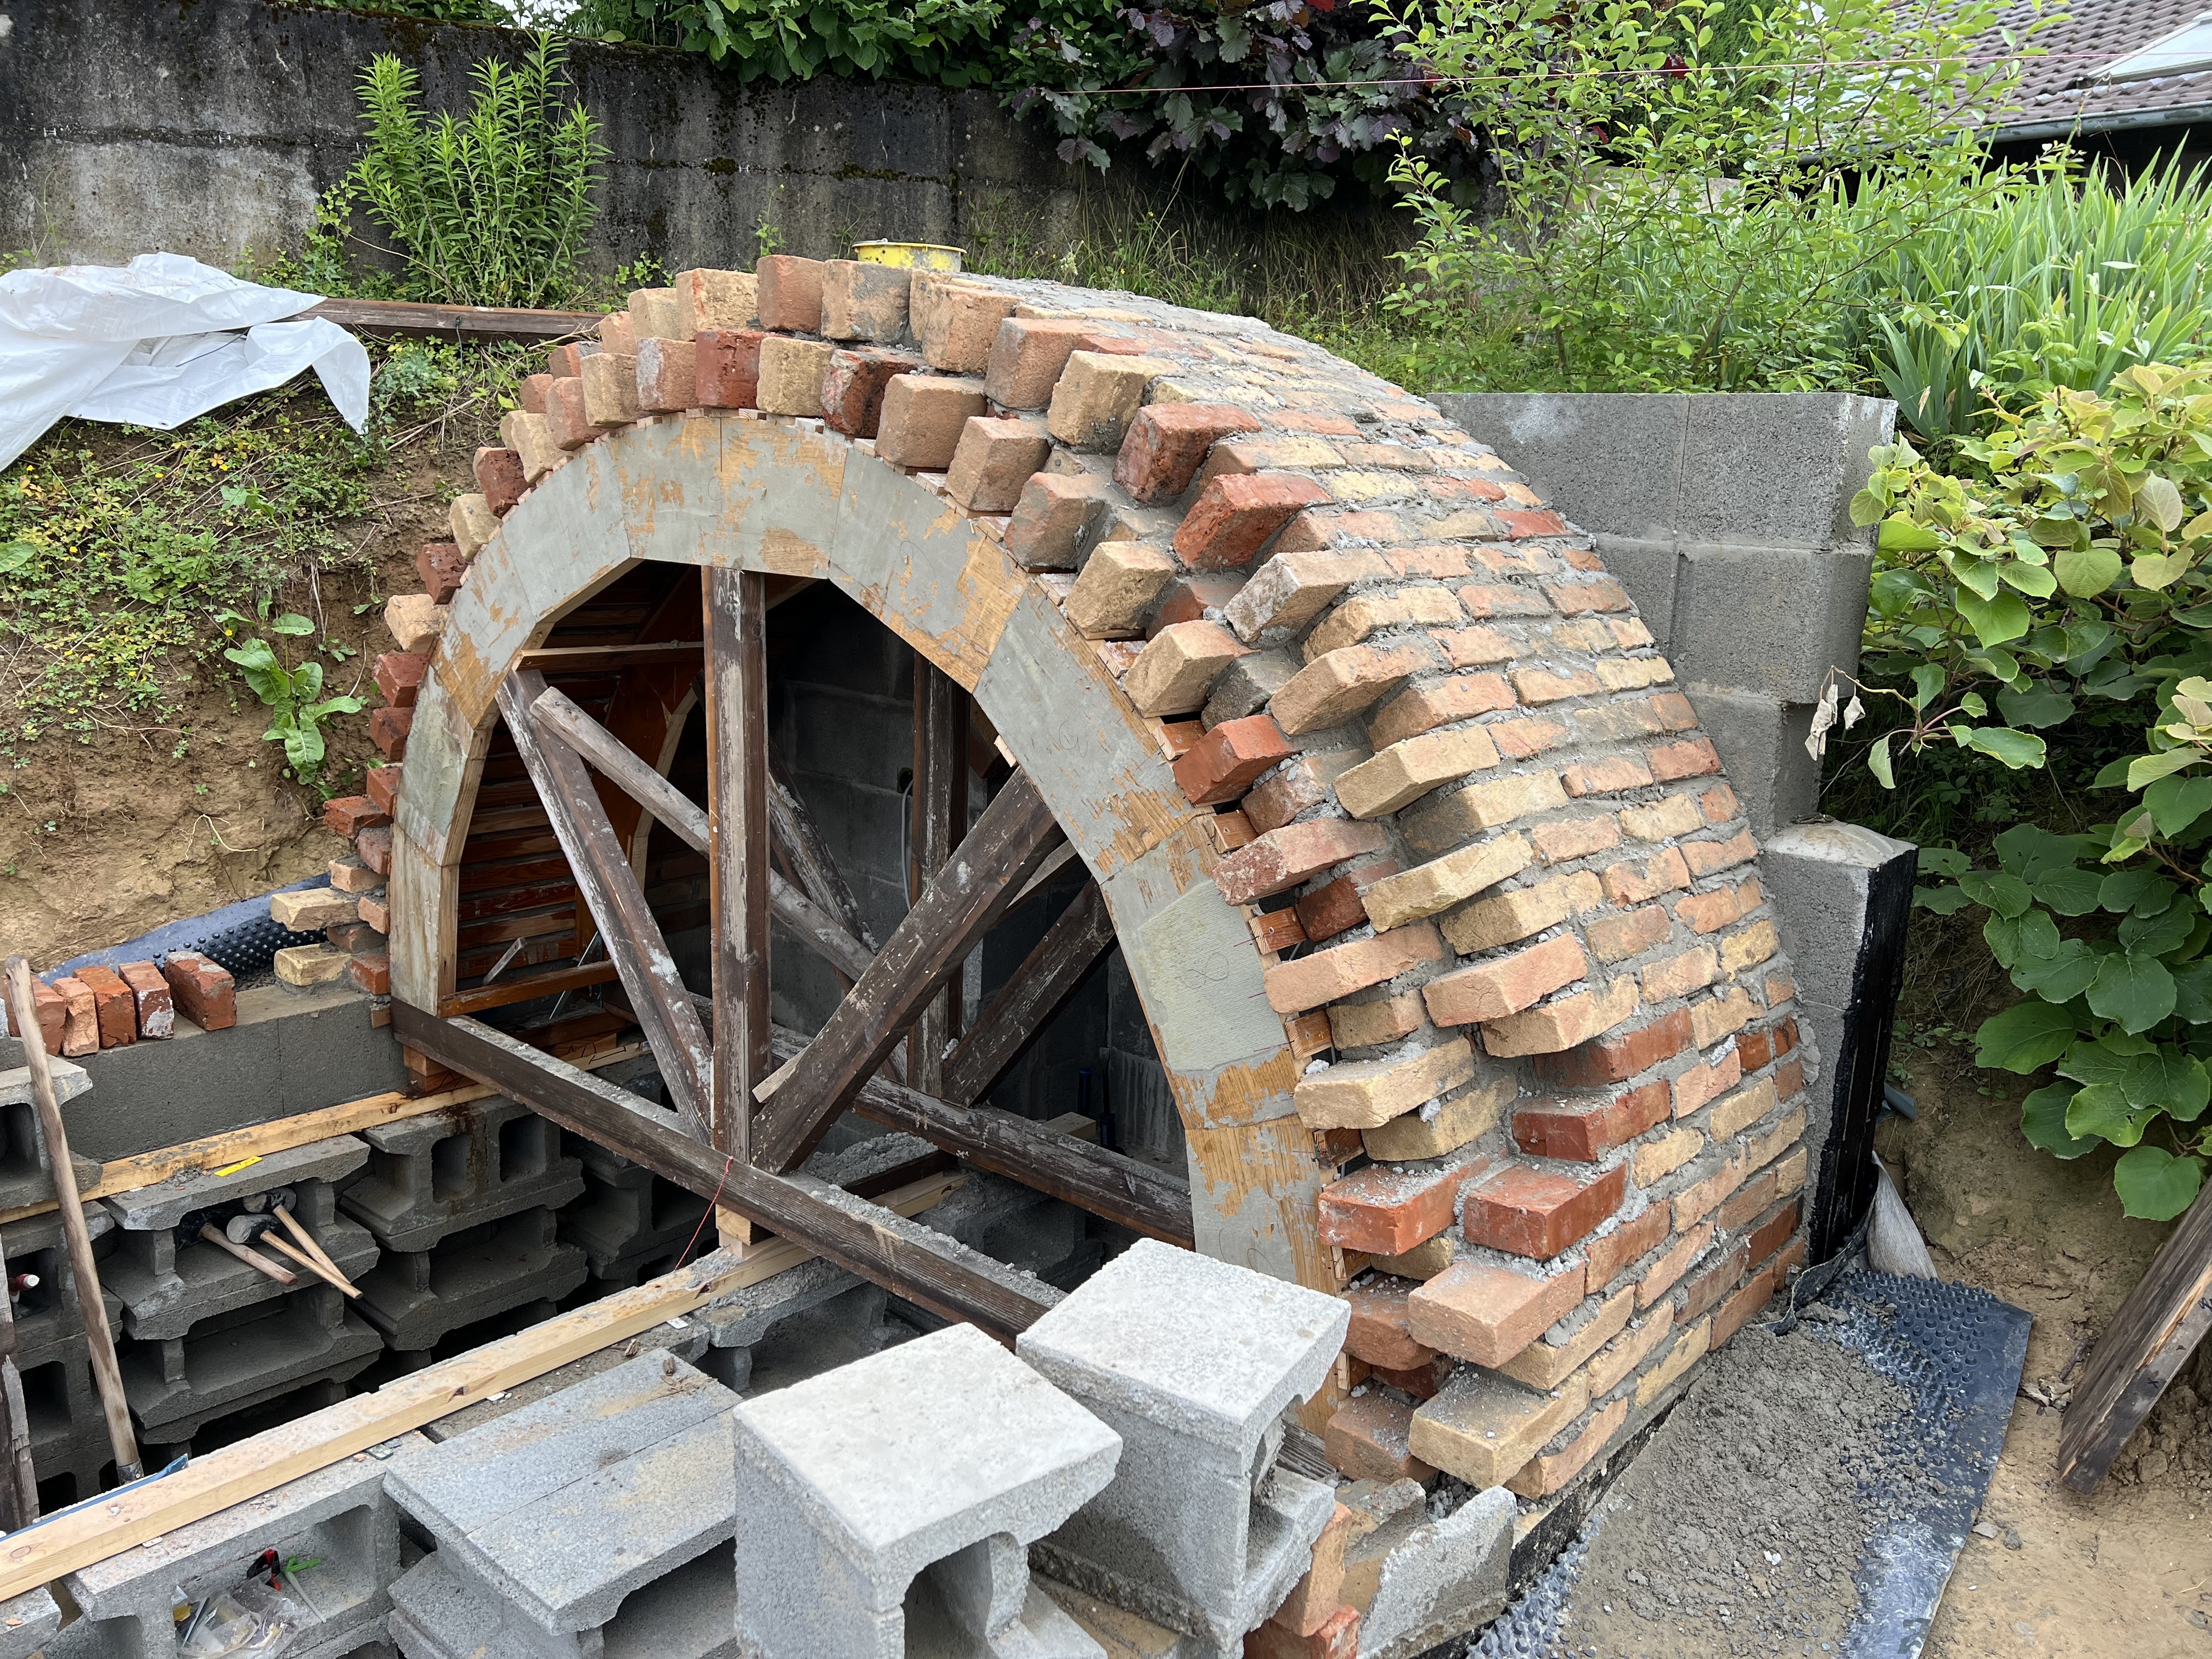
It's been a while, I skipped a couple of weeks to get things going on our project!

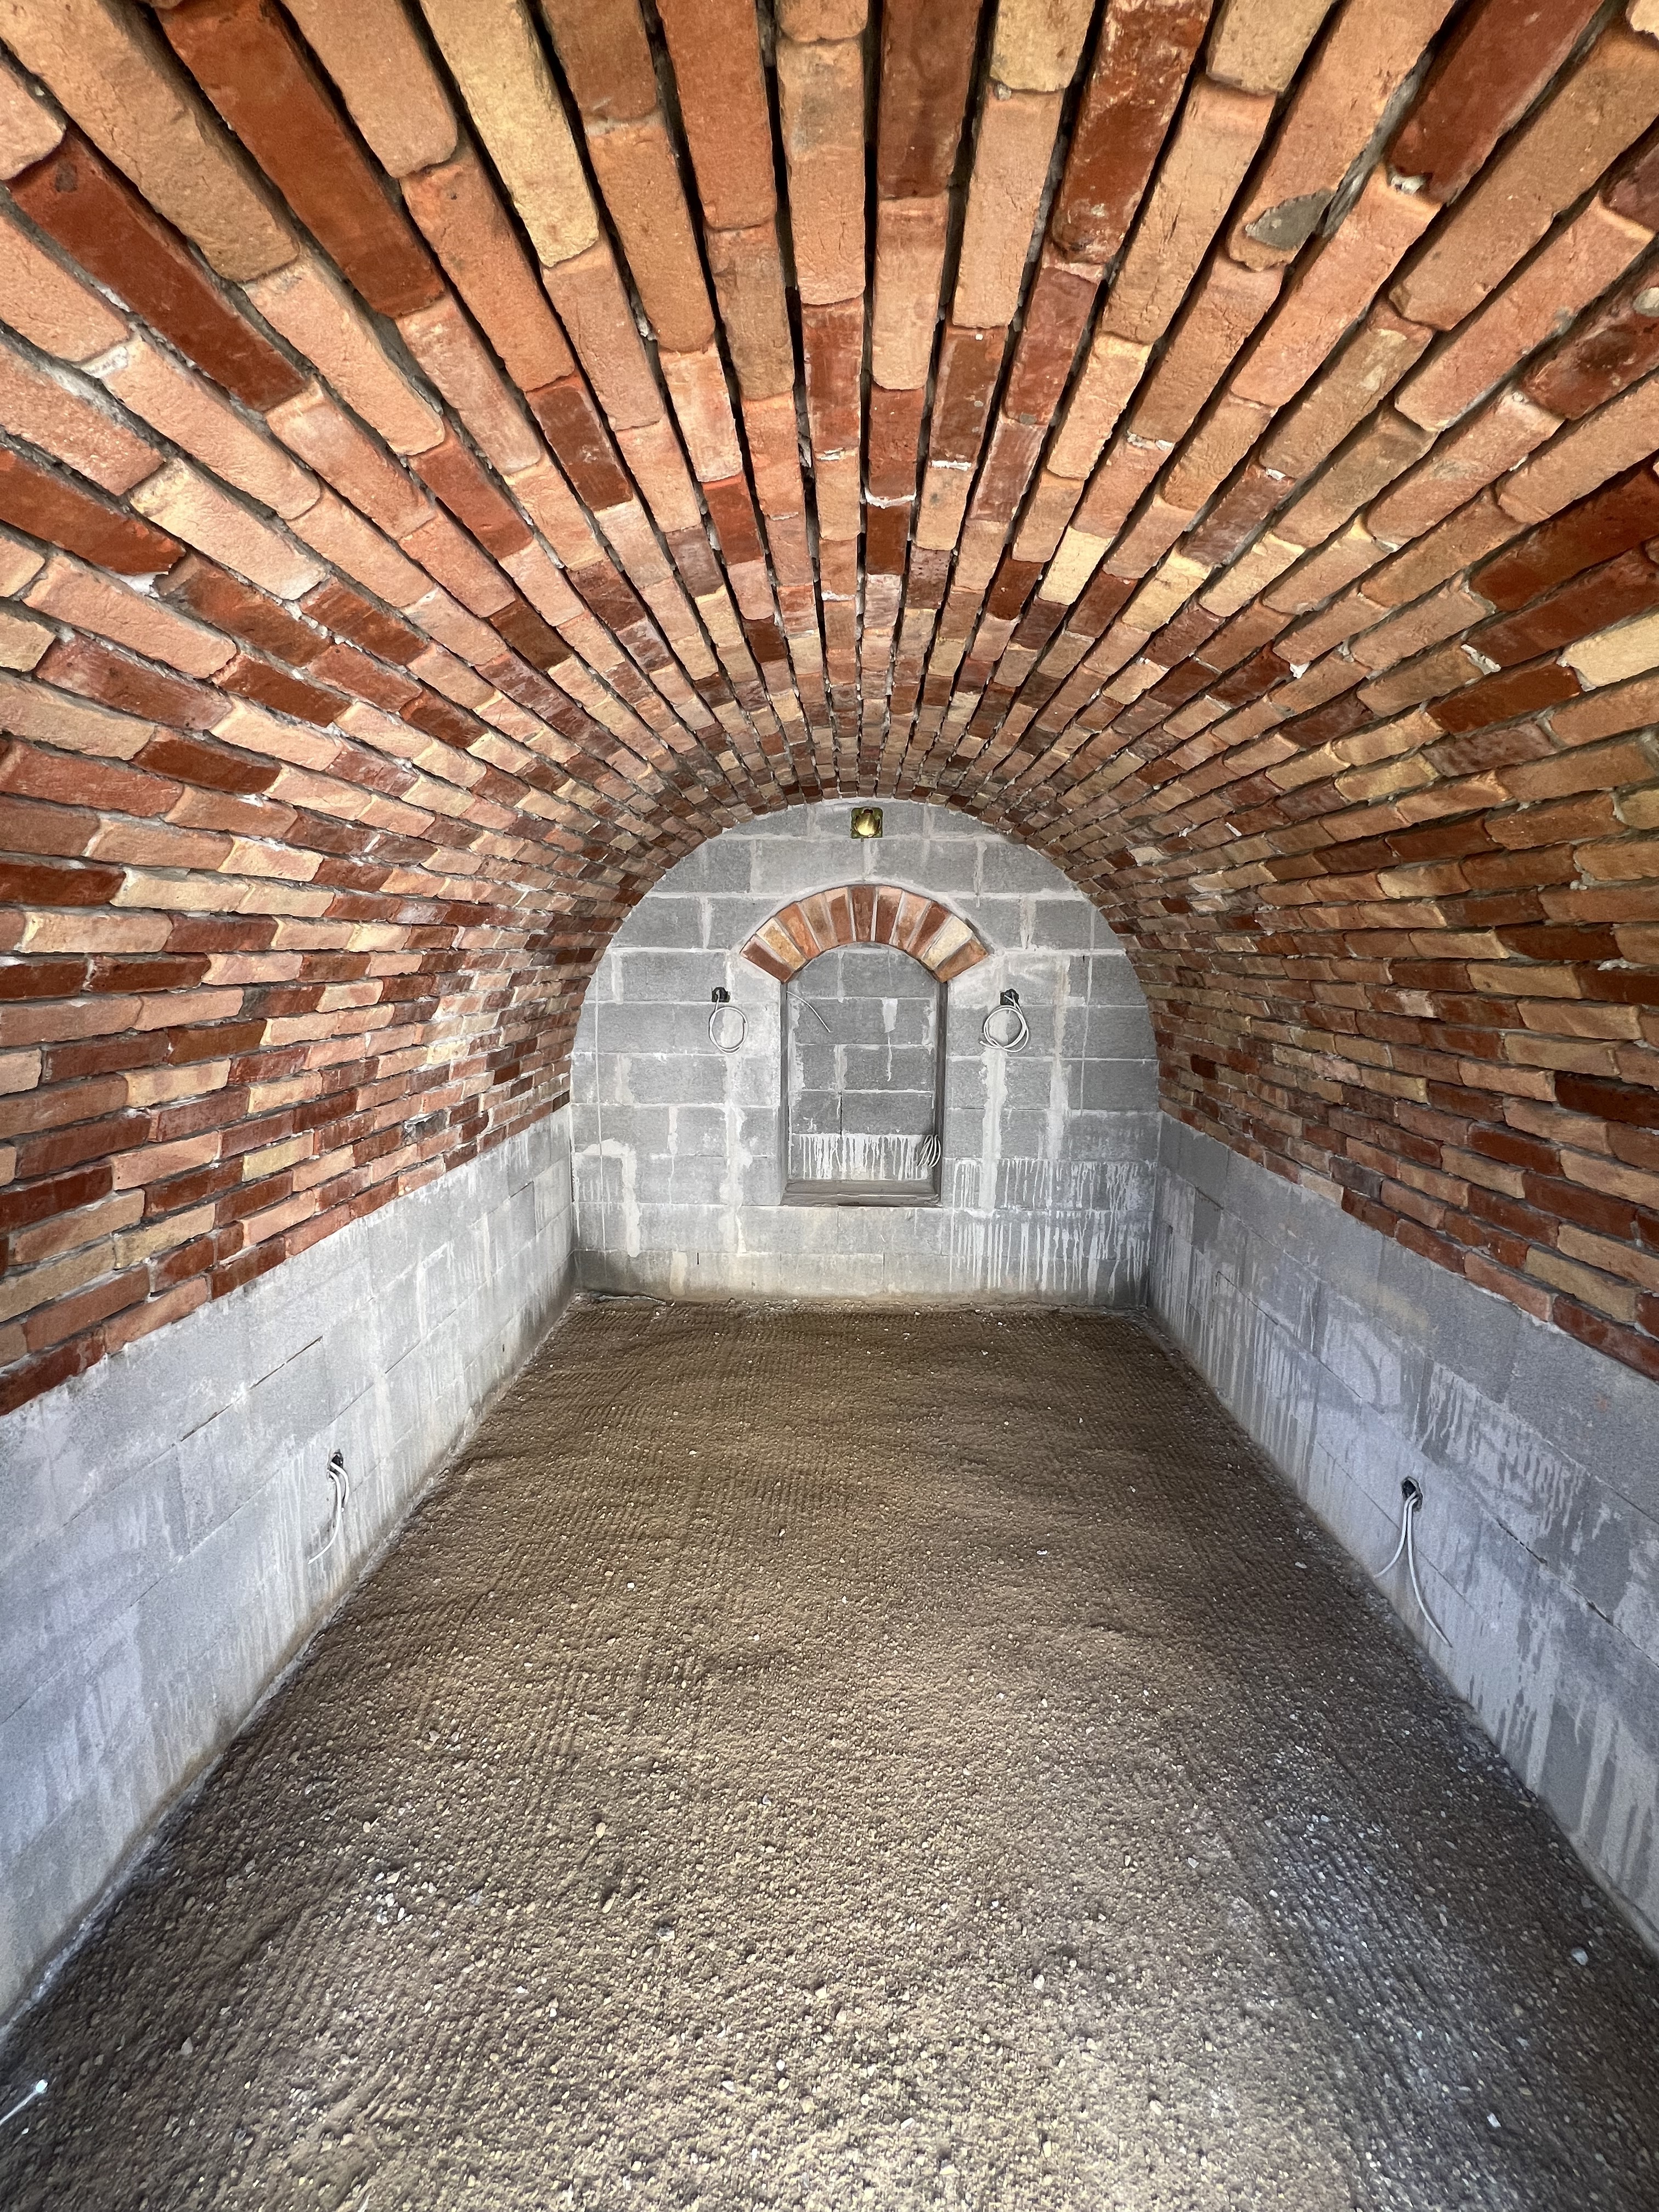
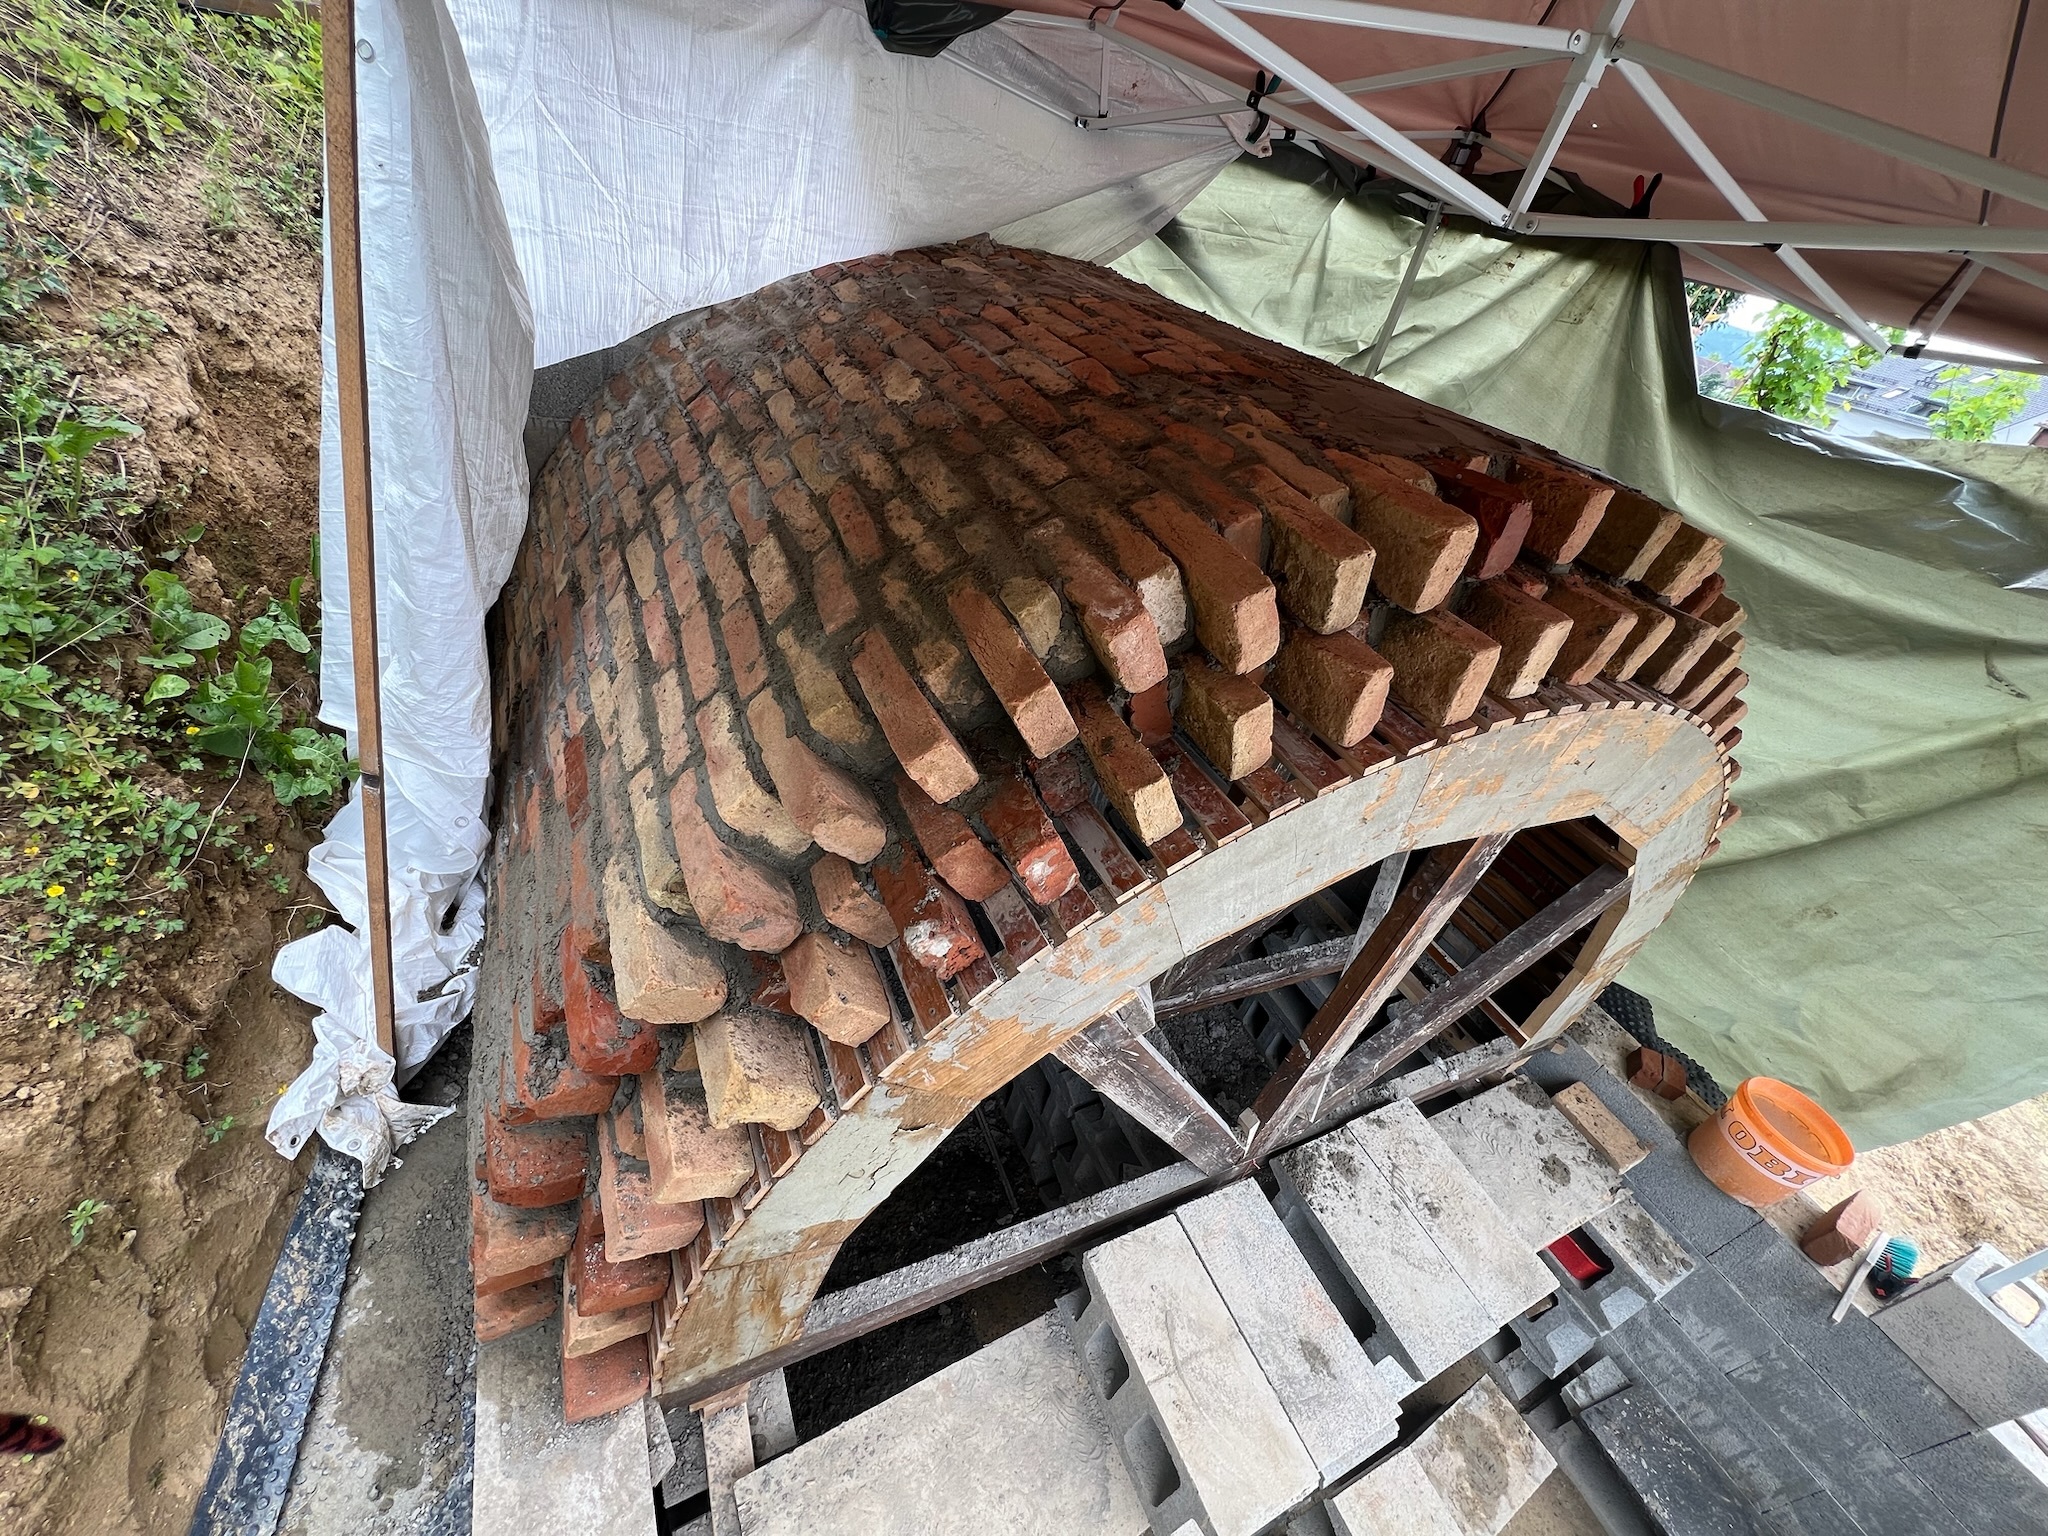
Last time I wrote we had finished 3 slices of the roof. In the meantime, we finished the 4 next ones and completed the roof.

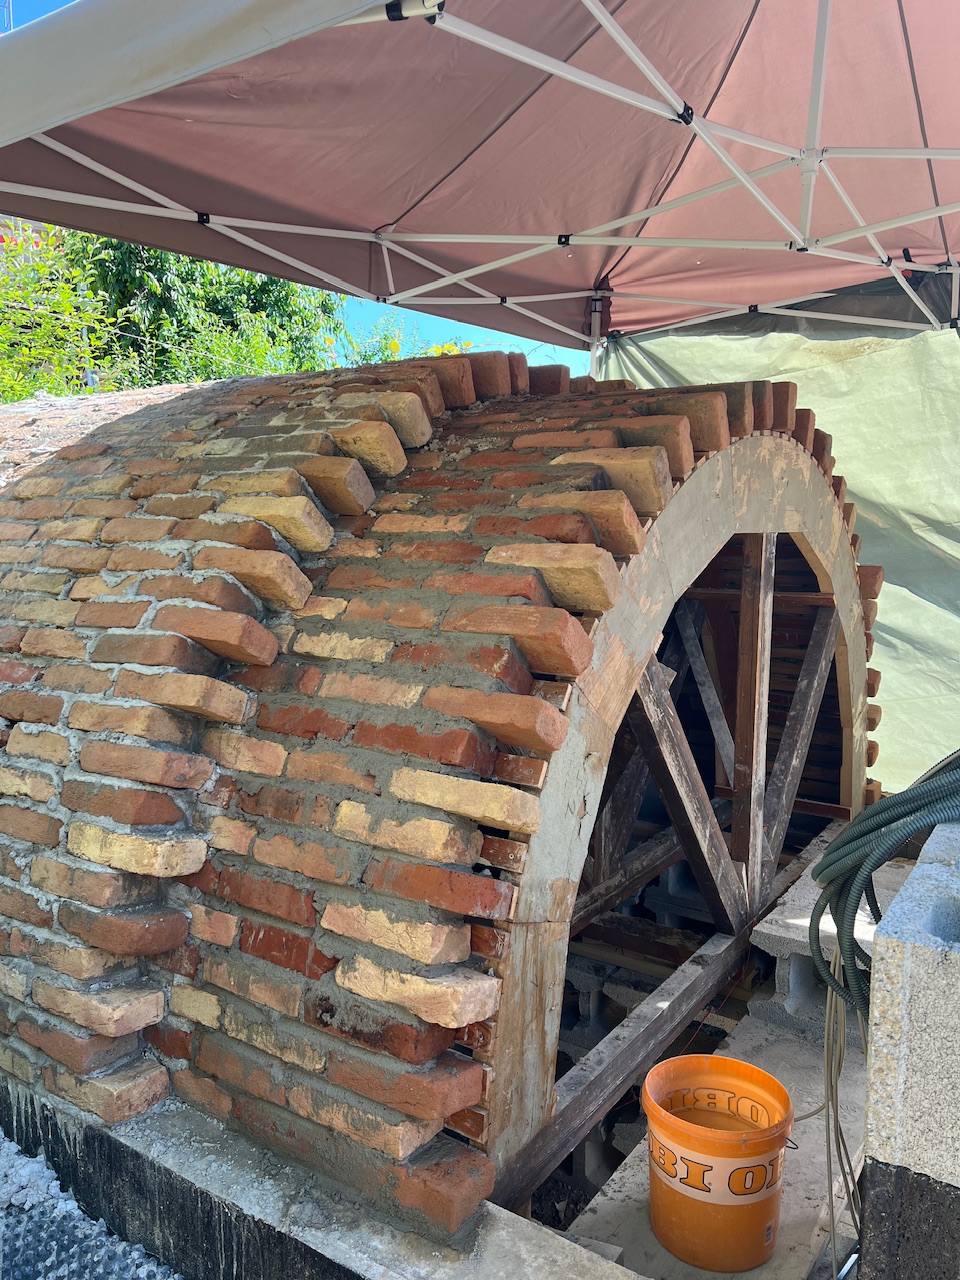
Eventually we were able to do a complete layer in one day, the second one on top the following day, and move the wooden structure the third day.

We held off laying the last slice to finish the front wall (and be eventually able to attach the ceiling to it), making a door lintel out of cinderblocks and reinforced concrete.

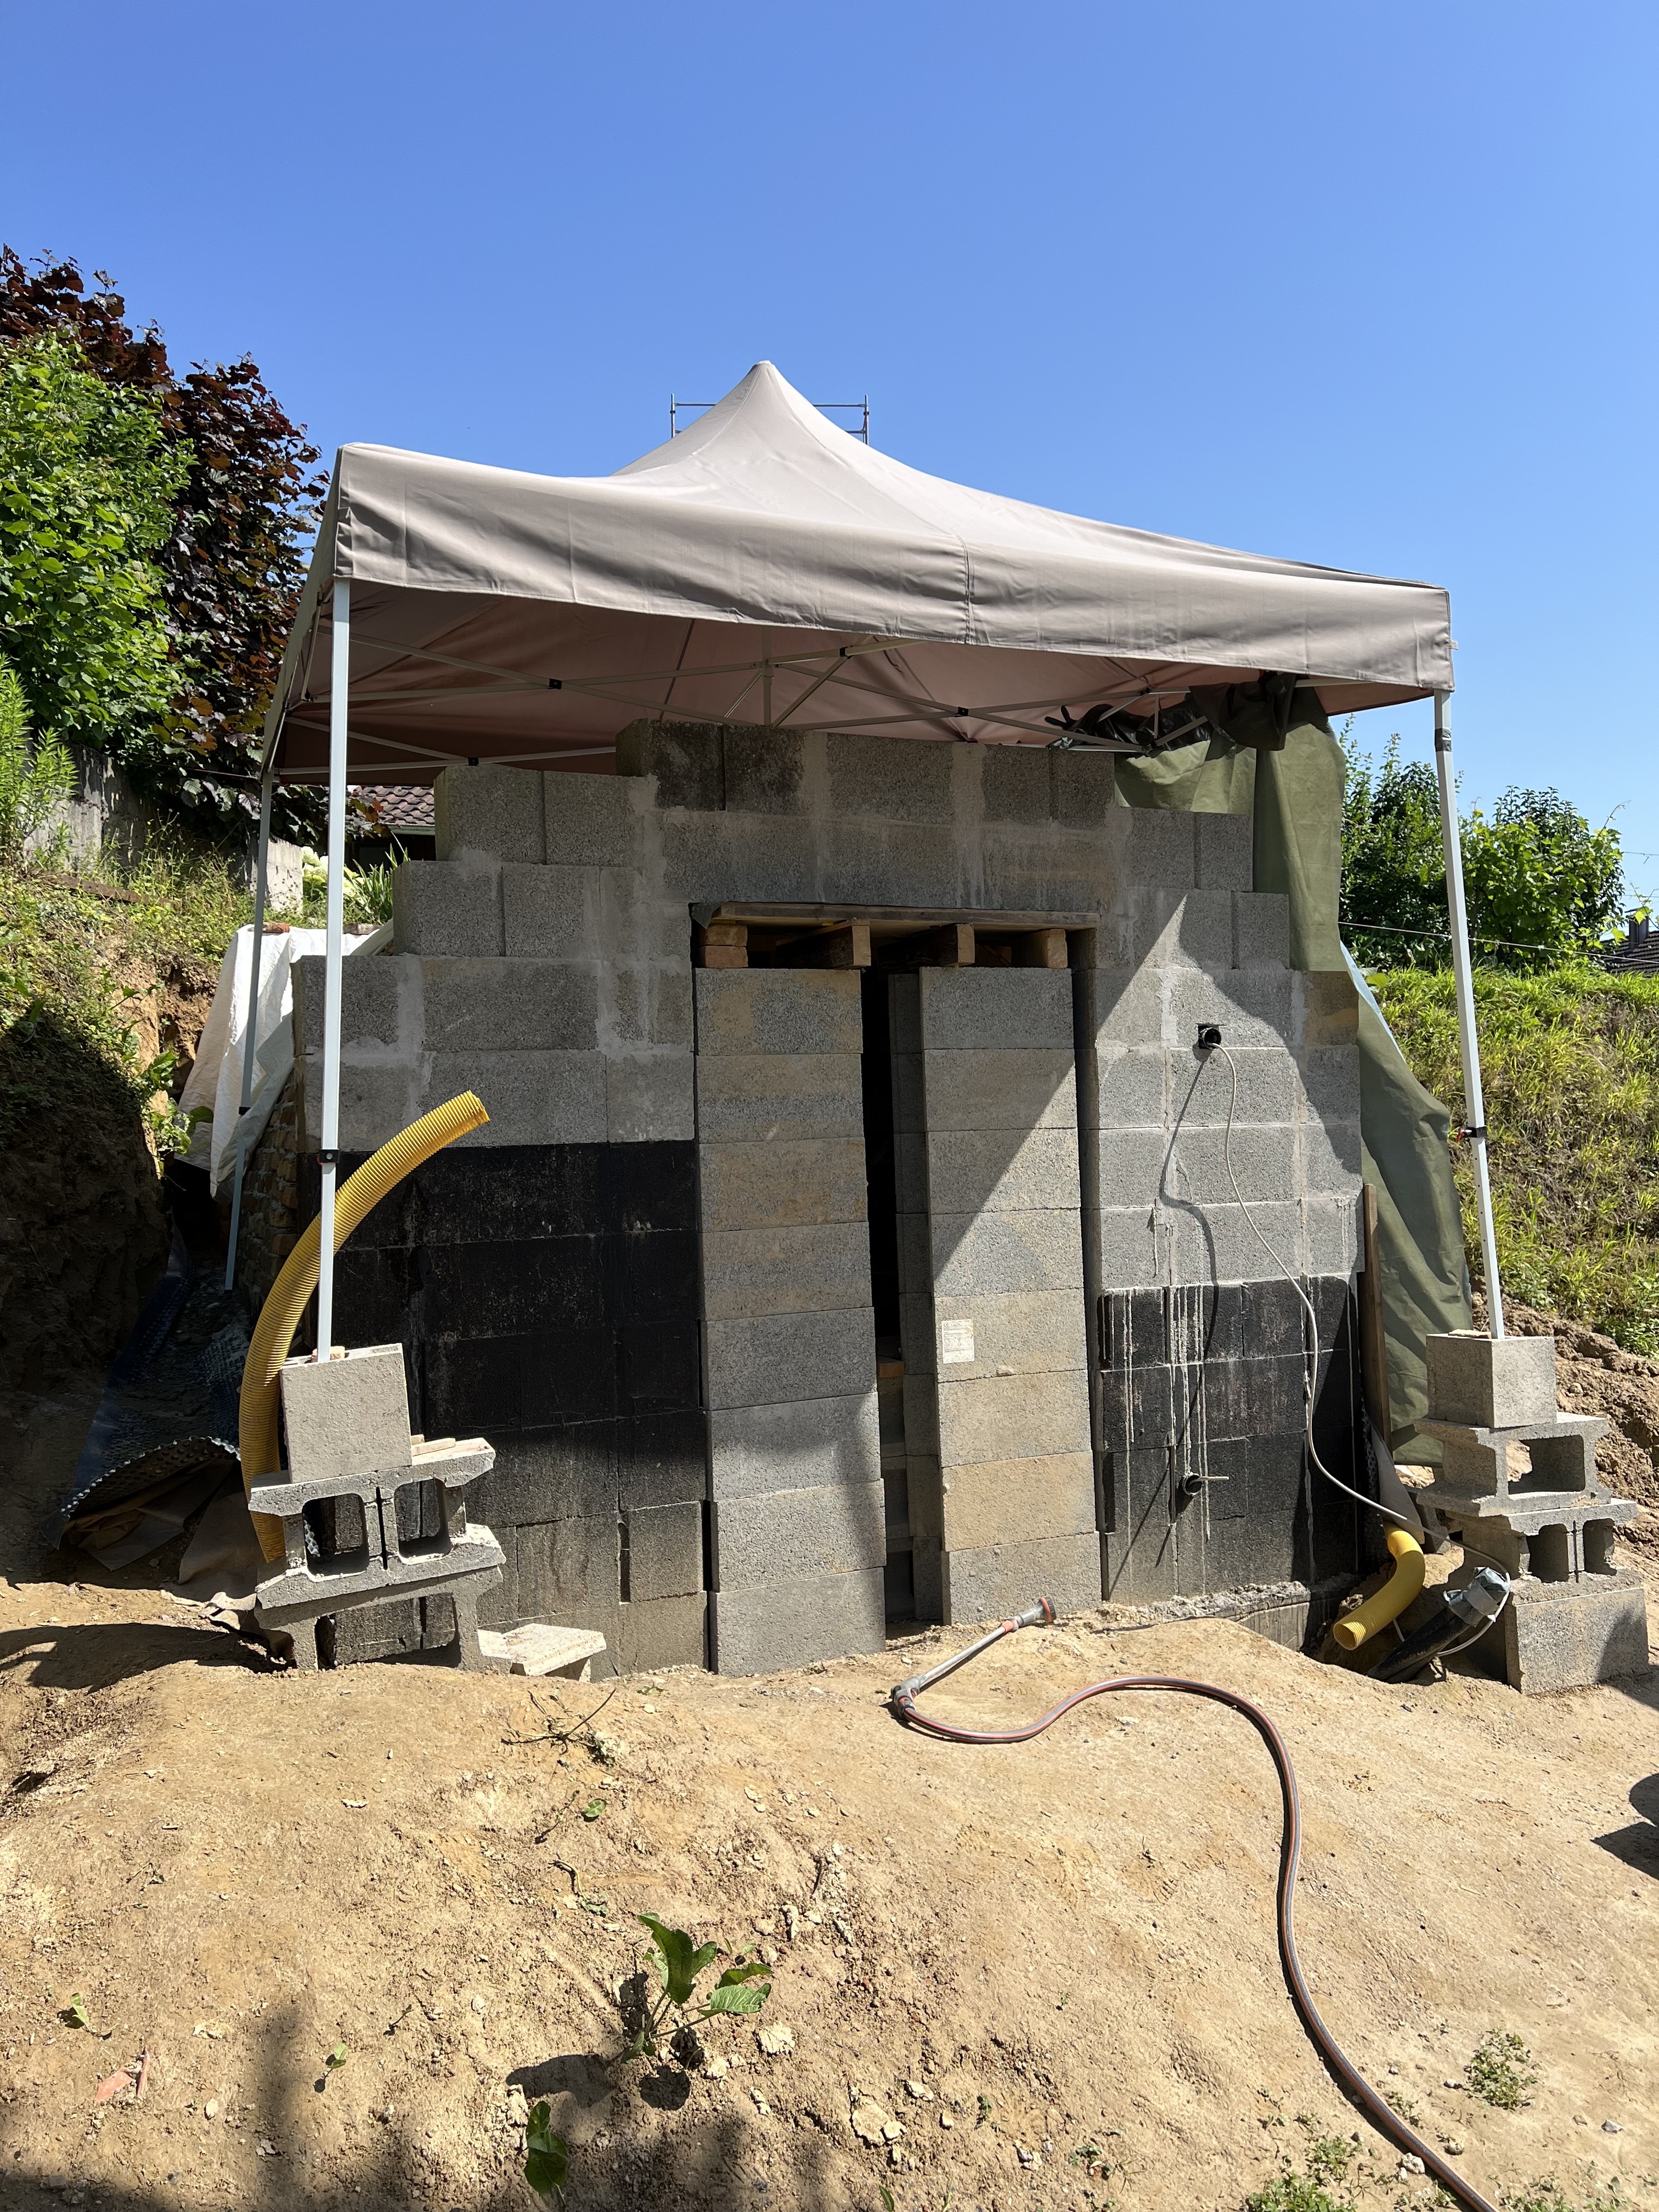
The suspense was high whether we would have enough bricks to finish the project and it turned out we had just 3 extra at the end!

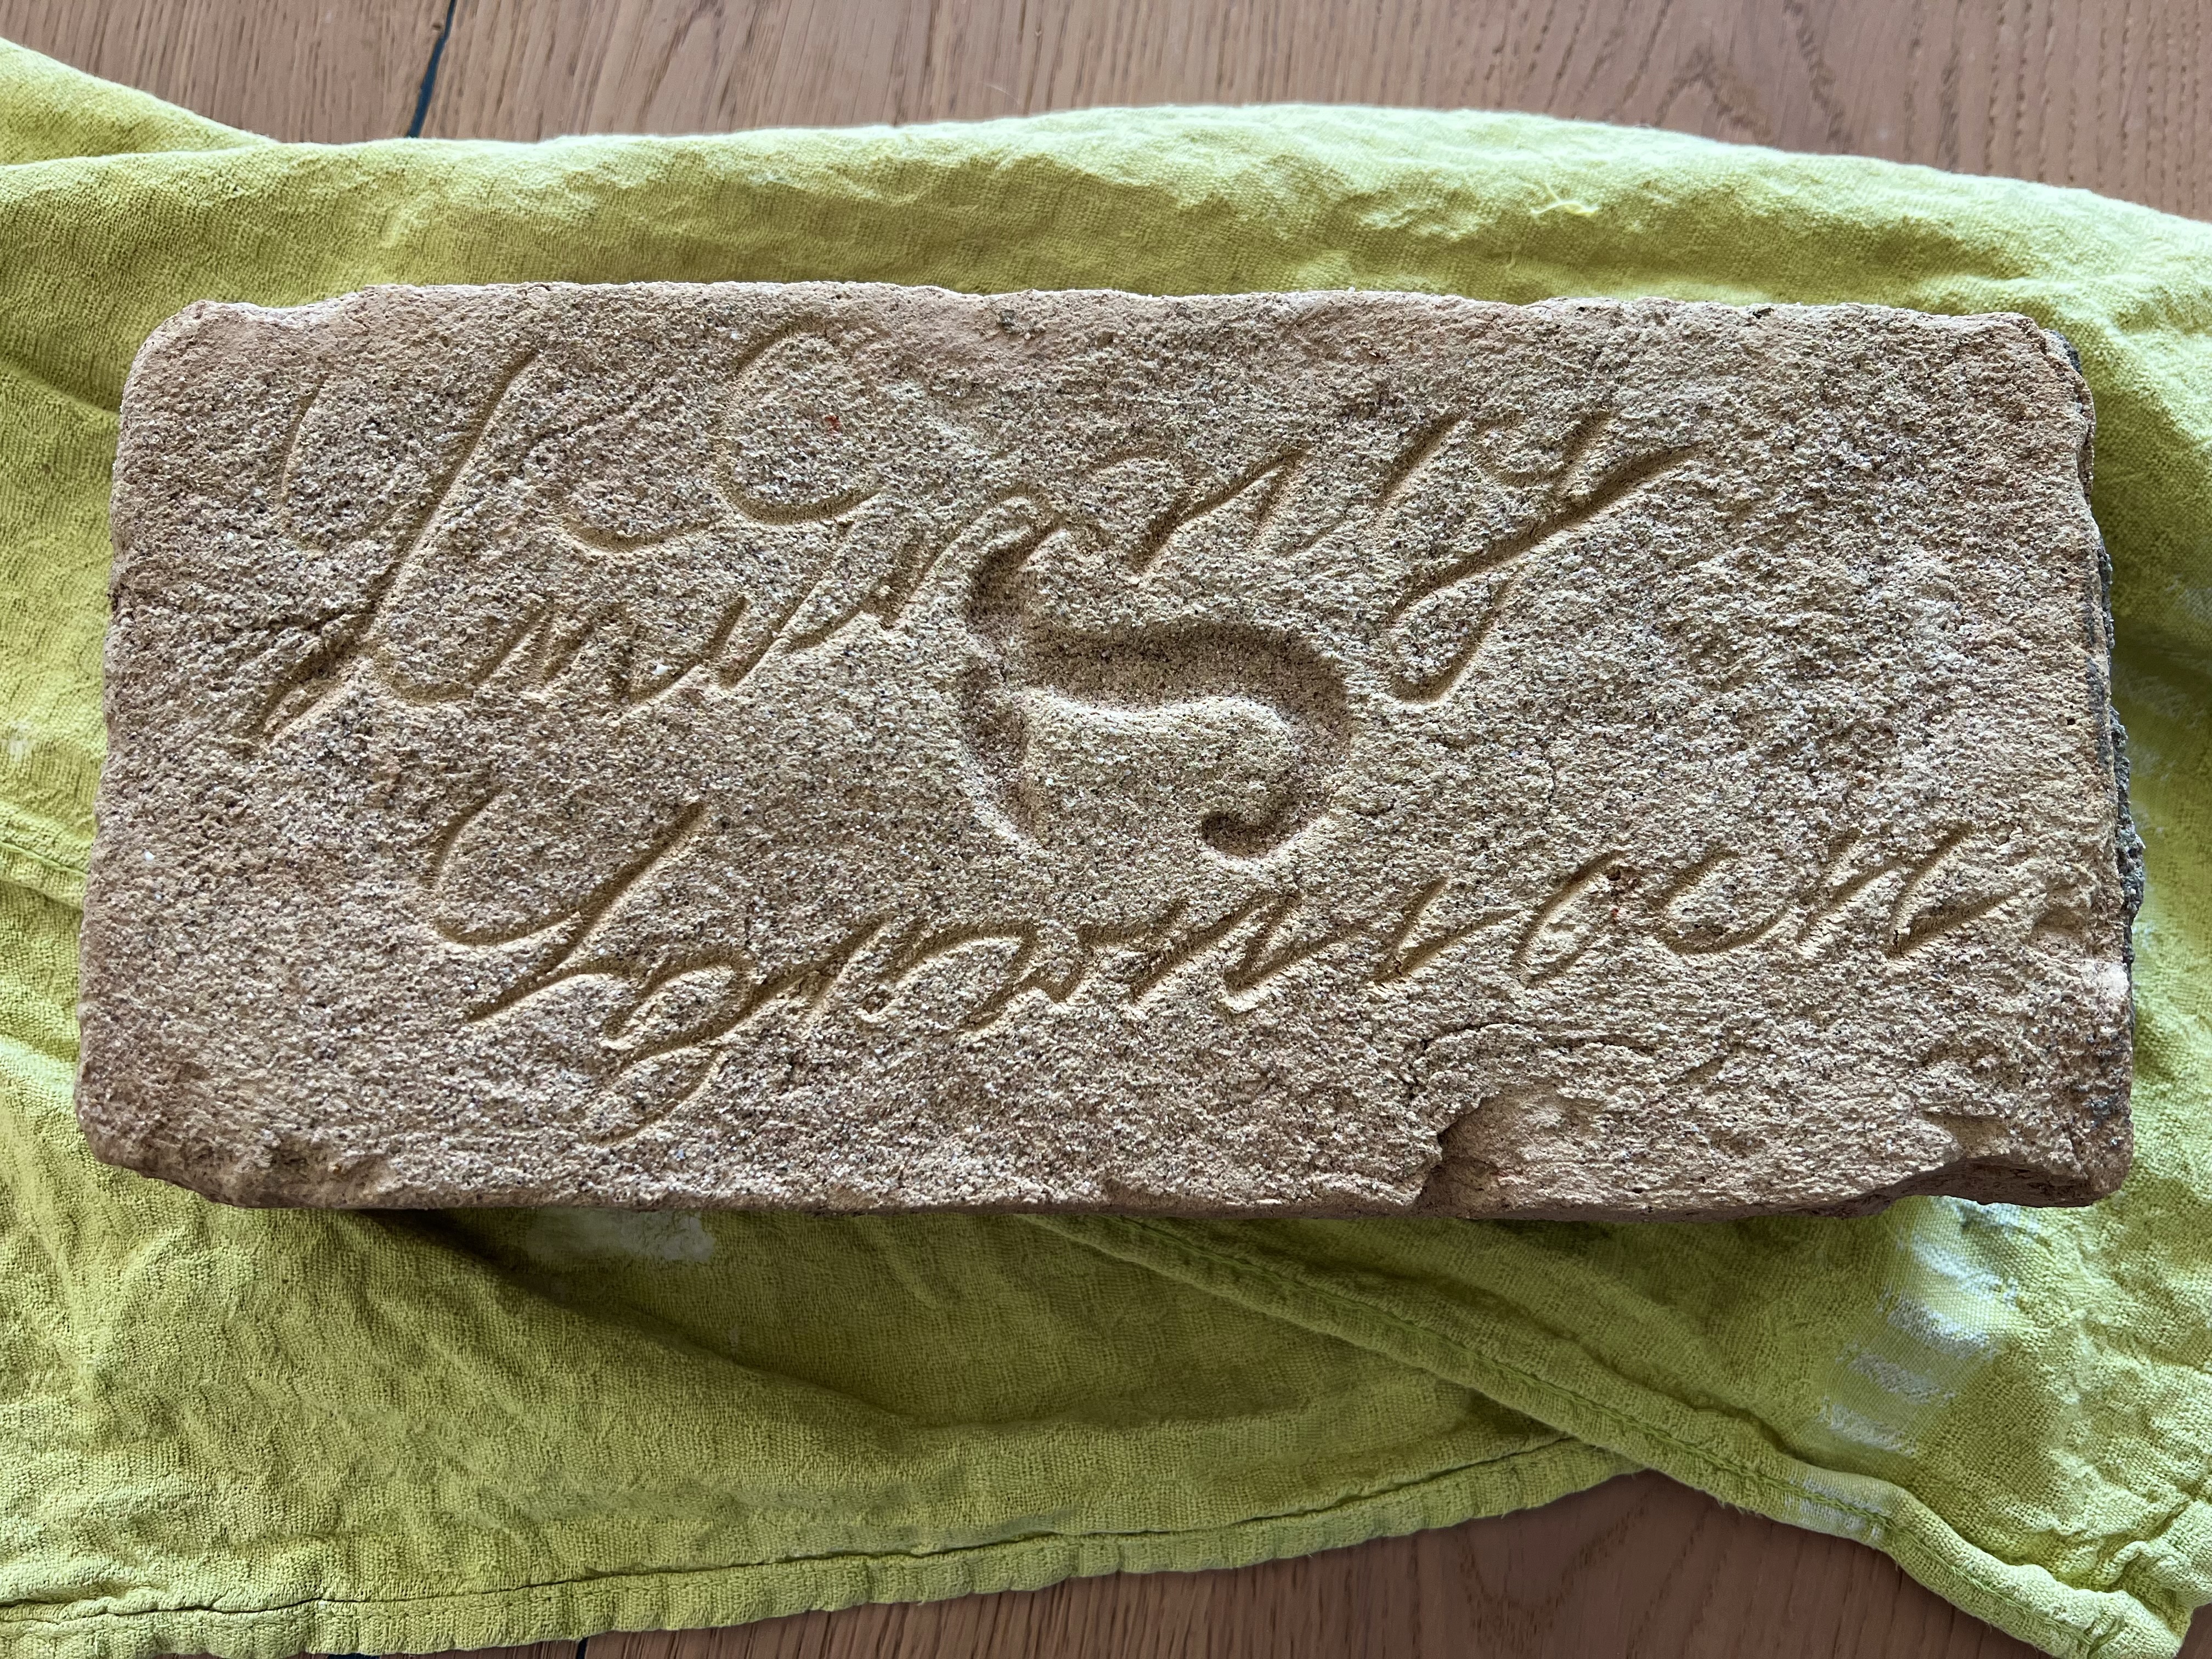
One of the bricks revealed a handwritten signature which turns out to mean "Ludwig Herman". We are still investigating who and when :)

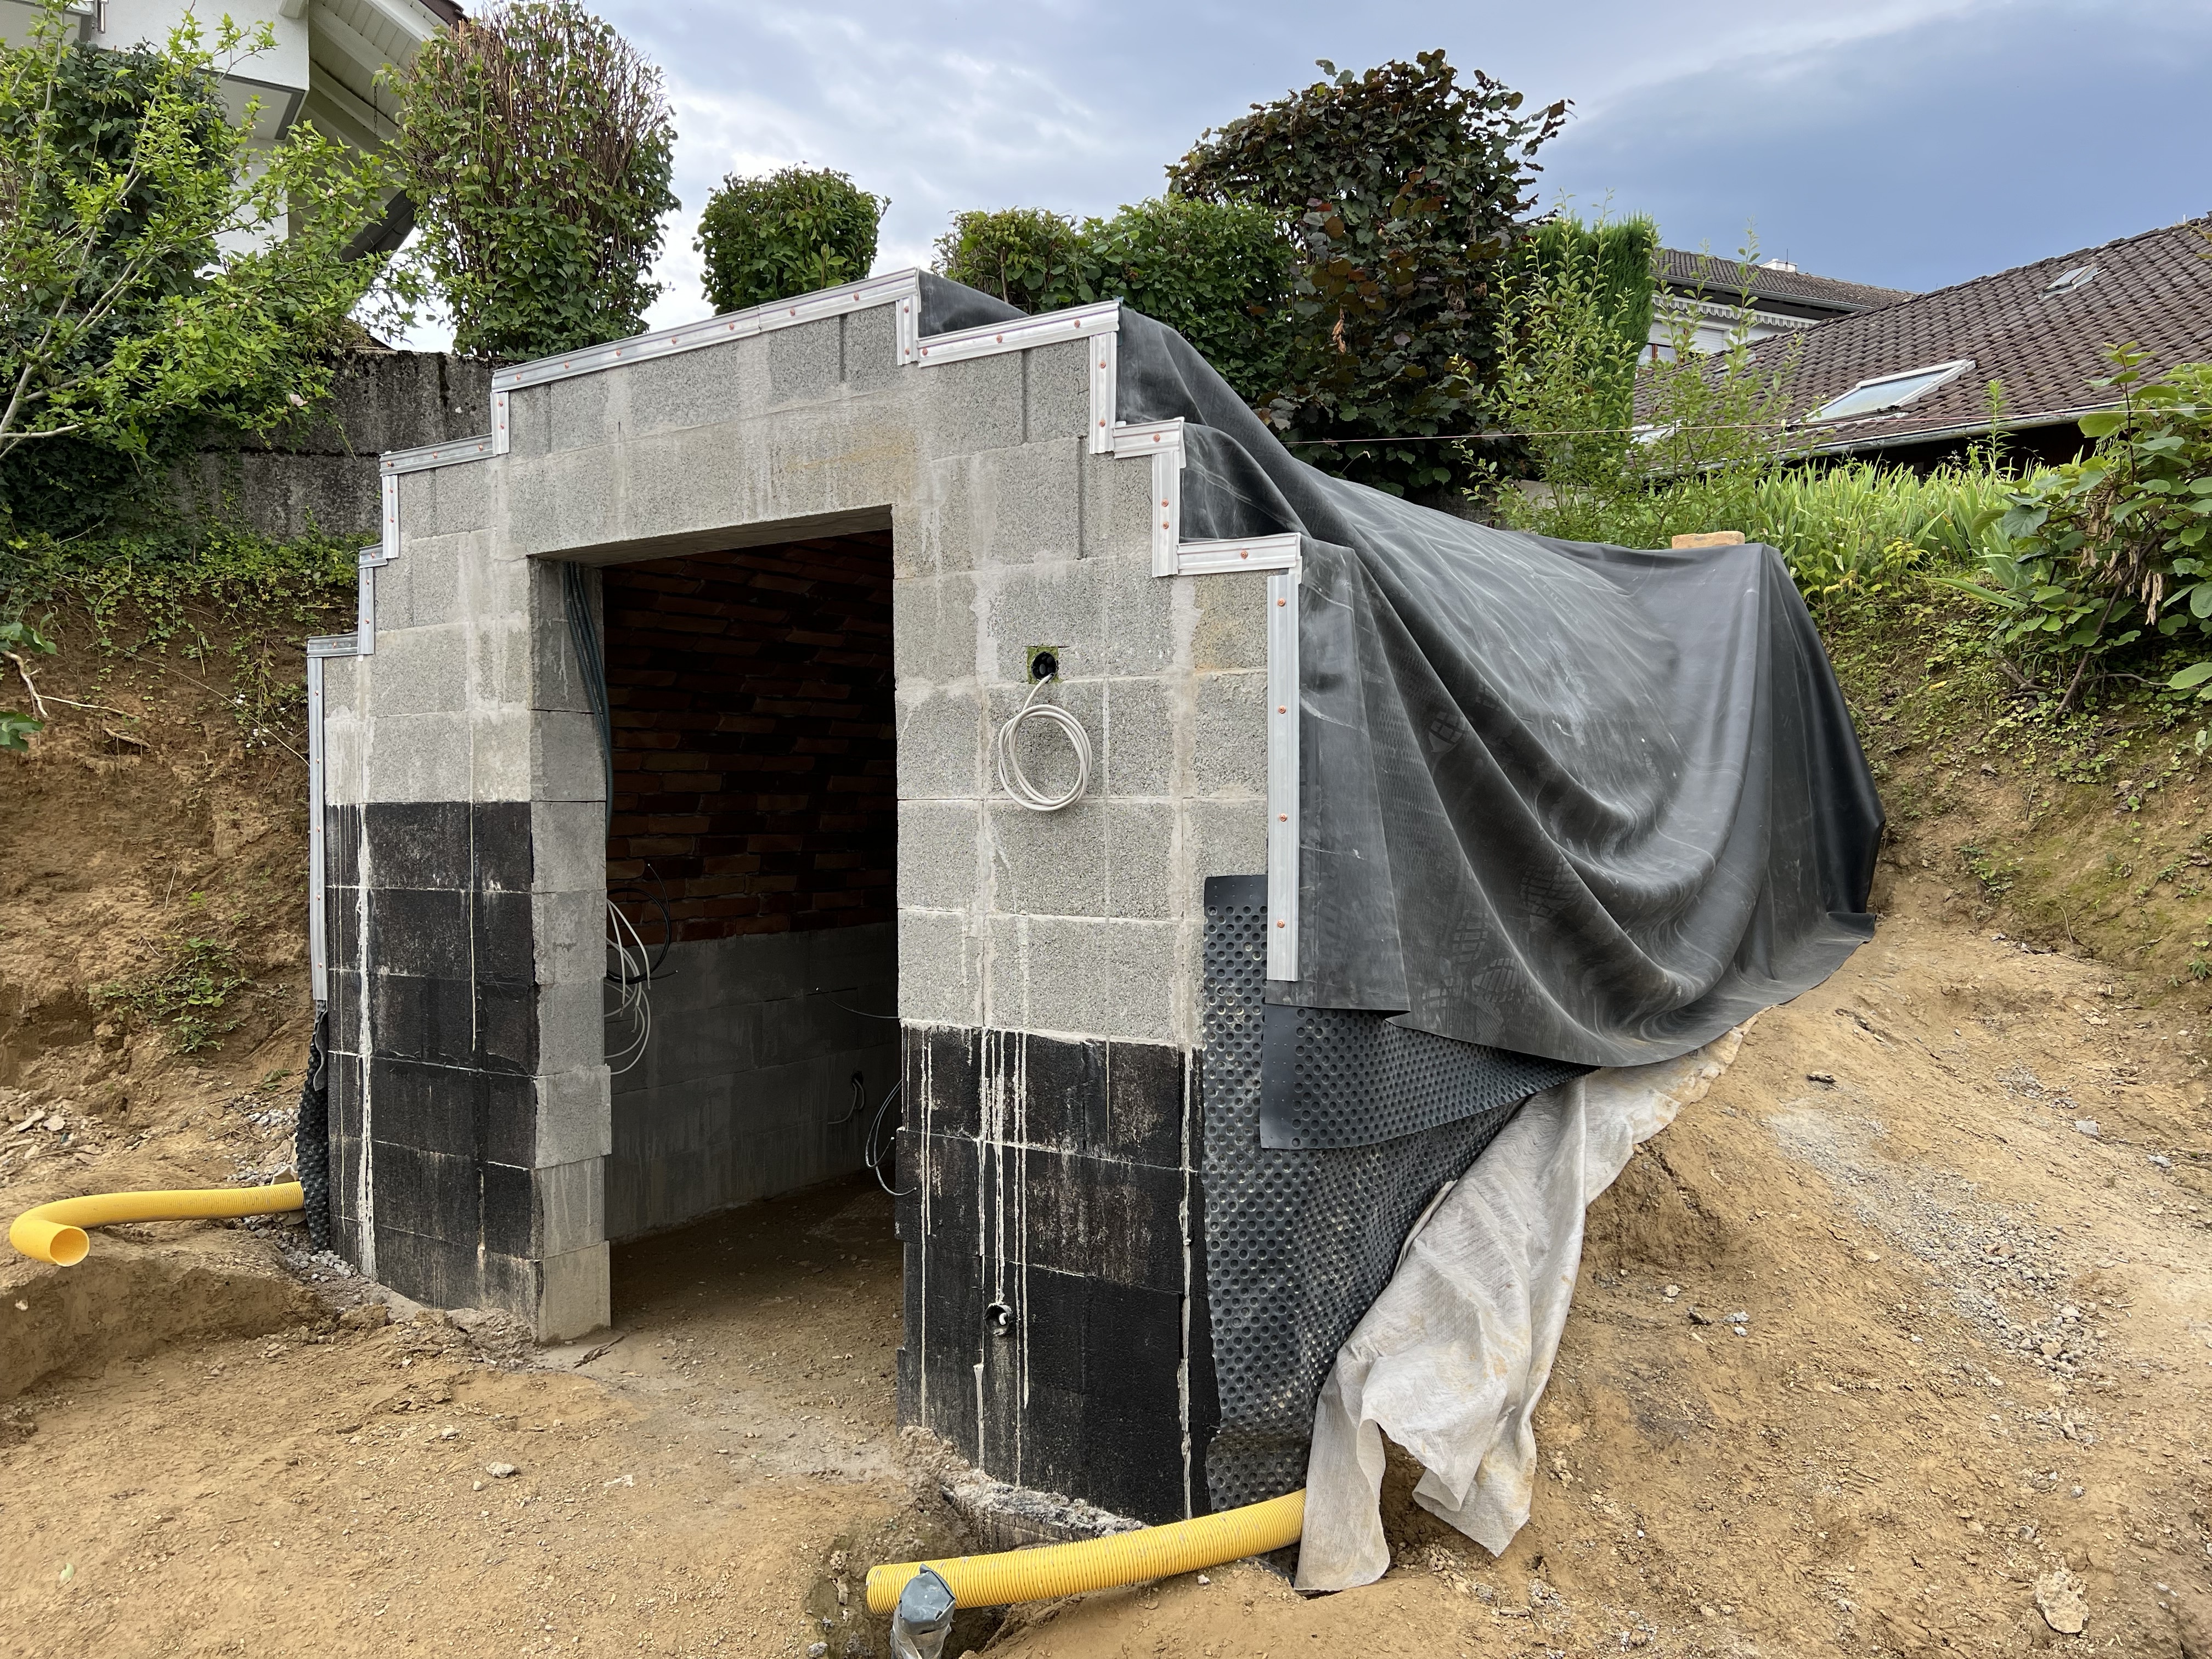
Next, we will spend many hours cleaning the grout from the inside to free the bricks and make nice regular joints. Then we will insulate the outside with a pond liner and cover the root cellar under a thick layer of dirt.

See you soon!

21
103
submitted 8 months ago* (last edited 7 months ago) by morgunkorn@discuss.tchncs.de to c/diy


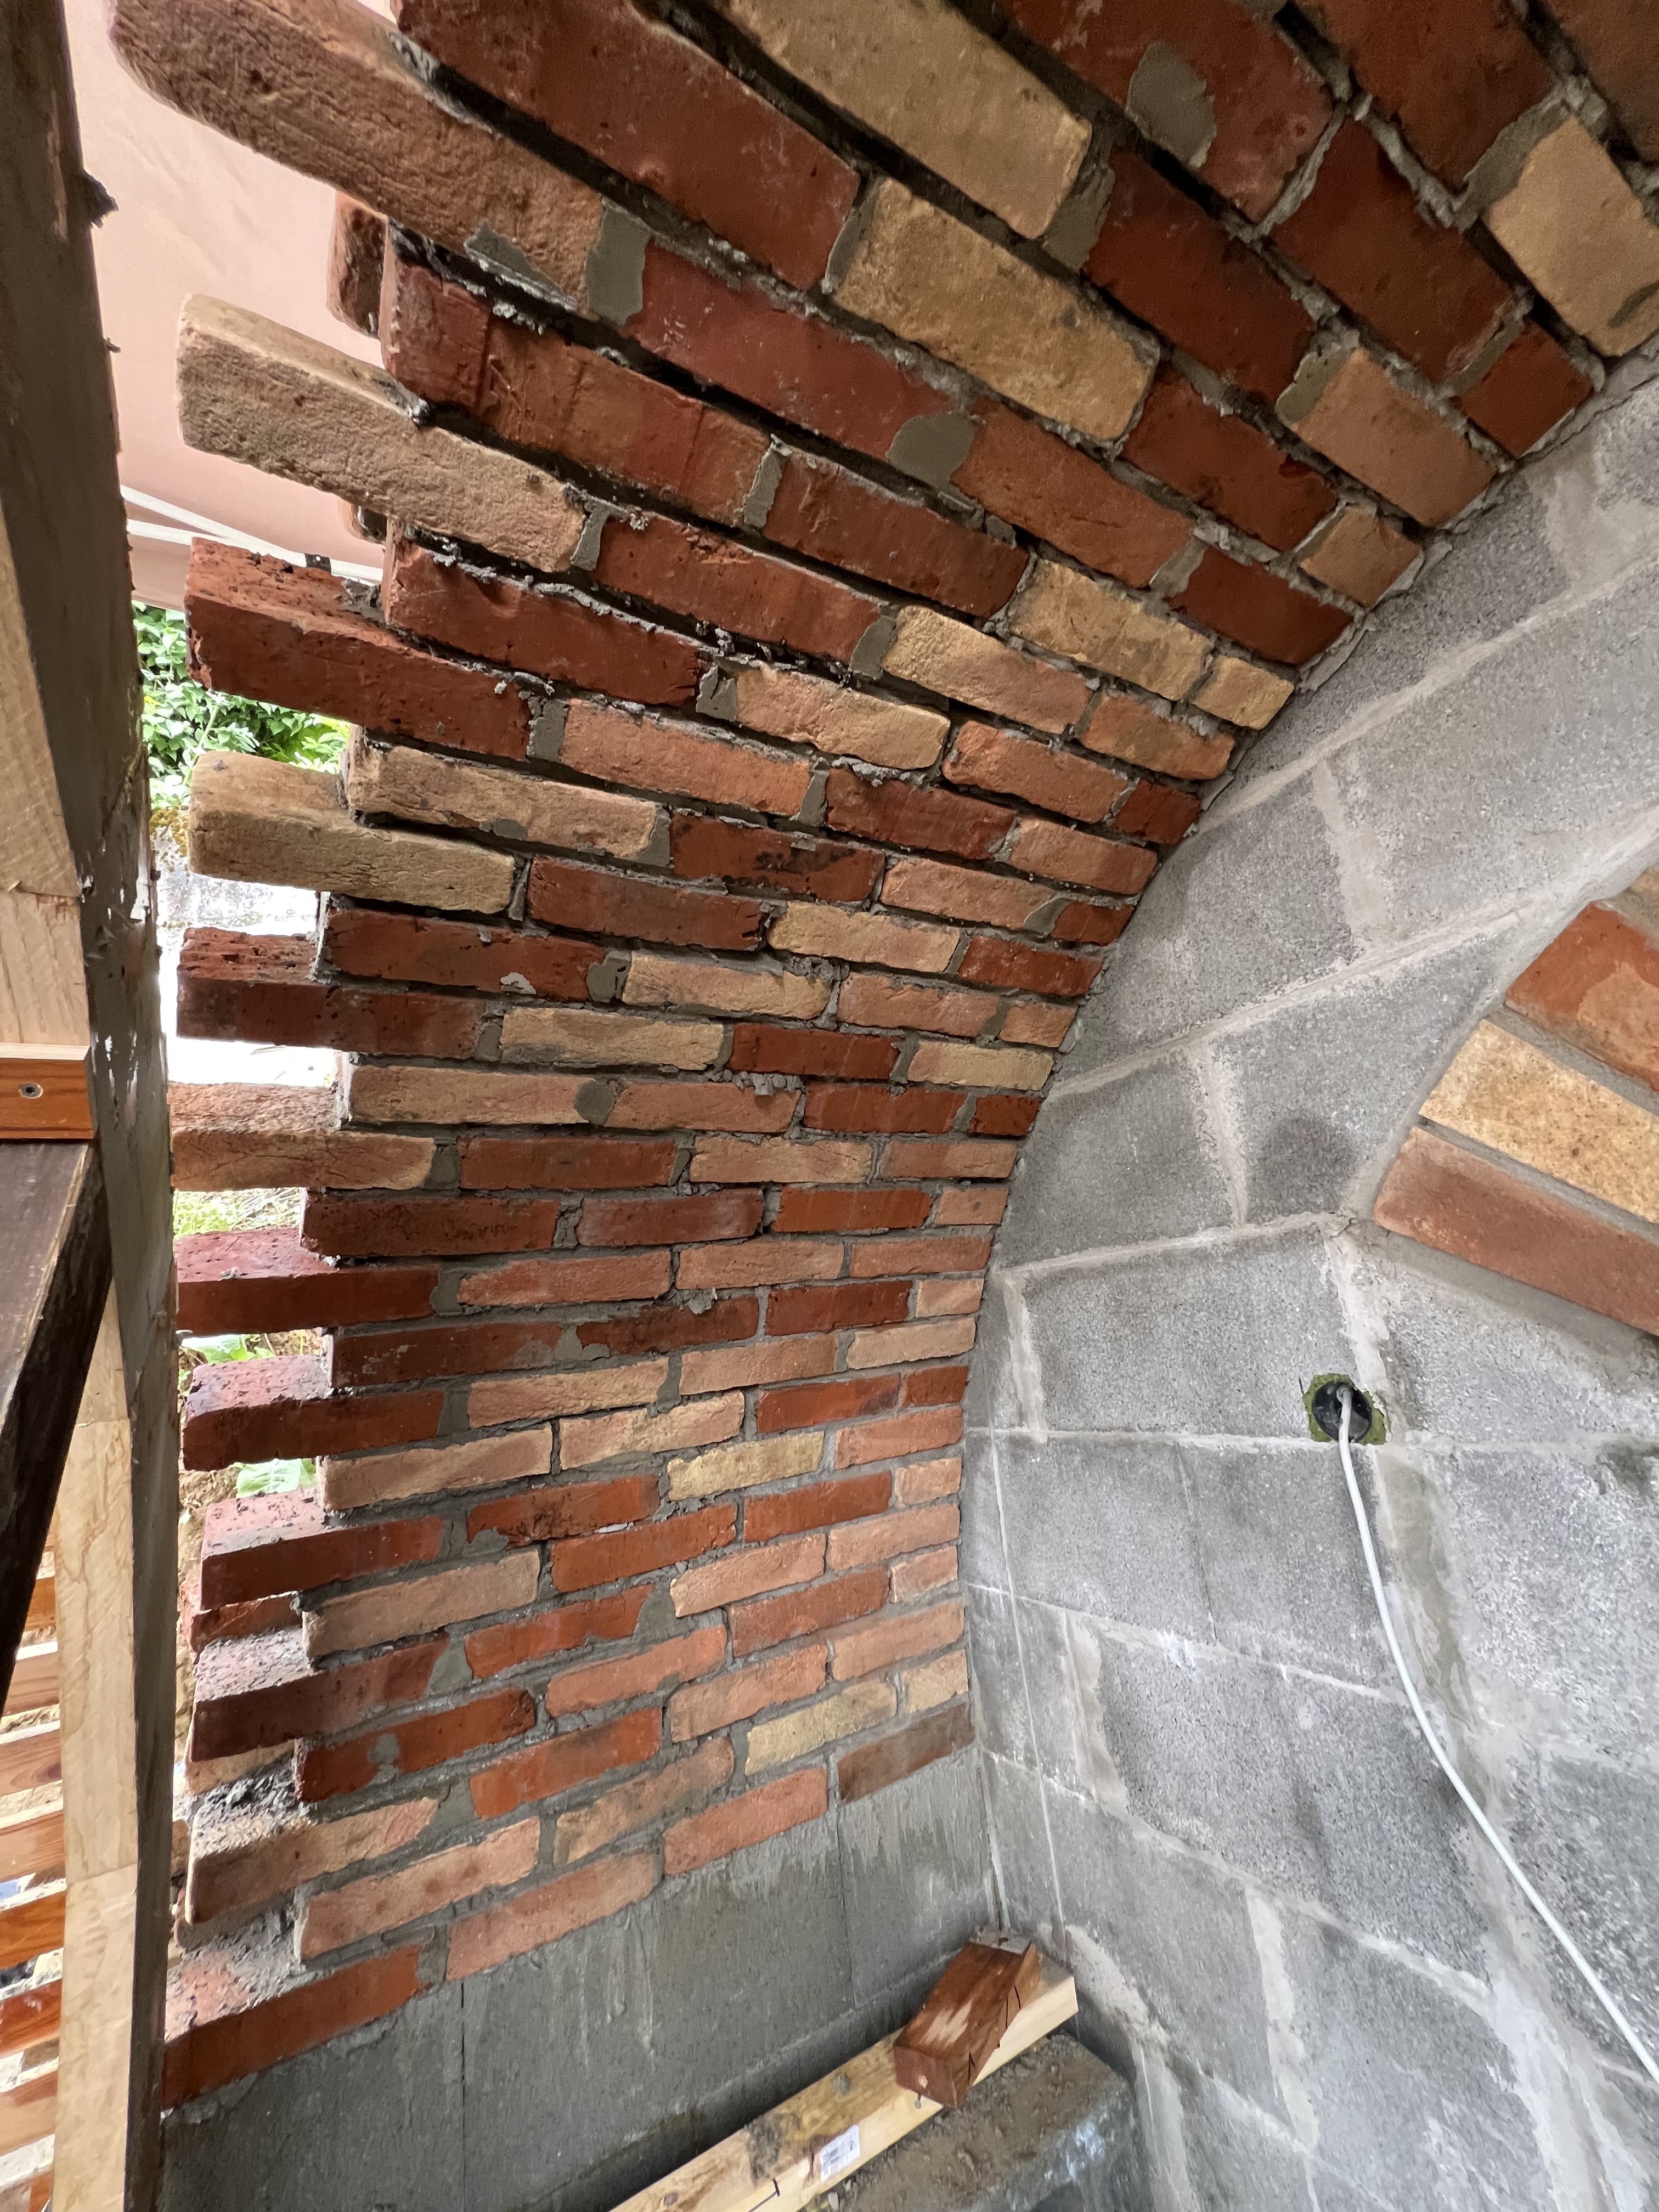
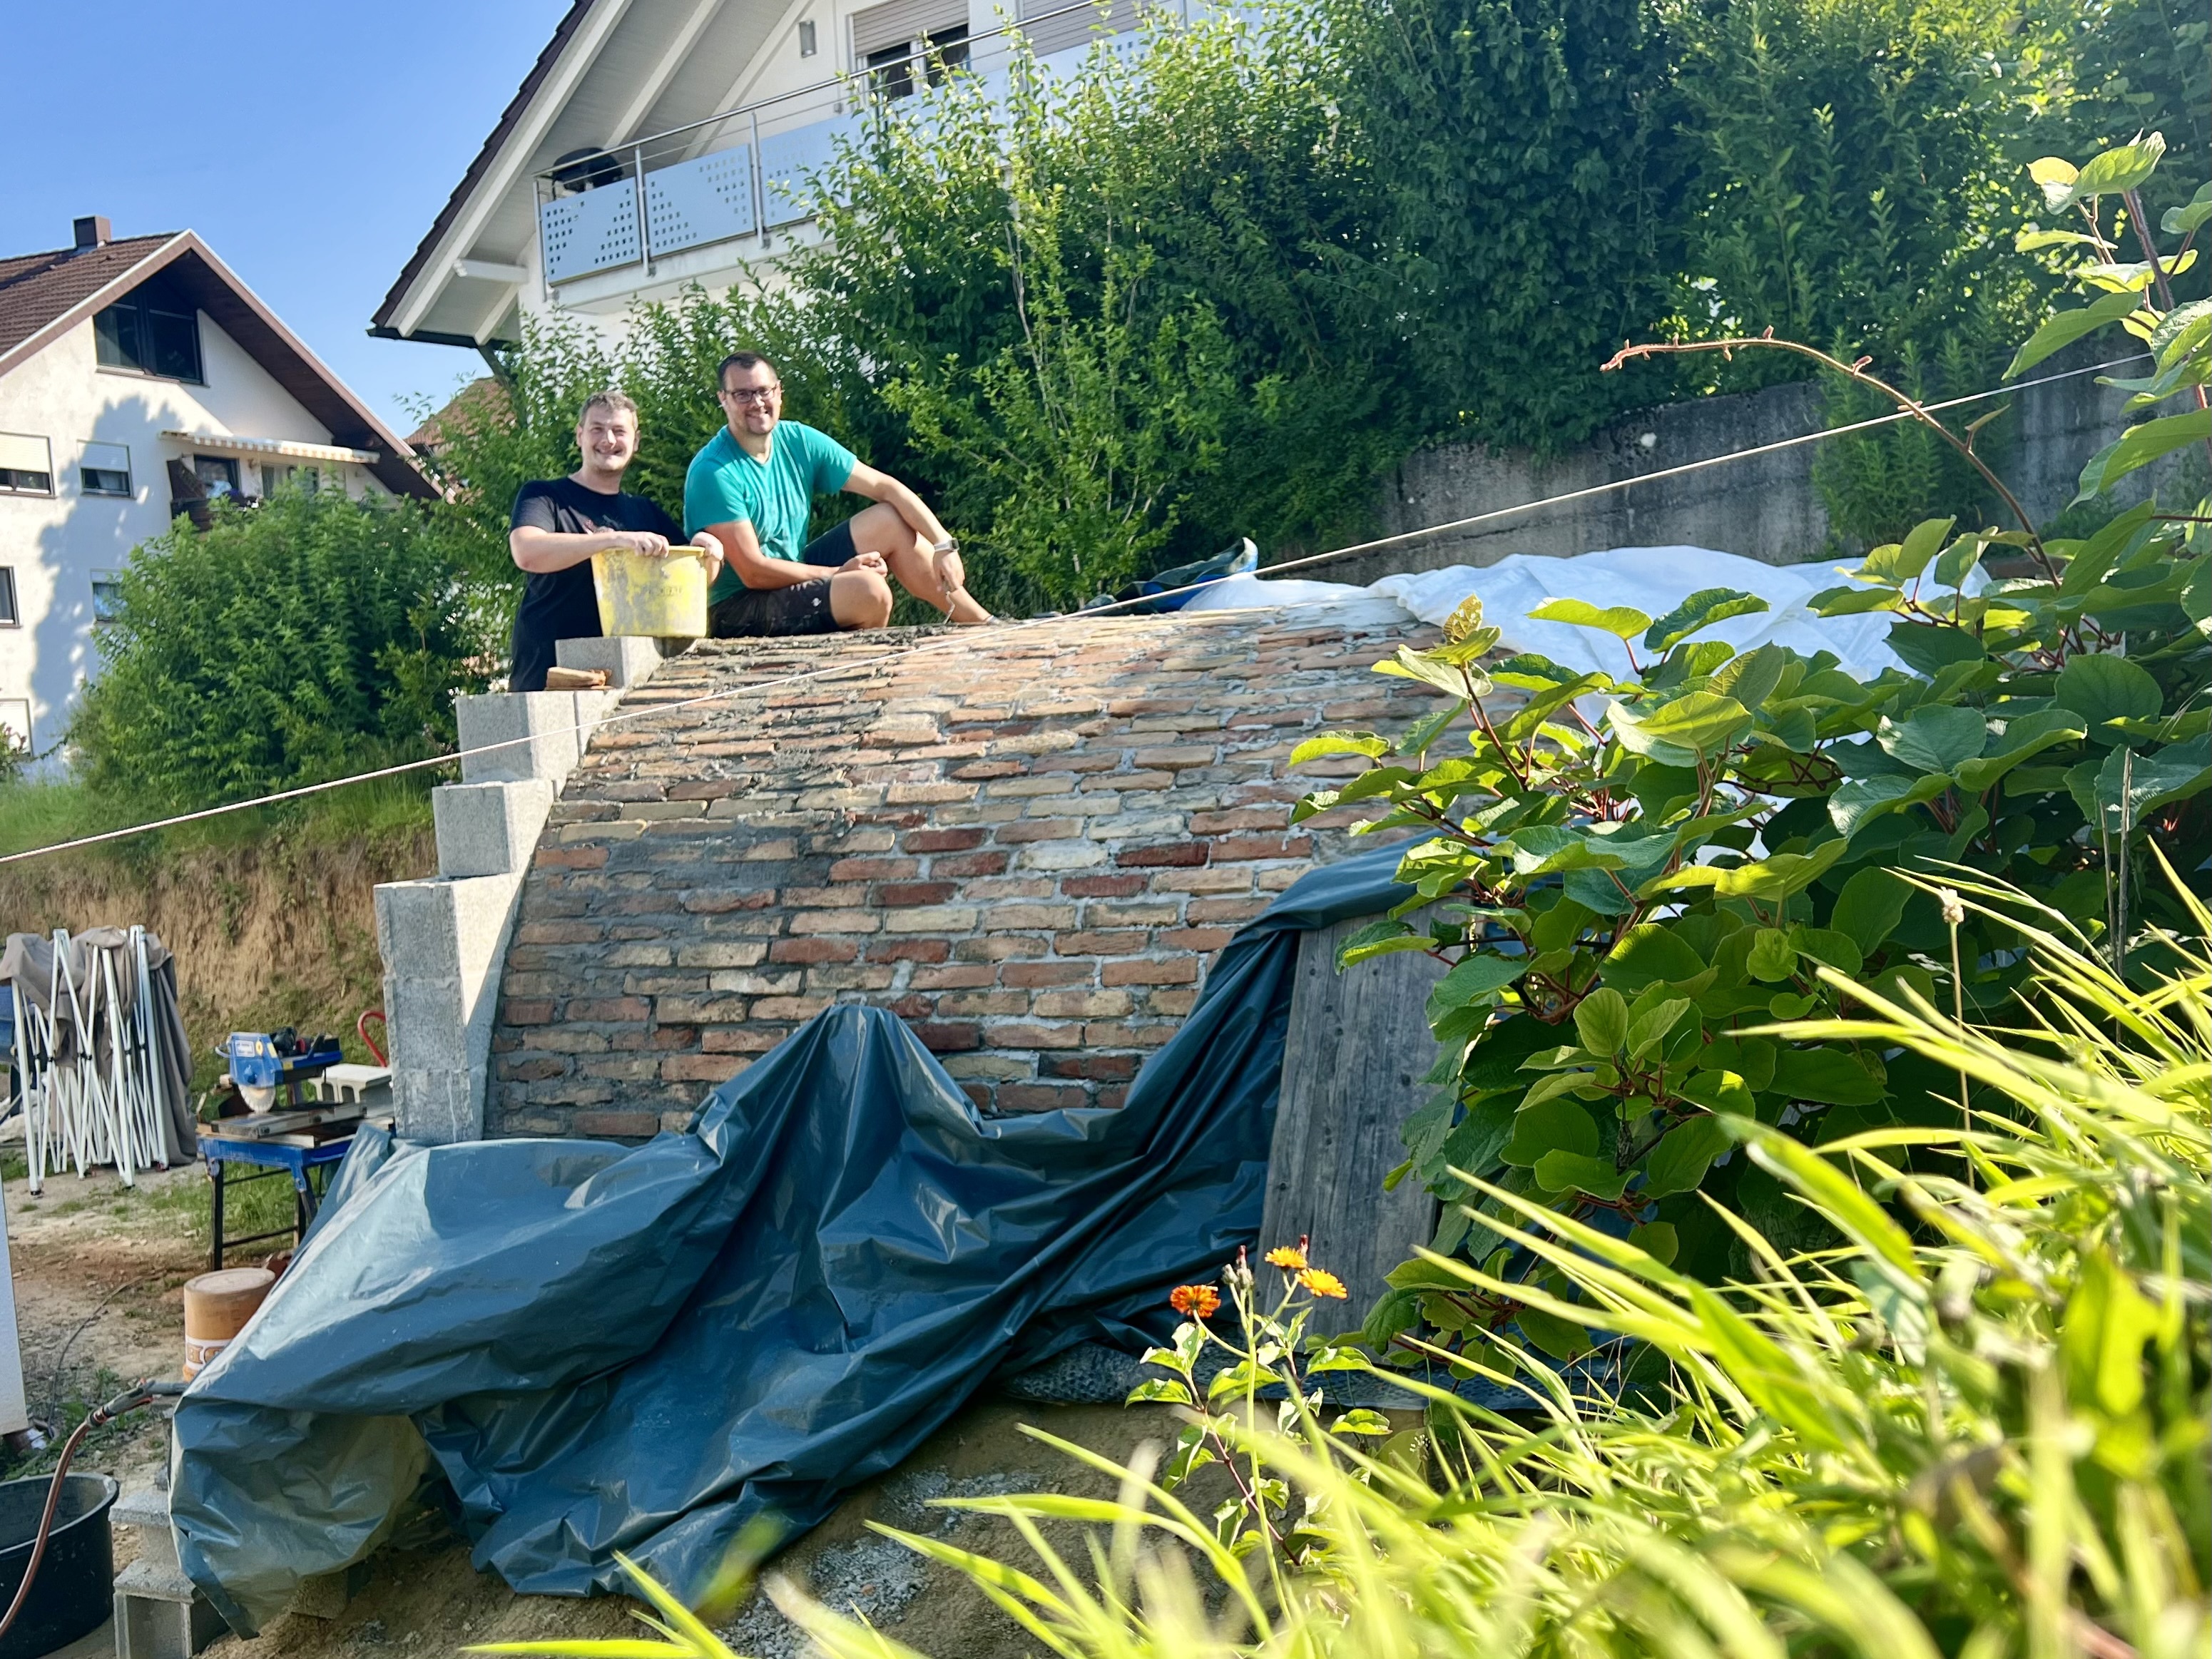
Hello everyone! Thank you for all the positive comments last week.

We managed to double the length of the vaulted roof, laying the 3rd and 4th slice, in four 3 to 4-hour sessions.

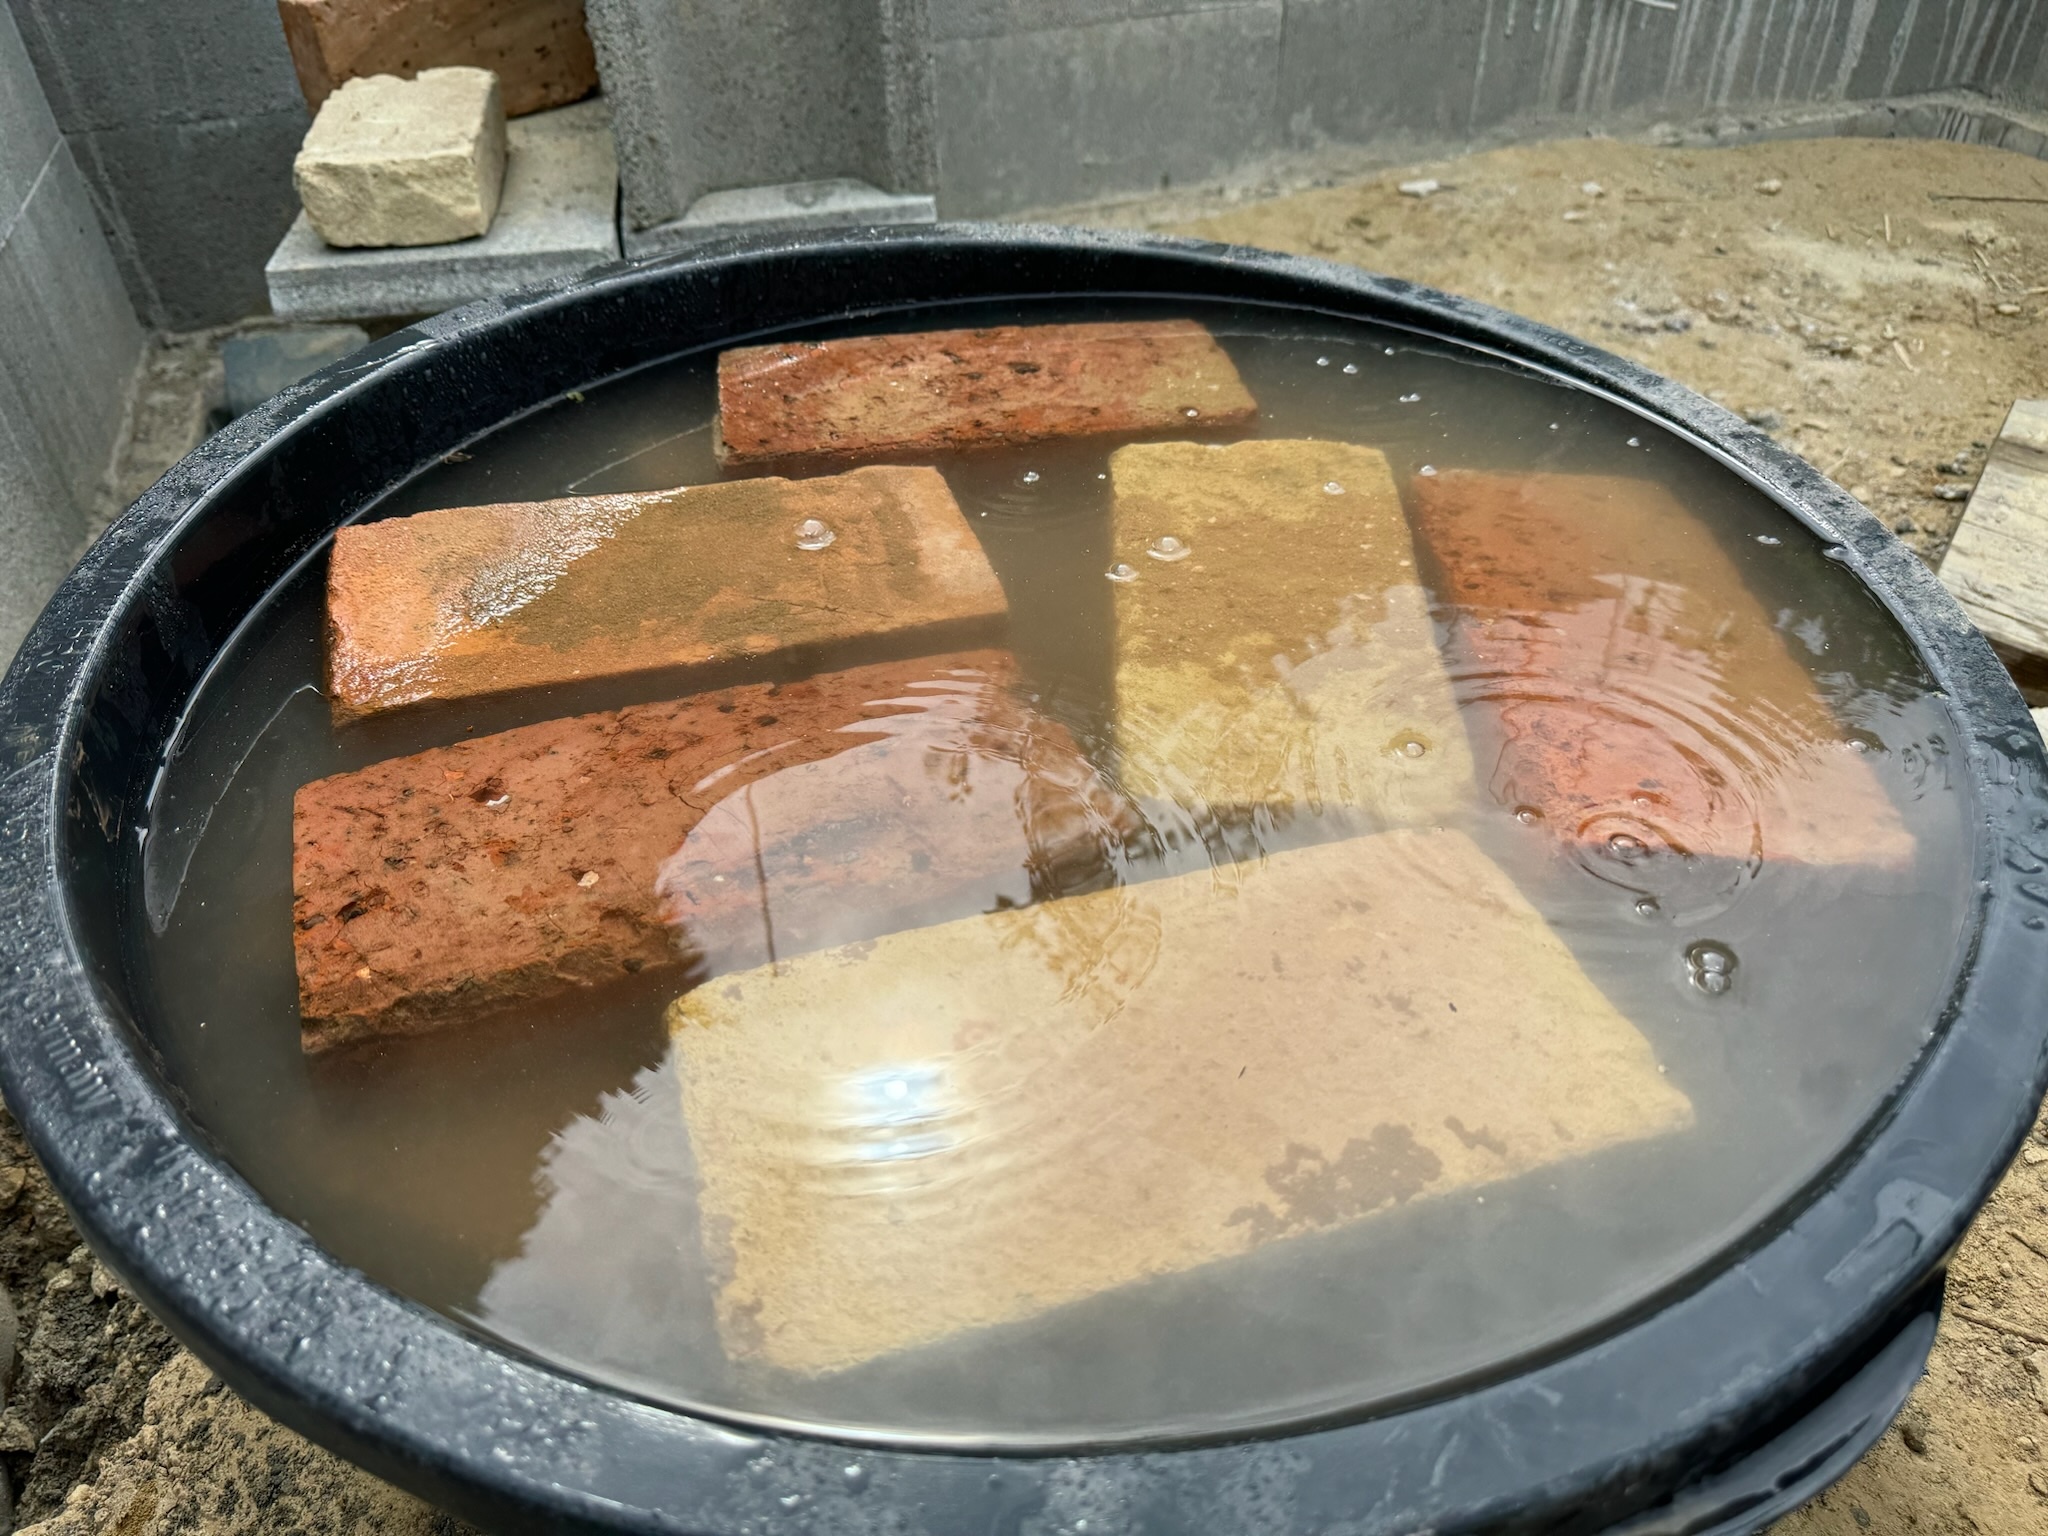
The bricks are from old dismantled buildings, still covered in lime cement and need to be submerged in water and brushed individually. My SO is doing the laying, and I'm cleaning + assessing each brick.

We also get better with putting a smaller amount of grout to avoid spilling, because it's going to be a lot of work to clean all the joints.

This week, we expect to be able to lay 2 additional rows, and next week do the last slice, finish the door lintel (new word!) and front wall.

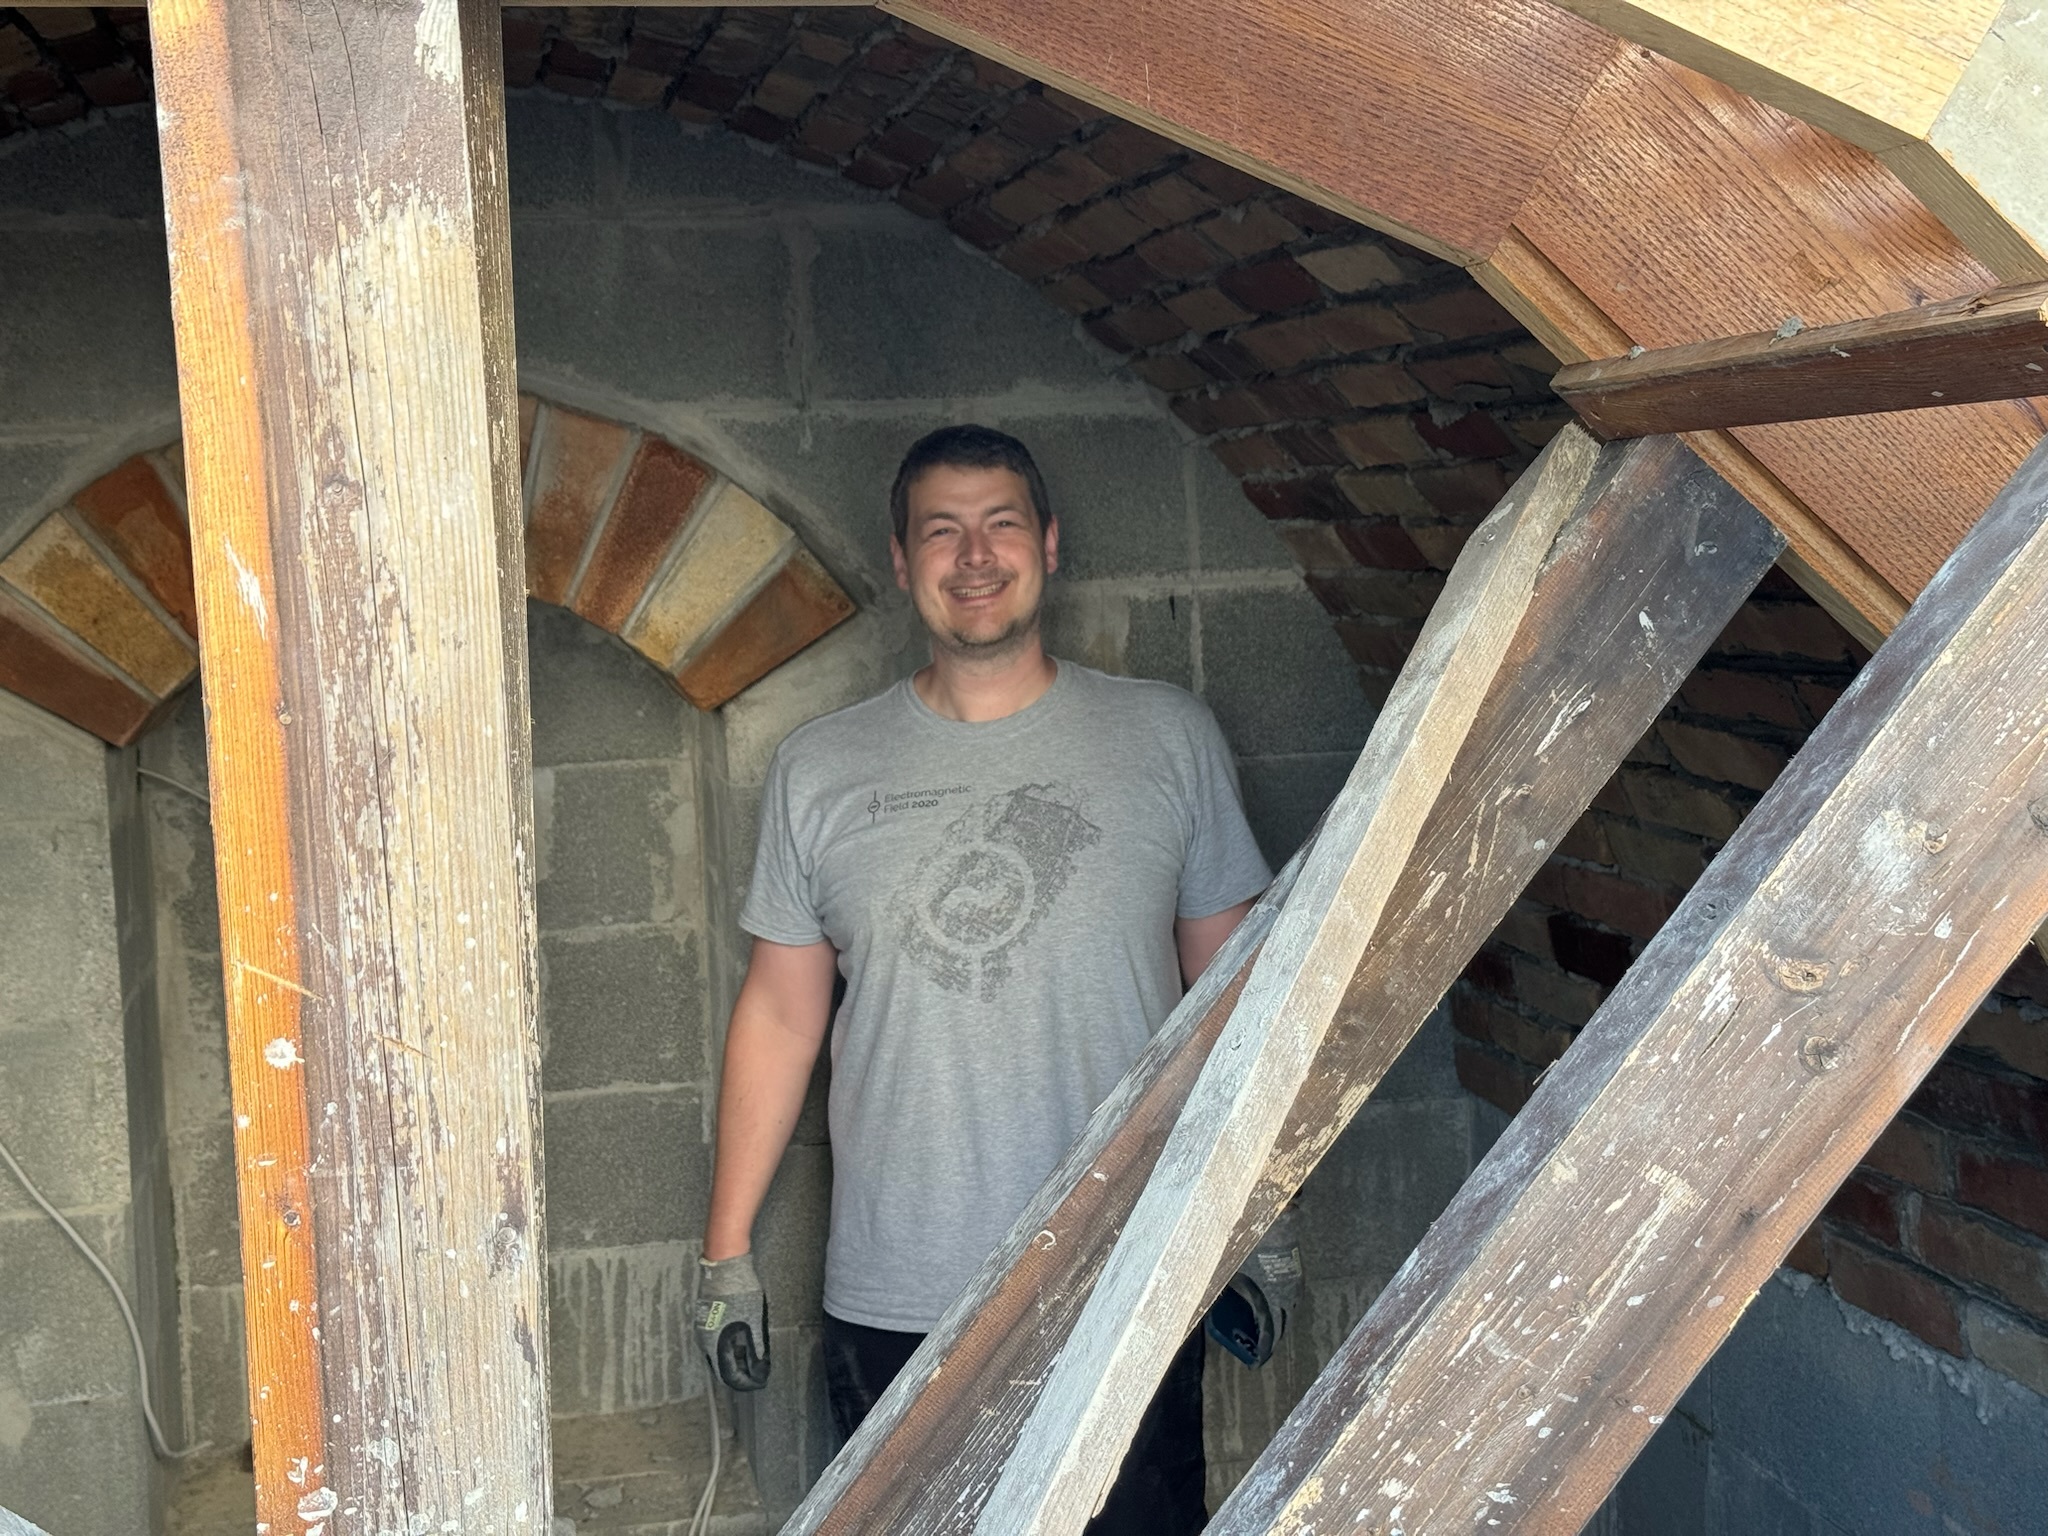
Lastly, a picture of me, because you know, we're getting familiar in the c/Do It Yourself family <3 Have a great week everyone!

22


Decided to build something rather complex as a first project and it's proving challenging at ever step of the way, but I'm really proud of how it's turning out.

We'll have a lot of work to clean the joints but it's going to be worth it I think. Something for the generations to come, if it doesn't collapse :-)

23
59
submitted 9 months ago by sexy_peach to c/diy


cross-posted from: https://beehaw.org/post/13852616

Pretty cool guide.

The guy says that he only recently realized that cleaning isn't intuitive so people need to be taught. This is for people who maybe haven't been taught how to clean or want to freshen up on their skills :)

24
17
submitted 11 months ago by LallyLuckFarm to c/diy


I'm almost wrapped up with filling voids, bark inclusions, and knot holes in the boards for the bookcase. If our garage was climate controlled I expect this process would have gone faster; the same could be said if I had more horizontal working space for staging and filling. Once everything is done curing I should be able to go back over each board with the finishing grits to reach 220 - after that it's cutting to have a plumb edge and to create the shelf supports.

Since we're popping the grain in between sandings (spraying lightly with water and allowing to dry, which swells the softer grain and allows for a smoother finish) I've been able to see what these will sort of look like once finished, but the small bits of epoxy that made it over the edges of some of these really make the grain look downright sexy.

25
view more: next ›